第03篇_SpringBoot基础应用
第01章_SpringBoot概述
第一节 SpringBoot简介
1. 什么是SpringBoot?
SpringBoot 是 Spring 项目的一个子工程,它将一些主流的技术与 Spring 框架进行了整合,基于约定优于配置的思想,为开发者提供了一个方便快捷的工程脚手架。
2. SpringBoot的主要作用
简化依赖管理:对于常见的业务场景,通过启动器(Starter)对所需依赖进行搭配和版本管理,开发者只需要引入场景启动器即可。
进行默认配置:分析导入的依赖,通过条件注解(@Condition)对业务场景进行默认配置,减少了项目中的"模板化"配置。
加载外部属性:从命令行参数、系统环境变量、外部属性文件等位置加载外部属性,并通过 Environment 进行统一管理。
提供运行监控:监控程序运行状况,通过端点的方式提供程序健康状态、安全指标、属性配置等监控信息。
内嵌servlet容器:通过 Maven 插件直接将程序打包为可执行的 Jar 包文件,无需应用服务器即可独立运行。
注意:
由于SpringBoot需要基于模块装配+条件装配+SPI机制等实现“约定大于配置”的思想,因此一般采用注解配置的方式。
基于 XML 的配置方式编写更灵活、易修改(无需重新打包),但是不方便整合场景制作启动器(需要根据不同的情况进行注册)。
第二节 入门案例
SpringBoot为我们提供了非常快速的开发体验,通过下面几个步骤,将会搭建一个简单的Web应用程序。
1. 继承SpringBoot父工程
新建一个Maven项目,在pom.xml文件中继承SpringBoot父工程:spring-boot-starter-parent。
x1 2<project xmlns="http://maven.apache.org/POM/4.0.0"3 xmlns:xsi="http://www.w3.org/2001/XMLSchema-instance"4 xsi:schemaLocation="http://maven.apache.org/POM/4.0.0 http://maven.apache.org/xsd/maven-4.0.0.xsd">5 <modelVersion>4.0.0</modelVersion>6
7 <groupId>org.example</groupId>8 <artifactId>SpringBoot-demo</artifactId>9 <version>1.0-SNAPSHOT</version>10
11 <!-- 继承SpringBoot父工程:spring-boot-starter-parent -->12 <parent>13 <groupId>org.springframework.boot</groupId>14 <artifactId>spring-boot-starter-parent</artifactId>15 <version>2.1.1.RELEASE</version>16 </parent>17
18</project>注意:
根据项目情况选择合适的SpringBoot版本,并在文档的 system-requirements 章节查看 Maven 和 JDK 的最低版本要求。
2. 引入场景启动器
我们开发的是一个Web应用,则在pom.xml文件中引入 Web 应用场景的启动器:spring-boot-starter-web。
61<dependencies>2 <dependency>3 <groupId>org.springframework.boot</groupId>4 <artifactId>spring-boot-starter-web</artifactId>5 </dependency>6</dependencies>
3. 编写启动类
SpringBoot应用一般需要一个启动类来引导程序的启动和开启自动配置。
121package com.huangyuanxin.notes.springboot;2
3import org.springframework.boot.SpringApplication;4import org.springframework.boot.autoconfigure.SpringBootApplication;5
6public class MyApplication {8 public static void main(String[] args) {9 SpringApplication.run(MyApplication.class, args);10 }11}12
4. 编写业务类
编写一个简单的/hello接口,来测试下我们的SpringBoot应用。
121package com.huangyuanxin.notes.springboot.controller;2
3import org.springframework.web.bind.annotation.GetMapping;4import org.springframework.web.bind.annotation.RestController;5
6public class HelloController {8 ("hello")9 public String hello() {10 return "hello,SpringBoot!";11 }12}
4. 运行和测试
直接在IDEA中执行main函数,或者在工程根目录(pom.xml文件所在目录)通过mvn spring-boot:run命令启动。
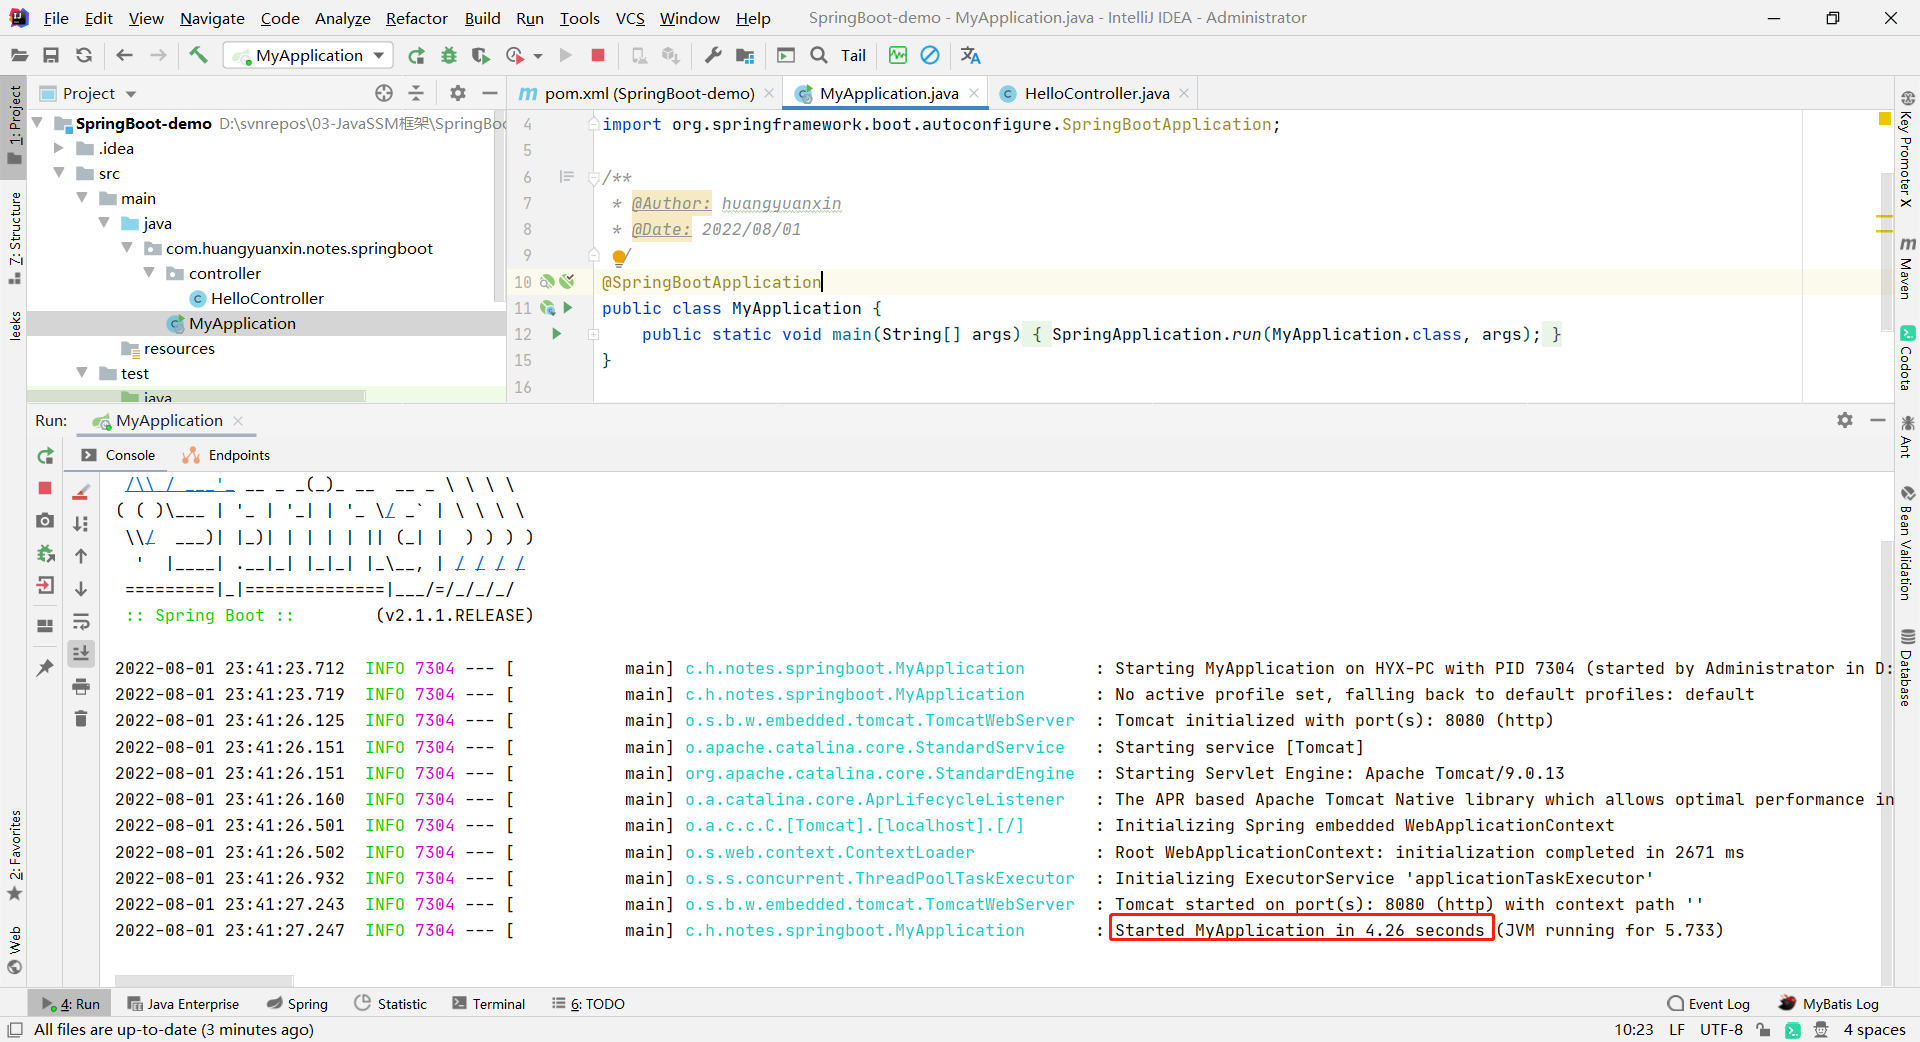
当启动完成后,点击http://localhost:8080/hello即可进行访问!

5. 发布可执行Jar包
由于Java 没有提供加载嵌套 jar 文件的标准方法,因此,需要引入一个插件spring-boot-maven-plugin来支持它。
81<build>2 <plugins>3 <plugin>4 <groupId>org.springframework.boot</groupId>5 <artifactId>spring-boot-maven-plugin</artifactId>6 </plugin>7 </plugins>8</build>然后,在工程根目录(pom.xml文件所在目录)使用mvn package -Dmaven.test.skip=true命令来对其进行打包。
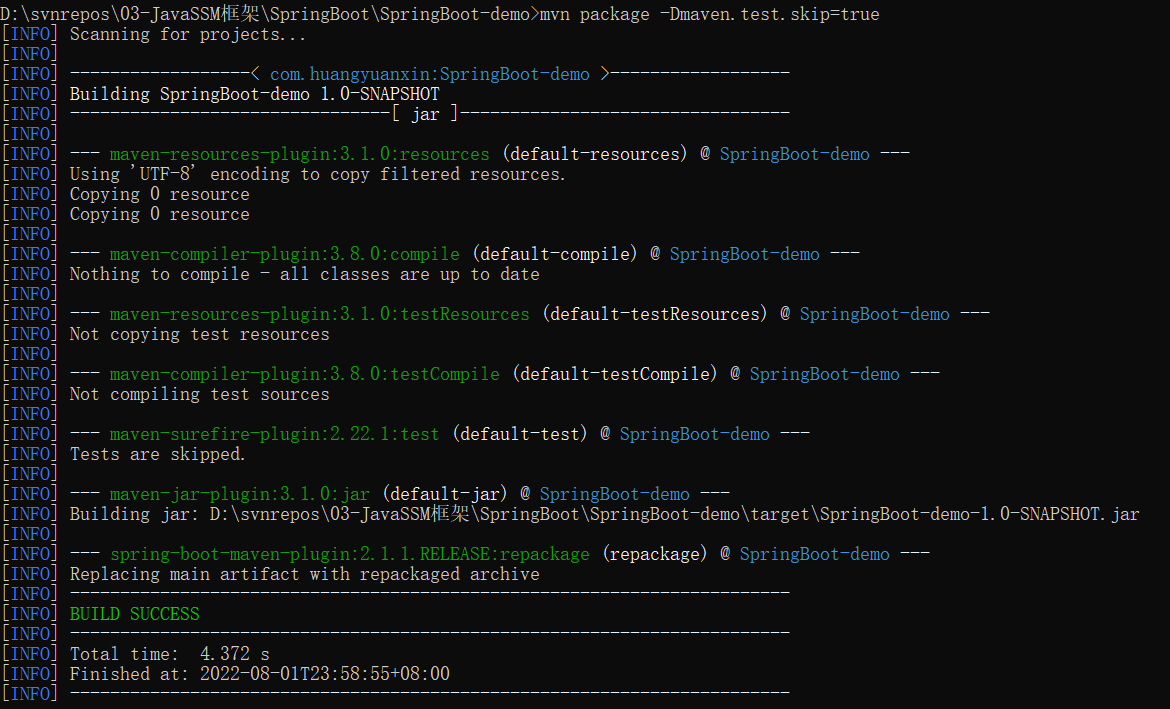
打包完成后,一般会生成SpringBoot-demo-1.1-SNAPSHOT.jar.original和SpringBoot-demo-1.1-SNAPSHOT.jar两个文件。前者为 Maven 生成的原始 Jar 文件,仅包含当前工程代码,一般提供给其它工程引用;后者为 SpringBoot 重新打包后生成的可执行jar文件,额外包含了工程的所有依赖Jar包及启动代码。

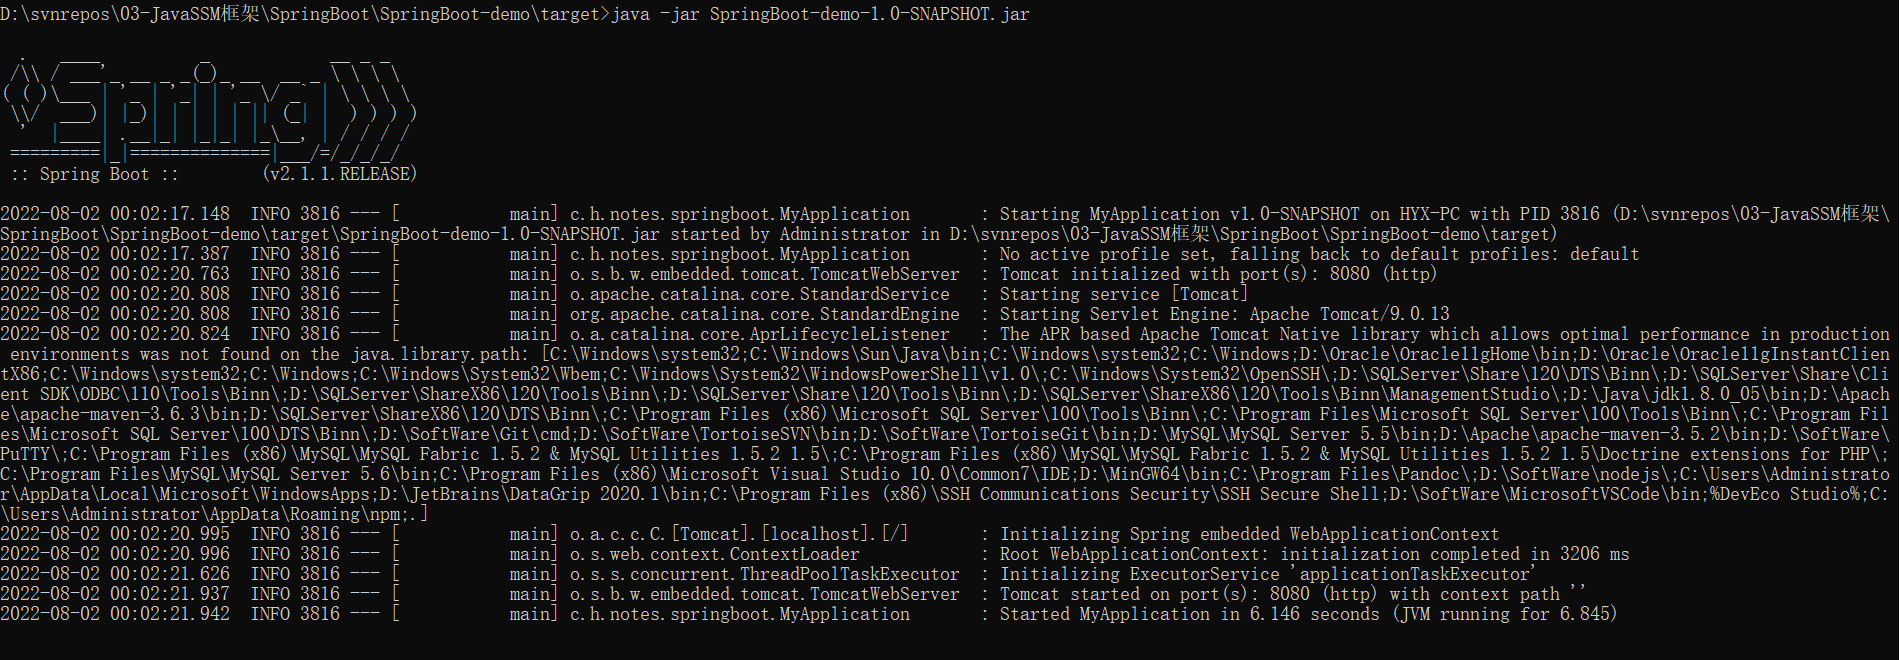
最后,使用java -jar SpringBoot-demo-1.0-SNAPSHOT.jar命令来启动和测试它!
6. 远程调试
如果需要支持远程调试,请使用如下命令启动你的 SpringBoot 应用程序:
21java -Xdebug -Xrunjdwp:server=y,transport=dt_socket,address=8000,suspend=n 2 -jar SpringBoot-demo-1.0-SNAPSHOT.jar
第三节 相关概念详解
1. SpringBoot父工程
一般来说,SpringBoot 项目都会继承spring-boot-starter-parent作为父工程,它提供了版本管理和默认配置:
版本管理:通过 dependencyManagement 标签对常见依赖进行版本管理,这些依赖会随 SpringBoot 一起升级。
默认配置:提供了一些默认属性和插件配置,如默认的源码编译级别(1.8)、默认的字符编码(UTF-8)、使用
-parameters编译等。
除此之外,SpringBoot 父工程还会进行一些插件的默认配置以及对配置文件(application.properties)的进行敏感资源过滤等。
父工程中的默认属性,可以通过覆盖的方式修改它们,如下例所示:
41<properties>2 <!--通过属性修改spring-data的默认版本为Fowler-SR2-->3 <spring-data-releasetrain.version>Fowler-SR2</spring-data-releasetrain.version>4</properties>
如果不想继承父工程,则也可以通过如下方式来使用 SpringBoot 的版本管理功能,但是你不能使用覆盖的方式去修改默认属性。
121<dependencyManagement>2 <dependencies>3 <dependency>4 <!-- Import dependency management from Spring Boot -->5 <groupId>org.springframework.boot</groupId>6 <artifactId>spring-boot-dependencies</artifactId>7 <version>2.1.1.RELEASE</version>8 <type>pom</type>9 <scope>import</scope>10 </dependency>11 </dependencies>12</dependencyManagement>
2. 场景启动器
场景启动器(Starter)是SpringBoot管理复杂依赖关系的一种手段,你可以把它理解为一些用于某项功能所需要依赖的集合。
SpringBoot官方为一些应用场景内置相应的启动器,一般以spring-boot-starter-开头,下面是常见的启动器列表:
| Name | Description | Pom |
|---|---|---|
spring-boot-starter | 核心启动器,包括自动配置、日志记录和YAML格式支持等 | Pom |
spring-boot-starter-actuator | 提供生产就绪功能,帮助您监视和管理应用程序 | Pom |
spring-boot-starter-aop | 使用SpringAOP和AspectJ进行面向切面编程 | Pom |
spring-boot-starter-jdbc | 使用JDBC访问数据库(使用HikariCP连接池) | Pom |
spring-boot-starter-test | 集成了JUnit、Hamcrest、Mockito等一些测试依赖 | Pom |
spring-boot-starter-web | 构建基于SpringMVC的Web应用程序(默认嵌入tomcat容器) | Pom |
spring-boot-starter-log4j2 | 使用Log4j2进行日志记录 | Pom |
spring-boot-starter-logging | 使用Logback进行日志记录(默认的日志启动器) | Pom |
spring-boot-starter-tomcat | 使用Tomcat作为嵌入式servlet容器 | Pom |
除上述一些官方内置的启动器外,第三方项目也可以基于开放的接口定义自己的启动器,如MyBatis定义的mybatis-spring-boot-starter启动器等。更多第三方启动器,可参考GitHub上spring-boot-starters模块中的README file。
3. @SpringBootApplication
@SpringBootApplication注解用于标识该应用为一个SpringBoot应用程序,它由如下三个注解组成:
@EnableAutoConfiguration:开启SpringBoot的自动配置(该注解只能被添加一次)。
@SpringBootConfiguration:声明当前类是一个配置类,本质是
@Configuration注解的包装类。@ComponentScan:配置注解扫描,等同于
<context:component-scan />,默认扫描当前包及其子包。
注意:
如果需要注册不在扫描路径内的 Spring 组件,可以使用 Spring 的
@Import或@ImportResource注解。
如果想禁用某个自动配置,可以使用该注解的exclude属性,如以下示例所示:
61(exclude={DataSourceAutoConfiguration.class})2public class MyApplication {3 public static void main(String[] args) {4 SpringApplication.run(MyApplication.class, args);5 }6}如果该类不在CLASSPATH中,则可以使用相关的excludeName属性,并指定全限定类名。除此之外,您也可以在application.yml中使用spring.autoconfigure.exclude属性来控制要排除的自动配置类的列表。
第02章_SpringBoot核心
第一节 SpringApplication
1. 创建SpringApplication
SpringApplication类提供了一个静态方法run,可以方便的从main函数来启动Spring应用程序,如下例所示。
41public static void main(String[] args) {2 // 创建并引导启动Spring应用程序(第一个参数为@Configuration配置对象,第二个参数为main函数参数)3 SpringApplication.run(MyApplication.class, args);4}当然,你也可以创建一个本地实例,并对其进行自定义设置后再启动。
51public static void main(String[] args) {2 SpringApplication app = new SpringApplication(MyApplication.class);3 app.setBannerMode(Banner.Mode.OFF);4 app.run(args);5}如果你更喜欢流式编程(Fluent Builder API),也可以使用如下方式。
61public static void main(String[] args) {2 new SpringApplicationBuilder()3 .sources(MyApplication.class)4 .bannerMode(Banner.Mode.OFF)5 .run(args);6}此外,利用 SpringapplicationBuilder 可以构建具有层次关系的 Spring Boot 应用程序:
11new springapplicationBuilder(...).parent(...).child(...).run(...);
2. 启动SpringApplication
1) 如何启动
入门案例中已经讲解了如何启动SpringBoot应用程序。
2) 生成PID和PORT文件
在META-INF/spring.factories文件中添加如下配置后,就可以生成相应的PID和PORT文件:
31org.springframework.context.ApplicationListener=\2org.springframework.boot.context.ApplicationPidFileWriter,\3org.springframework.boot.web.context.WebServerPortFileWriter默认的文件名为application.port和application.port,可以使用spring.pid.file=/var/log/app.pid属性进行修改。
3) 启动失败分析(FailureAnalyzer)
如果程序启动失败,SpringBoot 会通过已注册的FailureAnalyzer来分析错误,以提供专用的错误消息和解决该问题的具体措施。
如端口被占用时会打印如下错误报告:
121***************************2APPLICATION FAILED TO START3***************************4Description:6The Tomcat connector configured to listen on port 8080 failed to start. The port may already be in use or the connector may be misconfigured.8Action:10Verify the connector's configuration, identify and stop any process that's listening on port 8080, or configure this application to listen on another port.12
如果需要进行扩展,可继承针对于特定异常类型的AbstractFailureAnalyzer<T extends Throwable>抽象类,并在META-INF/spring.factories中通过如下配置进行注册。
11org.springframework.boot.diagnostics.FailureAnalyzer=com.example.ProjectConstraintViolationFailureAnalyzer提示:
使用JSR-303注解出现异常时也会由
FailureAnalyzer来分析错误。在FailureAnalyzer中,可以通过实现BeanFactoryAware和EnvironmentAware接口来获取BeanFactory和Environment。
3.SpringApplication的常用设置
SpringApplication可以在创建时通过其JavaAPI或spring.main前缀的外部化属性进行自定义设置。
81# 设置sources属性(注意:该属性做了特殊处理,不会被覆盖,而是合并)2spring.main.sources=com.acme.Config,com.acme.ExtraConfig3
4# 开启Banner打印5spring.main.banner-mode=console6
7# 移除嵌入式Web服务器8spring.main.web-application-type=none
1) 设置Banner
SpringBoot应用在启动时会自动加载类路径下的banner.txt文件或同名.gif/.jpg/.png结尾的图片(转化为ASCII艺术作品)来打印Banner。banner.txt文件示例如下:
111${AnsiColor.RED} ██████╗ ${AnsiColor.BLUE}██╗ ██╗3${AnsiColor.RED}██╔═══██╗${AnsiColor.BLUE}██║ ██╔╝4${AnsiColor.RED}██║ ██║${AnsiColor.BLUE}█████╔╝5${AnsiColor.RED}██║ ██║${AnsiColor.BLUE}██╔═██╗6${AnsiColor.RED}╚██████╔╝${AnsiColor.BLUE}██║ ██╗7${AnsiColor.RED} ╚═════╝ ${AnsiColor.BLUE}╚═╝ ╚═╝8${AnsiColor.BRIGHT_BLUE}:: Running Spring Boot ${spring-boot.version} ::10:: http://notes.huangyuanxin.com ::${AnsiColor.DEFAULT}11
在banner.txt中,可以使用下面一些占位符:
| 占位符 | 描述 | 示例 |
|---|---|---|
| ${application.version} | MANIFEST.MF文件中声明的应用程序的版本号(Implementation-Version: 1.0) | 1.0 |
| ${application.formatted-version} | MANIFEST.MF文件中声明的应用程序的版本号(格式化) | (v1.0) |
| ${spring-boot.version} | 您正在使用的 Spring Boot 版本 | 2.1.1.RELEASE |
| ${spring-boot.formatted-version} | 您正在使用的 Spring Boot 版本(格式化) | (v2.1.1.RELEASE) |
| ${Ansi.Xxx} ${AnsiColor.Xxx} ${AnsiBackground.Xxx} ${AnsiStyle.Xxx}) | 其中Xxx是 ANSI 转义代码的名称。有关详情,请参见AnsiPropertySource | AnsiColor.GREEN AnsiBackground.RED AnsiStyle.BOLD |
| ${application.title} | MANIFEST.MF文件中声明的应用程序标题(Implementation-Title: MyApp)。 | MyApp |
可通过下面一些属性来进行相关配置:
| 属性 | 作用 |
|---|---|
| spring.banner.location | 指定一个文本文件作为banner |
| spring.banner.charset | 指定banner文件的字符集,默认为UTF-8。 |
| spring.banner.image.location | 指定一张gif/jpg/png格式的图片作为banner,图片将转化为ASCII艺术作品展示 |
| spring.main.banner-mode | 指定banner打印在控制台(console)还是日志(log),或者干脆不打印("off") |
除上述属性配置的方式外,也可以通过实现接口的方式来设置Banner。首先实现org.springframework.boot.Banner接口。
191import org.springframework.boot.Banner;2import org.springframework.core.env.Environment;3import java.io.PrintStream;4 5public class MyBanner implements Banner {6 private static final String BANNER =7 " ___ ___ .__ .__ \n" +8 " / | \\ ____ | | | | ____ \n" +9 "/ ~ \\_/ __ \\| | | | / _ \\ \n" +10 "\\ Y /\\ ___/| |_| |_( <_> )\n" +11 " \\___|_ / \\___ >____/____/\\____/ \n" +12 " \\/ \\/ ";13 14 15 public void printBanner(Environment environment, Class<?> sourceClass, PrintStream out) {16 out.println(BANNER);17 out.println();18 }19}然后在启动应用前通过SpringApplication.setBanner(…)方法进行设置。
91public static void main(String[] args) {2 SpringApplication springApplication = new SpringApplication(DemoApplication.class);3 // 开打印Banner到日志(默认打印到控制台)4 app.setBannerMode(Banner.Mode.LOG);5 // 设置自定义Banner6 springApplication.setBanner(new MyBanner());7 // 启动Spring Boot8 springApplication.run(args);9}注意:
该实现类会被注册为名称叫springBootBanner的单例Bean。
2) 指定Web环境
SpringApplication根据当前依赖环境来为你创建合适的ApplicationContext实现。
如果存在SpringMVC,则优先创建AnnotationConfigServletWebServerApplicationContext;
如果不存在SpringMVC且存在Spring WebFlux,则创建AnnotationConfigReactiveWebServerApplicationContext;
否则创建AnnotationConfigApplicationContext。
如果需要修改,你可以通过setWebApplicationType(WebApplicationType.Xxx)轻松覆盖它!
| WebApplicationType | 用途 |
|---|---|
| SERVLET | 指定为SpringMVC环境 |
| REACTIVE | 指定为Spring WebFlux环境 |
| NONE | 指定为Junit测试环境 |
注意:
也可以使用
spring.main.web-application-type属性来修改WEB环境或直接通过setApplicationContextClass(…)来显式指定ApplicationContext 的实现!
3) 延迟初始化
如果需要设置Bean在使用时才创建,而不是在应用程序启动期间创建,可以设置其延迟初始化,但这会延迟应用程序问题的发现。
对所有Bean进行设置,可以通过
spring.main.lazy-initialization=true属性或setLazyInitialization方法来实现。对单个Bean进行设置,可以使用
@Lazy(true)注解,它将会覆盖对所有Bean上的设置。
4. 生命周期回调
1) SpringApplicationRunListener
SpringApplicationRunListener贯穿SpringBoot启动的全程,是最常用的干涉SpringBoot启动过程的扩展点。
421public interface SpringApplicationRunListener {2
3 // 调用 springApplication 的 run 方法时立即调用4 default void starting(ConfigurableBootstrapContext bootstrapContext) {5 }6
7 // Environment 构建完成,但在创建ApplicationContext之前8 default void environmentPrepared(ConfigurableBootstrapContext bootstrapContext,9 ConfigurableEnvironment environment) {10 }11
12 // 在创建和准备 Applicationcontext之后,但在加载之前13 default void contextPrepared(ConfigurableApplicationContext context) {14 }15
16 // ApplicationContext已加载,但尚未刷新容器时17 default void contextLoaded(ConfigurableApplicationContext context) {18 }19
20 // IOC 容器已刷新,但未调用CommandLineRunners和ApplicationRunners 时21 default void started(ConfigurableApplicationContext context, Duration timeTaken) {22 started(context);23 }24 25 default void started(ConfigurableApplicationContext context) {26 }27
28 // ???29 default void ready(ConfigurableApplicationContext context, Duration timeTaken) {30 running(context);31 }32
33 // 在 run 方法彻底完成之前34 35 default void running(ConfigurableApplicationContext context) {36 }37
38 // run 方法执行过程中抛出异常时39 default void failed(ConfigurableApplicationContext context, Throwable exception) {40 }41
42}
2) ApplicationListener
SpringBoot 内置了 一个 SpringApplicationRunListener 的实现类 EventPublishingRunListener,用于在上下文启动时发布一些关键事件,提供给使用者干涉上下文启动过程:
在运行开始时,但在进行任何处理之前(侦听器和初始化器的注册除外),发送ApplicationStartingEvent。
当知道要在上下文中使用的Environment时,但在创建上下文之前,发送ApplicationEnvironmentPreparedEvent。
在刷新开始之前,但在加载 bean 定义之后,发送ApplicationPreparedEvent。
在刷新上下文之后,但在调用任何应用程序和命令行运行程序之前,发送ApplicationStartedEvent。
调用任何应用程序和命令行运行程序后,将发送ApplicationReadyEvent。它指示应用程序已准备就绪,可以处理请求。
如果启动时出现异常,则会发送ApplicationFailedEvent。
如下定义了一个 ApplicationStartingEvent 事件的监听器,可通过注册为Bean的方式来对其进行注册。
71public class ApplicationStartingEventListener implements ApplicationListener<ApplicationStartingEvent> {2 3 public void onApplicationEvent(ApplicationStartingEvent contextRefreshedEvent) {4 ApplicationContext applicationContext = contextRefreshedEvent.getApplicationContext();5 System.out.println("==============Spring容器刷新完毕==============");6 }7}但上述部分事件触发时,可能 ApplicationContext 尚未创建完成,需要在META-INF/spring.factories文件中注册上述创建的监听器:
31# spring.factories2org.springframework.context.Applicationlistener=\3 com.linkedbear.springboot.listener.ApplicationStartingEventListener或者通过编程方式使用SpringApplication.addListeners(…)方法或SpringApplicationBuilder.listeners(…)方法注册:
121public class MyApplication {3 public static void main(String[] args) {4 SpringApplication springApplication = new SpringApplication(MyApplication.class);5 springApplication.addListeners(new ApplicationStartingEventListener());6 springApplication.run(args);7 }8}9
10// SpringApplicationBuilder11new SpringApplicationBuilder(SpringApplicationApplication.class)12 .listeners(new ApplicationStartingEventListener()).run(args);或者在application.properties文件中进行注册:
21# ApplicationStartingEventListener2context.listener.classes=com.huangyuanxin.notes.springboot.listener.ApplicationStartingEventListener
3) ApplicationContextInitializer
ApplicationContextInitializer在Springboot启动过程(refresh方法前)调用,是一种更加简单的介入方式。
61public class MyApplicationContextInitializer implements ApplicationContextInitializer {2 3 public void initialize(ConfigurableApplicationContext applicationContext) {4 System.out.println("===========MyApplicationContextInitializer=========");5 }6}注册方式和监听器类似,推荐在META-INF/spring.factories文件中进行注册。
21# ApplicationContextInitializer2org.springframework.context.ApplicationContextInitializer=com.huangyuanxin.notes.springboot.initializer.MyApplicationContextInitializer当然,也可以使用SpringApplication.addInitializers(…)方法、SpringApplicationBuilder.initializers(…)方法或context.initializer.classes属性注册它们。
4) EnvironmentPostProcessor
EnvironmentPostProcessor可用于在刷新应用程序上下文之前自定义Environment。如下示例从 Classpath 加载 YAML 配置文件:
391package com.huangyuanxin.notes.springboot.environment;2
3import org.springframework.boot.SpringApplication;4import org.springframework.boot.env.EnvironmentPostProcessor;5import org.springframework.boot.env.YamlPropertySourceLoader;6import org.springframework.core.env.ConfigurableEnvironment;7import org.springframework.core.env.PropertySource;8import org.springframework.core.io.ClassPathResource;9import org.springframework.core.io.Resource;10 11import java.io.IOException;12
13public class YmlLoadEnvironmentPostProcessor implements EnvironmentPostProcessor {14
15 private final YamlPropertySourceLoader loader = new YamlPropertySourceLoader();16
17 18 public void postProcessEnvironment(ConfigurableEnvironment environment, SpringApplication application) {19 // 从类路径加载YML文件20 Resource path = new ClassPathResource("com/huangyuanxin/notes/springboot/my-config.yml");21 PropertySource<?> propertySource = loadYaml(path);22
23 // 添加在末尾,优先于其它常见的属性源24 environment.getPropertySources().addLast(propertySource);25 }26
27 private PropertySource<?> loadYaml(Resource path) {28 if (!path.exists()) {29 throw new IllegalArgumentException("Resource " + path + " does not exist");30 }31
32 try {33 return this.loader.load("my-config", path).get(0);34 } catch (IOException ex) {35 throw new IllegalStateException("Failed to load yaml configuration from " + path, ex);36 }37 }38
39}同样的,你需要在META-INF/spring.factories中进行注册,而不能通过注册组件的方式来注册它。
21# EnvironmentPostProcessor2org.springframework.boot.env.EnvironmentPostProcessor=com.huangyuanxin.notes.springboot.environment.YmlLoadEnvironmentPostProcessor注意:
在处理属性加密时,一般也是通过
EnvironmentPostProcessor实现的。
5) ApplicationRunner/CommandLineRunner
如果在SpringApplication启动的最后,需要运行一些特定的代码,可以实现ApplicationRunner或CommandLineRunner接口,两者工作方式一致,仅 run 方法的参数类型不同。
ApplicationRunner
91// 可直接通过组件注解来注册2(100) // 执行顺序,越小越先执行3public class MyApplicationRunner implements ApplicationRunner {456public void run(ApplicationArguments args) throws Exception {7System.out.println("============MyApplicationRunner=============");8}9}
CommandLineRunner
91// 可直接通过组件注解来注册2(200) // 执行顺序,越小越先执行3public class MyCommandLineRunner implements CommandLineRunner {456public void run(String... args) {7System.out.println("============MyCommandLineRunner=============");8}9}
注意:
你可以通过实现
Ordered接口或使用@Order注解来调整其执行顺序,值越小,优先级越高,越先执行。
5. 获取命令行参数
如果需要访问启动时的命令行参数,可以通过注入org.springframework.boot.ApplicationArguments来获取。
231public class ApplicationArgumentsTest {3 4 private ApplicationArguments applicationArguments;5
6 7 public void init() {8 // 1. 获取所有原始参数9 String[] sourceArgs = applicationArguments.getSourceArgs();10
11 // 2. 获取所有option参数及其值(--开头的参数)12 Set<String> optionNames = applicationArguments.getOptionNames();13 for (String optionName : optionNames) {14 List<String> optionValues = applicationArguments.getOptionValues(optionName);15 }16
17 // 3. 判断是否包含某个option参数18 boolean debug = applicationArguments.containsOption("debug");19
20 // 4. 获取所有非option参数21 List<String> nonOptionArgs = applicationArguments.getNonOptionArgs();22 }23}除此之外,SpringBoot还向容器注册了一个CommandLinePropertySource,这样就可以使用@Value注解直接注入单个应用程序参数。
6. 关闭SpringApplication
每个应用在启动时都会向JVM注册一个关闭钩子,以确保在退出时正常关闭,保证所有标准的 Spring 生命周期回调如期生效。
另外,如果希望在调用SpringApplication.exit()时返回特定的退出代码,则可以实现ExitCodeGenerator接口,然后可以将此退出代码传递给System.exit(),以将其作为状态代码返回,如以下示例所示:
171public class MyApplication {3 public static void main(String[] args) {4 // 创建和启动5 SpringApplication springApplication = new SpringApplication(MyApplication.class);6 ConfigurableApplicationContext context = springApplication.run(args);7
8 // 关闭应用9 System.exit(SpringApplication.exit(context));10 }11
12 // 设置上下文退出代码13 14 public ExitCodeGenerator exitCodeGenerator() {15 return () -> 42;16 }17}此外,ExitCodeGenerator接口可能会通过异常实现。遇到此类异常时,Spring Boot 将返回已实现的 getExitCode() 方法提供的退出代码。
第二节 外部化属性配置
SpringBoot支持使用Properties文件、YAML文件、环境变量和命令行参数等多种方式来配置外部属性,并使用Environment进行统一管理,然后通过@Value注解注入到Bean,或通过@ConfigurationProperties注解绑定到结构化对象后使用。
1. 加载顺序
SpringBoot从不同来源加载的外部属性允许被覆盖,它们之间的优先级如下:
主目录(
$HOME)中Devtools配置的全局属性(位于~/.spring-boot-devtools.properties)。通过
@TestPropertySource等测试相关注解配置的属性。命令行参数。
SPRING_APPLICATION_JSON中配置的属性。
来自Web环境的属性:ServletConfig的初始化参数、ServletContext的初始化参数和来自java:comp/env的JNDI属性。
通过System.getProperties()获取的Java系统属性。
系统环境变量。
通过RandomValuePropertySource生成随机值的属性(属性值为random.*前缀)。
特定Profile的配置文件(application-{profile}.properties或类似YAML)(Jar包外部的优先)。
默认配置文件(application.properties或类似YAML)(Jar包外部的优先)。
@Configuration类上的@PropertySource注解加载的配置文件。
通过SpringApplication.setDefaultProperties指定的默认属性。
2. 属性配置
1) 命令行参数
SpringBoot会将任何命令行选项参数(以--开头)或JVM属性(以-D开头)添加到Environment中,如下所示:
11java -jar my-app.jar --name="Spring" --server.port=9000小提示:
可以使用
SpringApplication.setAddCommandLineProperties(false)禁用此默认行为。可以在属性值中使用占位符来减短属性长度,如属性
server.port=${port:8080},只需通过--port=9000配置即可。
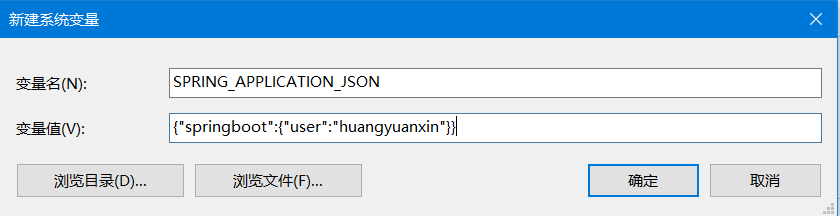
2) SPRING_APPLICATION_JSON
SPRING_APPLICATION_JSON是通过命令行参数、系统变量、环境属性等其它方式配置的内联JSON,SpringBoot会对其进行展开,提取JSON配置的属性。使用系统变量的配置方式如下:
其它配置方式可参考如下示例:
81# JVM属性2java -Dspring.application.json='{"name":"test"}' -jar myapp.jar。3
4# 命令行参数5java -jar myapp.jar --spring.application.json='{"name":"test"}'。6
7# 环境属性8java:comp/env/spring.application.json
3) 随机值属性
SpringBoot提供了RandomValuePropertySource类用于支持随机值的配置,类型可以是int、long、uuid或字符串等,示例如下:
51# 随机字符串、整型、长整型、UUID2my.secret=${random.value}3my.number=${random.int}4my.bignumber=${random.long}5my.uuid=${random.uuid}其中random.int和random.long属性支持一个范围后缀,其语法为:OPEN value (,max) CLOSE,其中OPEN和CLOSE可以是任何字符,max是整数。如果提供了max,则value是最小值,max是最大值(不含)。
31# 带范围的随机值2my.number.less.than.ten=${random.int(10)}3my.number.in.range=${random.int[1024,65536]}
4) 特定Profile的配置文件
Profiles是一种策略式的组件或配置文件的加载方式,可以方便的切换不同的环境配置,使用时分为标记和激活两个步骤。
标记
对于Spring组件可以使用@Profile注解进行标记:
41("prod") // 标记为prod环境3public class ProductionConfiguration {4}对于多个配置文件,可通过属性文件名-profile的方式来标记:
41application.properties2application-dev.properties3application-test.properties4application-prod.properties
对于YML分段文件,可以使用spring.profiles属性来标记:
171server2 port80803spring4 profiles5 activedev # 激活配置6---7# 开发环境8server9 port808110spring11 profilesdev12---13# 生产环境14server15 port808316spring17 profilesprod & eu-central
激活
可以通过spring.profiles.active属性来指定需激活的profile列表,该属性可以配置在属性文件中:
11spring.profiles.active=dev,hsqldb也可以在命令行上指定它:
11java -jar my-app.jar --Dspring.profiles.active=dev,hsqldb注意:
该属性可以被覆盖,这意味着您可以在属性文件中指定默认的active配置,然后使用命令行开关“替换”它们。
附加
有时候,不需要对整个active属性进行替换,而是在此基础上附加一些额外的profile,可以使用spring.profiles.include属性。
91---2my.propertyfromyamlfile3
4---5# prod策略,并且级联激活proddb、prodmq策略6spring.profilesprod7spring.profiles.include8proddb9prodmq除此之外,也可以使用编程的方式实现:
11SpringApplication.setAdditionalProfiles(…)
5) 默认配置文件
SpringBoot使用application.properties/application.yaml/application.yml(按优先级从高到低排序)作为默认的属性配置文件,将会从下列路径依次加载,后加载的同名属性会将之前的值覆盖。
ClassPath根目录。
ClassPath/config包。
Jar包执行的当前目录。
Jar包执行的当前目录/config子目录。
如果想修改默认属性文件名,可以使用spring.config.name进行指定。
21# 指定默认的属性配置文件名为myapplication.properties/myapplication.yaml/myapplication.yml2java -jar myproject.jar --spring.config.name=myapplication
如果想修改默认加载目录,可以使用spring.config.location指定或通过spring.config.additional-location进行附加。
61# 指定属性文件加载目录,加载的顺序从后往前(注意:支持特定于Profiles的变体)2java -jar myproject.jar --spring.config.location=classpath:/,classpath:/config/,file:./,file:./config/3
4# 附加属性文件加载目录,加载的顺序从后往前(注意:1. 支持特定于Profiles的变体。2. 附加目录优先加载,可能被默认目录下的值覆盖)5java -jar myproject.jar --spring.config.location=classpath:/,classpath:/config/,file:./,file:./config/6
如果想同时指定加载目录和属性文件名,也可以使用spring.config.location属性:
31# 显式指定路径下的某些文件(注意:不支持特定于Profiles件的变体)2java -jar myproject.jar --spring.config.additional-location=classpath:/custom-config/,file:./custom-config/3
注意:
由于上述属性在加载属性文件之前被使用,因此你必须使用系统变量、系统属性或命令行参数等高优先级的配置方式。
大多操作系统不支持使用句点分隔的环境变量名,你可以使用下划线形式代替(例如:SPRING_CONFIG_NAME)。
6) 其它配置文件
SpringBoot默认从application.properties文件加载属性配置,如果存在其它properties类型的配置文件,可以通过@PropertySource注解来加载。示例如下:
41(value = {"com/huangyuanxin/notes/springboot/my-config.properties"})3public class LoadPropertiesConfig {4}
7) YML格式简介
YAML是JSON的超集,是一种用于指定层次结构配置数据的便捷格式,非常适合用来做以数据为中心的配置文件。spring-boot-starter自动引入了SnakeYAML库用于支持yaml格式,其基本语法如下:
数据格式为
key: value,大小写敏感,并且kv之间必须有空格。使用缩进表示层级关系,且缩进不允许使用tab,只允许空格。
缩进的空格数不重要,只要相同层级的元素左对齐即可。
注释行使用'#'开头,注意不支持行尾注释。
字符串可以不加引号,如果要加,''与""分别表示字符串内容会被转义和不转义。
可以使用
---对文件进行分段,将多个YML文件整合为一个。
下面是使用yaml配置不同类型数据的语法格式:
201# 1. 字面量类型:单个不可再分的值,如date、boolean、string、number、null等。2kv3
4---5
6# 2. 对象类型:键值对的集合,如object、map、hash、set等。7kk1v1k2:v2k3:v38k9 k1v110 k2v211 k3v312
13---14
15# 3. 数组类型:一组按次序排列的值,如array、list、queue等。16kv1v2v317k18v119v220v3具体案例可参考属性注入和绑定章节!
3. 属性注入和绑定
1) 通过@Value("${Xxx}")注入
61// 注入Environment中的spring.application.name属性2public class HelloController {4 ("${spring.application.name}")5 private String appName;6}注意:
该注解不能在静态变量和常量上使用!
2) 绑定到属性Bean
SpringBoot提供了@ConfigurationProperties注解将属性配置与强类型的JavaBean进行绑定,并且支持宽松的绑定格式、属性值转换、属性值验证及元数据提示等,使用起来更加方便。
有如下一个YML配置文件,已通过YmlLoadEnvironmentPostProcessor(见第二章节)进行加载:
271# 配置person2person3 userNamezhangsan4 bossfalse5 birth2019/12/12 2012336 age187 pet8 nametomcat9 weight23.410 interests篮球游泳11 animal12jerry13mario14 score15 english16 first3017 second4018 third5019 math13114014820 chinesefirst128second13621 salarys39994999.985999.9922 allPets23 sick24nametom25namejerryweight4726 healthnamemarioweight4727
我们可以通过如下JavaBean进行属性绑定,绑定后可直接通过容器中的PersonProperty实例使用绑定属性。
241(prefix = "person")3public class PersonProperty {4 private String userName;5 private Boolean boss;6 private Date birth;7 private Integer age;8 private Pet pet;9 private String[] interests;10 private List<String> animal;11 private Map<String, Object> score;12 private Set<Double> salarys;13 private Map<String, List<Pet>> allPets;14
15 // getter/setter/toString...16 }17
18 static class Pet {19 private String name;20 private float weight;21
22 // getter/setter/toString...23 }24}提示:@ConfigurationProperties有一些属性可以控制绑定时的行为。
ignoreUnknownFields:默认为true,如果设置为false,则在属性文件中提供了属性类没有的属性时报错。
ignoreInvalidFields:默认为false,如果设置为true,则在属性绑定失败时不报错。
如果该Bean不是Spring组件,则在必须在其它Spring组件上使用@EnableConfigurationProperties(Person.class)注解将其拉起。
41(PersonProperty.class)3public class MyConfiguration {4}
属性Bean以属性前缀-全类名作为Bean名称,如果未配置属性前缀,则Bean名称为全类名。可以像使用其他任何Bean一样注入该属性Bean并使用,如构造函数注入、@Bean方法注入、@Autowird注入等。
91public class MyService {3 private PersonProperty personProperty;4
5 6 public MyService(PersonProperty personProperty) {7 this.personProperty = personProperty;8 }9}注意:
必须为配置的属性提供相关的getter/setter方法及默认构造函数,但二级属性等除外。
不支持对静态属性进行绑定。
使用
@ConfigurationProperties还可让您生成元数据文件,IDE可以使用这些元数据文件为提供配置提示。
3) 注入到第三方组件
如果需要将属性绑定到不可修改的第三方组件等,可以在@Bean方法上加@ConfigurationProperties注解来实现:
111public class JdbcConfiguration {3 4 5 // 声明要注入的属性前缀,SpringBoot会自动把相关属性通过set方法注入到DataSource中6 (prefix = "jdbc")7 public DataSource dataSource() {8 DruidDataSource dataSource = new DruidDataSource();9 return dataSource;10 }11}
4) 宽松的绑定规则
SpringBoot使用一些宽松的规则将加载的属性绑定到属性Bean,因此属性名称和Bean中的属性名不需要完全匹配。如下示例:
121(prefix="acme.my-project.person")2public class OwnerProperties {3 private String firstName;4
5 public String getFirstName() {6 return this.firstName;7 }8
9 public void setFirstName(String firstName) {10 this.firstName = firstName;11 }12}可以使用下列一些方式来配置firstName的属性值:
121# 标准驼峰写法2acme.myProject.person.firstName3
4# 烤肉串(Kebab)形式,推荐在properties和yml文件中使用5acme.my-project.person.first-name6
7# 下划线形式,也推荐在properties和yml文件中使用8acme.my_project.person.first_name9
10# 大写下划线形式,一般在系统环境变量中使用11ACME_MYPROJECT_PERSON_FIRSTNAME12
注意:
前提:@ConfigurationProperties注解中的
prefix属性必须是小写且由-分隔的形式,如acme.my-project.person。属性名建议使用小写的 kebab 格式存储,例如
my.property-name=acme。如需在环境变量中配置列表数据,可以使用带下划线的数字值表示,如
MY_ACME_1_OTHER = my.acme[1].other。绑定到Map属性时,如果key包含小写字母、数字字符或-以外的任何内容,则必须使用
[]括起来,否则将会被删除。51# 如下Map的配置效果为:/key1=value1,key2:value22acme3map4"[/key1]"value15/key2value2
4. 属性覆盖与合并
默认情况下,SpringBoot会直接覆盖旧的属性值,但对于复杂类型,做了一些特殊处理。
1) List类型属性
如果在多个属性源配置了同名的List属性,处理方式和基本属性一致,采用完全覆盖的方式,取优先级最高的配置。如下属性:
81("acme")2public class AcmeProperties {3 private final List<MyPojo> list = new ArrayList<>();4
5 public List<MyPojo> getList() {6 return this.list;7 }8}在外部属性源存在多个list的配置如下:
101acme2 list3namemy name4 descriptionmy description5---6spring7 profilesdev8acme9 list10namemy another name最终生效情况如下:
81# 情形一:未激活dev2list3namemy name4 descriptionmy description5
6# 情形二:激活dev7list8namemy another name
2) Map类型属性
如果在多个属性源配置了同名的Map属性,采用合并的方式进行处理。如下属性:
81("acme")2public class AcmeProperties {3 private final Map<String, MyPojo> map = new HashMap<>();4
5 public Map<String, MyPojo> getMap() {6 return this.map;7 }8}在外部属性源存在多个map的配置如下:
151acme2 map3 key14 namemy name 15 descriptionmy description 16---7spring8 profilesdev9acme10 map11 key112 namedev name 113 key214 namedev name 215 descriptiondev description 2最终生效情况如下:
161# 未激活dev2acme3 map4 key15 namemy name 16 descriptionmy description 17
8# 激活dev(合并了默认配置中key1.description属性)9acme10 map11 key112 namedev name 113 descriptionmy description 114 key215 namedev name 216 descriptiondev description 2
5. 属性转换
在SpringBoot绑定属性时,会尝试将外部属性值强制转换为对应的类型,几种特殊类型及如何自定义类型转换如下。
1) Duration类型
Duration类型专门用于表达持续时间,SpingBoot在属性绑定时对其做了特殊处理。支持下面一些格式:
常规long表示形式(使用毫秒作为默认单位,除非已指定@DurationUnit)。
由 java.util.Duration使用的标准 ISO-8601 格式。
值和单位相结合的更易读的格式(例如10s表示10秒),常见的单位还有:ns、us、ms、s、m、h、d等。
111("app.system")2public class AppSystemProperties {3 // 属性可以配置如30 PT30S 30s等4 (ChronoUnit.SECONDS)5 private Duration sessionTimeout = Duration.ofSeconds(30);6
7 // 属性可以配置如500 PT0.5S 500ms等8 private Duration readTimeout = Duration.ofMillis(1000);9
10 // 省略getter/setter11}
2) DataSize类型
DataSize类型专门用于表达数据大小,SpingBoot在属性绑定时对其做了特殊处理。支持下面一些格式:
常规的long表示形式(除非已指定@DataSizeUnit,否则使用字节作为默认单位)。
值和单位耦合在一起的更具可读性的格式(例如10MB表示10兆字节),常见的单位还有:B、KB、MB、GB、TB等。
121("app.io")2public class AppIoProperties {3
4 // 属性可以配置如:10、10MB5 (DataUnit.MEGABYTES)6 private DataSize bufferSize = DataSize.ofMegabytes(2);7
8 // 属性可以配置如:256、256B9 private DataSize sizeThreshold = DataSize.ofBytes(512);10
11 // 省略getter/setter12}
3) 自定义类型转换
如果需要自定义类型转换,可以使用属性编辑器(CustomEditorConfigurer)、Converters(@ConfigurationPropertiesBinding)或ConversionService(名称为conversionService的Bean)等,请参考 Spring 相关章节。
注意:
该类型Bean在生命周期中非常早的初始化,请注意所使用的依赖。
6. 属性值验证
在绑定属性时,如果Classpath上有兼容的JSR-303 实现,那么还支持JSR-303标准定义的@Validated注解进行属性值的验证。
181(prefix="acme")2 // 启用验证3public class AcmeProperties {4 5 private InetAddress remoteAddress;6
7 8 private final Security security = new Security();9
10 // ... getters and setters11
12 public static class Security {13 14 public String username;15
16 // ... getters and setters17 }18}除此之外,也可以通过在创建属性Bean的@Bean方法上使用@Validated注解来触发验证。
注意:
尽管嵌套属性在绑定时也会验证,但是最好将关联的字段注解为@Valid。这样可以确保即使没有嵌套属性也可以触发验证。
如果需要对Validator进行扩展,可以创建名为configurationPropertiesValidator的bean来添加自定义Spring Validator,但注意,其@Bean方法应声明为static(防止配置属性验证器过早实例化)。
第三节 使用自动配置
对于一些开源或商业项目,或者是其它的一些共享Jar包,可能也希望使用SpringBoot提供的自动配置功能,下面将会介绍如何使用。
1. AutoConfiguration类
AutoConfiguration类是SpringBoot中用于实现自动配置的特殊配置类,其通过一系列的条件注解约束配置在特定的条件下才会生效。
如需使 SpringBoot 识别自定义的自动配置类,则必须在类路径下的META-INF/spring.factories文件中进行配置。
31org.springframework.boot.autoconfigure.EnableAutoConfiguration=\2com.szkingdom.koca.boot.autoconfigure.bex.BexAutoConfiguration,\3com.szkingdom.koca.boot.autoconfigure.context.ContextAutoConfiguration如果需要指定自动配置类的加载顺序,可以通过@AutoConfigureOrder注解来声明,它和 Spring 的 Order 注解类似。除此之外,也可以通过@AutoConfigureAfter或@AutoConfigureBefore注解来配置指定Bean之间的先后顺序。
注意:
自动配置类一般在
@Configuration上加proxyBeanMethods=false属性,表示禁止代理@Bean方法,这样在代码中显式调用@Bean方法时不会返回容器中已存在的值。
2. @Conditional注解
条件注解@Conditional是实现自动配置的关键,SpringBoot支持许多类型的条件注解。
1) 类条件
@ConditionalOnClass和@ConditionalOnMissingClass使自动配置仅在特定类存在/缺失时生效,可以使用value属性直接引用特定的类,或使用name属性指定其字符串形式的全类名。
101({AppContext.class, AppLoadListener.class}) // 当类路径下存在AppContext和AppLoadListener时该配置才会生效3(-2147473648) // 指定加载顺序,数值越小越先加载4public class ContextAutoConfiguration {5 ({"koca-core-application-context"})6 7 public AppContext appContext() {8 return new AppContext();9 }10}注意:
由于注解的元数据是通过ASM进行解析的,因此即使引用的类不在类路径上,也可以使用value属性进行引用。
但上述注解形成的组合注解,无法使用value属性引用类路径下不存在的类。
3) Bean条件
@ConditionalOnBean和@ConditionalOnMissingBean使自动配置仅在特定的Bean存在/缺失时生效,可以使用value属性指定Bean的类型,如果该注解加在@Bean方法上,则默认值为方法的返回值类型。此外,也可以使用name属性指定Bean的名称。
61public class MyAutoConfiguration {3 4 // 当容器中不存在MyService类型的Bean时,则该配置生效5 public MyService myService() { ... }6}除此之外,还可以使用search属性限制搜索Bean时应考虑的ApplicationContext层次结构。
注意:
该条件注解是根据当前已处理的内容来评估的,因此需要特定注意Bean的初始化顺序。
3) 属性条件
@ConditionalOnProperty使自动配置仅在Spring环境中包含特定的属性时生效,分别使用prefix和name属性来指定应检查的属性,默认情况下,当检测的属性存在且不等于 false 时生效。
可以使用havingValue属性来设置与之对比的值,当属性存在且值相同时则加载。此外,matchIfMissing属性可以设置指定的属性不存在时是否进行加载。
21// 检查com.huangyuanxin.autocheck.enabled属性是否为true。在属性不存在默认配置生效。2(prefix = "com.huangyuanxin.autocheck", name = "enabled", havingValue = true, matchIfMissing = true)
4) 资源条件
@ConditionalOnResource使自动配置仅在特定资源存在时才生效,使用通常的Spring约定来指定资源,如:file:/home/user/test.dat。
5) Web环境
@ConditionalOnWebApplication和@ConditionalOnNotWebApplication使自动配置仅在Web环境下生效。Web环境指使用了WebApplicationContext,或定义了session范围,或具有StandardServletEnvironment的环境。
6) SpEL条件
@ConditionalOnExpression注解允许基于SpEL expression的结果决定配置是否生效。
7) byType条件
@ConditionalOnSingleCandidate注解使自动配置仅在当容器中具有唯一的该类型Bean(或存在主候选对象)时生效。
11(DataSource.class)
8) 自定义条件
141//自定义条件2public class ExistBossCondition implements Condition {3 4 public boolean matches(ConditionContext context, AnnotatedTypeMetadata metadata){5 return context.getBeanFactory().containsBeanDefinition(Boss.class.getName());6 }7}8
9// 基于自定义条件装配10(ExistBossCondition.class)12public Bar bbbar (){13 return new Bar();14}
3. 自定义启动器
启动器是为某个使用场景提供的一系列依赖和自动配置的集合。通常来说,可以将启动器分为两个部分:
autoconfigure模块:通过条件注解实现自动配置等功能,通常以
-spring-boot-autoconfigure结尾。starter模块:直接引用autoconfigure模块,并引入一些必要的依赖和进行相关配置,通常以
-spring-boot-start结尾。
实际开发中,也可以将autoconfigure模块直接合并到starter模块之中。
注意:
启动器必须直接或间接的引用核心Spring Boot启动程序spring-boot-starter。
如果启动器需要暴露自定义属性,可以通过下面注解处理器来生成元数据文件(META-INF/spring-configuration-metadata.json),以便IDE进行配置提示。
51<dependency>2 <groupId>org.springframework.boot</groupId>3 <artifactId>spring-boot-autoconfigure-processor</artifactId>4 <optional>true</optional>5</dependency>
第03章_SpringBoot整合
第一节 整合Web服务器
每个SpringBoot Web应用程序都会包含一个嵌入式Web服务器,下面介绍如何进行替换和配置。
1. 基本使用
1) 选择嵌入式Web服务器
基于 Servlet 的 Web 应用程序(spring-boot-starter-web),默认的嵌入式服务器为Tomcat,可以将它替换为Jetty或Undertow等:
221<properties>2    <!--修改Servlet版本(Jetty9.4不支持Servlet4.0)-->3    <servlet-api.version>3.1.0</servlet-api.version>4</properties>5
6<dependency>7    <groupId>org.springframework.boot</groupId>8    <artifactId>spring-boot-starter-web</artifactId>9    <exclusions>10        <!-- 排除默认的Tomcat启动器 -->11        <exclusion>12            <groupId>org.springframework.boot</groupId>13            <artifactId>spring-boot-starter-tomcat</artifactId>14        </exclusion>15    </exclusions>16</dependency>17
18<!-- 使用Jetty启动器 -->19<dependency>20    <groupId>org.springframework.boot</groupId>21    <artifactId>spring-boot-starter-jetty</artifactId>22</dependency>
基于 Reactive 的 Web 应用程序(spring-boot-starter-webflux),默认的嵌入式服务器启动器为spring-boot-starter-reactor-netty,可以通过spring-boot-starter-tomcat、spring-boot-starter-jetty或spring-boot-starter-undertow来进行替换。
注意:
可以通过
spring.main.web-application-type=none属性来禁止启动类路径下的嵌入式服务器。
2) 配置和获取HTTP端口
可以使用server.port属性来设置Web服务器的HTTP端口,默认的端口号为8080。
81# 设置自定义HTTP端口2server.port=80813
4# 自动扫描可用的端口5server.port=06
7# 关闭HTTP端口,但仍创建WebApplicationContext(用于测试)8server.port=-1
如需在应用运行时获取HTTP端口,可以监听WebServerInitializedEvent事件(Web服务器启动完成时触发)。
91public void onWebServerInitialized(WebServerInitializedEvent event) {3 if ("server".equals(event.getServerId())) {4 localServerPort = event.getWebServer().getPort();5 }6 if ("management".equals(event.getServerId())) {7 localManagementPort = event.getWebServer().getPort();8 }9}
如需获取测试时@SpringBootTest(webEnvironment=WebEnvironment.RANDOM_PORT)生成的随机端口,可以通过@LocalServerPort注解注入,或通过local.server.port属性获取。
91(SpringJUnit4ClassRunner.class)2(webEnvironment=WebEnvironment.RANDOM_PORT)3public class MyWebIntegrationTests {4 5 ServletWebServerApplicationContext server;6
7 8 int port;9}
3) 配置访问日志
201# 配置Tomcat访问日志2server.tomcat.basedir=tomcat-log # 日志生成目录(该目录下的logs目录下)3server.tomcat.accesslog.enabled=true # 开启访问日志4server.tomcat.accesslog.prefix=demo-log # 日志前缀5server.tomcat.accesslog.suffix=.log # 日志后缀6server.tomcat.accesslog.file-date-format=.yyyyMMdd # 日志日期格式7server.tomcat.accesslog.pattern=%h %l %u %t \"%r"\ %s %b # 日志内容格式(%h 请求的客户端IP、%l 用户身份、%u 用户名、%t 请求时间、%r 请求地址、%s 响应状态码、%b 响应大小)8logging.level.org.apache.tomcat = debug; #开启服务器内部日志9logging.level.org.apache.catalina = debug; #开启服务器内部日志10
11
12# 配置Undertow访问日志 server.undertow.accesslog.directory13server.undertow.accesslog.enabled=true14server.undertow.accesslog.pattern=%t %a "%r" %s (%D ms)15
16
17# 配置Jetty访问日志18server.jetty.accesslog.enabled=true19server.jetty.accesslog.filename=/var/log/jetty-access.log20
4) 其它配置
如果需要修改其它相关配置,可以在application.properties文件中修改,常用的配置如下:
| 配置属性 | 说明 |
|---|---|
| server.port | HTTP 请求的端口 |
| server.servlet.session.persistence | 会话是否持久 |
| server.servlet.session.timeout | 会话超时时间 |
| server.servlet.session.store-dir | 会话数据的位置 |
| server.servlet.session.cookie.* | 会话 cookie 配置 |
| server.error.path | 错误页面的位置 |
注意:
关于Servlet容器的更多配置请参考
ServerProperties类,其中还包含一些如server.tomcat.*前缀等特定于容器的配置。如果在CentOS上使用Tomcat,生成的临时文件可能被自动清理,可使用
server.tomcat.basedir属性配置到其它位置。
2. HTTP特性支持
1) HTTP响应压缩
嵌入式Tomcat、Jetty和Undertow服务器都支持HTTP响应压缩,可通过如下属性来开启和配置。
81# 开启HTTP响应压缩,默认关闭2server.compression.enabled=true3
4# 响应长度阈值,低于该值时不进行压缩,默认为2048字节5server.compression.min-response-size=20486
7# 只对指定Content Type的响应进行压缩,默认支持text/html、text/xml、text/plain、text/css、text/javascript、application/javascript、application/json、application/xml8server.compression.mime-types=application/json
2) 配置HTTPS
HTTPS是以安全为目标的HTTP通道,在HTTP的基础上通过传输加密和身份认证保证了传输过程的安全性。
在SpringBoot应用程序中可以通过server.ssl.*前缀的相关属性来配置SSL以支持HTTPS。
41server.port=84432server.ssl.key-store=classpath:keystore.jks3server.ssl.key-store-password=secret4server.ssl.key-password=another-secret注意:
更多属性配置可参考源代码:org.springframework.boot.web.server.Ssl.java。
如果需要同时支持HTTP和HTTPS,可参考spring-boot-sample-tomcat-multi-connectors案例给Tomcat配置额外的HTTP连接器。
211public class SampleTomcatTwoConnectorsApplication {3
4 5 public ServletWebServerFactory servletContainer() {6 TomcatServletWebServerFactory tomcat = new TomcatServletWebServerFactory();7 tomcat.addAdditionalTomcatConnectors(createStandardConnector());8 return tomcat;9 }10
11 private Connector createStandardConnector() {12 Connector connector = new Connector("org.apache.coyote.http11.Http11NioProtocol");13 connector.setPort(0);14 return connector;15 }16
17 public static void main(String[] args) {18 SpringApplication.run(SampleTomcatTwoConnectorsApplication.class, args);19 }20
21}当然,也可以直接通过编程方式添加HTTPS连接器来同时支持HTTP和HTTPS,如下所示:
291public ServletWebServerFactory servletContainer() {3 TomcatServletWebServerFactory tomcat = new TomcatServletWebServerFactory();4 tomcat.addAdditionalTomcatConnectors(createSslConnector());5 return tomcat;6}7
8private Connector createSslConnector() {9 Connector connector = new Connector("org.apache.coyote.http11.Http11NioProtocol");10 Http11NioProtocol protocol = (Http11NioProtocol) connector.getProtocolHandler();11 try {12 File keystore = new ClassPathResource("keystore").getFile();13 File truststore = new ClassPathResource("keystore").getFile();14 connector.setScheme("https");15 connector.setSecure(true);16 connector.setPort(8443);17 protocol.setSSLEnabled(true);18 protocol.setKeystoreFile(keystore.getAbsolutePath());19 protocol.setKeystorePass("changeit");20 protocol.setTruststoreFile(truststore.getAbsolutePath());21 protocol.setTruststorePass("changeit");22 protocol.setKeyAlias("apitester");23 return connector;24 }25 catch (IOException ex) {26 throw new IllegalStateException("can't access keystore: [" + "keystore"27 + "] or truststore: [" + "keystore" + "]", ex);28 }29}
3) 支持HTTP/2
HTTP/2也被称为HTTP 2.0,相对于HTTP 1.1新增多路复用、压缩HTTP头、划分请求优先级、服务端推送等特性,解决了在HTTP 1.1中一直存在的问题,优化了请求性能,同时兼容了HTTP 1.1的语义。
SpringBoot应用程序可以通过如下属性来开启HTTP/2支持。
21# 开启HTTP/2支持2server.http2.enabled=true注意:
Spring Boot不支持h2c,即HTTP/2 协议的明文版本。因此您必须首先配置SSL。
基本环境要求:
Undertow1.4.0+:只需要JDK8+环境。
Jetty9.4.8+:还需要附加依赖项org.eclipse.jetty:jetty-alpn-conscrypt-server和org.eclipse.jetty.http2:http2-server。
Tomcat 9.0.x:最好为JDK9+,也可以使用JDK8,则需要添加libtcnative库及其依赖项(-Djava.library.path=/usr/local/opt/tomcat-native/lib)。
3. Web服务器高级配置
1) WebServerFactoryCustomizer
如果提供的属性配置无法满足你对Web服务器的配置需要,还可以通过实现WebServerFactoryCustomizer接口来自定义Web服务器。
91// 配置Tomcat服务器(Jetty和Undertow服务器同理)2public class MyTomcatWebServerCustomizer implements WebServerFactoryCustomizer<TomcatServletWebServerFactory> {4
5 6 public void customize(TomcatServletWebServerFactory factory) {7 // 在此处可以配置连接器、服务器资源或服务器本身8 }9}
2) WebServerFactory
作为最终的手段,你还可以定义自己的WebServerFactory组件,来覆盖掉Spring Boot提供的对应组件,但是在这种情况下,您不能再依赖server名称空间中的配置属性。
81public ConfigurableServletWebServerFactory webServerFactory() {3 TomcatServletWebServerFactory factory = new TomcatServletWebServerFactory();4 factory.setPort(9000);5 factory.setSessionTimeout(10, TimeUnit.MINUTES);6 factory.addErrorPages(new ErrorPage(HttpStatus.NOT_FOUND, "/notfound.html"));7 return factory;8}注意:
如果您需要做一些更奇特的操作,还提供了几种受保护的方法“钩子”。有关详情,请参见源代码文档。
第二节 整合日志框架
1. 日志的基本使用
1) 默认日志实现
SpringBoot中默认使用JCL(Java Common Logging)门面记录所有内部日志,并为Logback、Log4J2和JUL提供了默认配置:
| 日志实现 | 默认配置文件(通过logging.config属性可修改) |
|---|---|
Logback | logback.xml、logback-spring.xml、logback.groovy、logback-spring.groovy |
| Log4j2 | log4j2.xml、log4j2-spring.xml |
| JUL | logging.properties |
注意:
在使用
spring-boot-starter-web启动器时,默认采用Logback日志实现,默认级别为INFO。推荐使用以
-spring结尾的日志配置文件,以便 Spring 控制日志框架的初始化。不推荐在以 java -jar 方式运行时使用JUL日志实现,可能会引发类加载错误。
2) 设置日志级别
SpringBoot默认将日志输出到控制台,并打印ERROR、WARN和INFO级别的日志,可通过如下配置修改:
51# 修改日志级别:logging.level.<logger-name>=<level>2# 可选:TRACE、DEBUG、INFO、WARN、ERROR、FATAL、OFF3logging.level.root=WARN4logging.level.org.springframework.web=DEBUG5logging.level.org.hibernate=ERROR注意:
日志级别可通过
debug=true、trace=true等属性或命令行方式java -jar my-app.jar --trace进行全局修改。Logback框架没有FATAL级别,它将会被映射到ERROR。
3) 其它日志配置属性
下面是一些可用的日志配置属性,以及通过系统属性配置时的属性名:
| Spring Environment | System Property | Comments |
|---|---|---|
| logging.exception-conversion-word | LOG_EXCEPTION_CONVERSION_WORD | 记录异常时使用的转换字 |
| logging.file | LOG_FILE | 日志文化目录和文件名 |
| logging.file.max-size | LOG_FILE_MAX_SIZE | 最大日志文件大小(默认为10M,后缀可以为KB、MB和GB) |
| logging.file.max-history | LOG_FILE_MAX_HISTORY | 要保留的最大归档日志文件数(默认无限制) |
| logging.path | LOG_PATH | 日志文件目录,默认文件名为spring.log |
| logging.pattern.console | CONSOLE_LOG_PATTERN | 在控制台上使用的日志模式(stdout) |
| logging.pattern.dateformat | LOG_DATEFORMAT_PATTERN | 记录日期格式的附加模式 |
| logging.pattern.file | FILE_LOG_PATTERN | 文件中使用的日志模式 |
| logging.pattern.level | LOG_LEVEL_PATTERN | 渲染日志级别时使用的格式(默认为%5p) |
| PID | PID | 当前进程ID |
注意:
日志功能在创建容器之前进行初始化,因此必须通过系统属性或更高级别的属性配置方式来修改日志属性。
2. 使用SLF4J->Logback
使用Web启动器时,会自动引入SLF4J和Logback的相关依赖,可通过logback.xml或logback-spring.xml对其进行配置。
1) logback.xml配置
SpringBoot在org/springframework/boot/logging目录下提供一份base.xml文件,对LogBack进行了一些默认配置:
101<included>2 <include resource="org/springframework/boot/logging/logback/defaults.xml" />3 <property name="LOG_FILE" value="${LOG_FILE:-${LOG_PATH:-${LOG_TEMP:-${java.io.tmpdir:-/tmp}}}/spring.log}"/>4 <include resource="org/springframework/boot/logging/logback/console-appender.xml" />5 <include resource="org/springframework/boot/logging/logback/file-appender.xml" />6 <root level="INFO">7 <appender-ref ref="CONSOLE" />8 <appender-ref ref="FILE" />9 </root>10</included>可以在应用的LogBack配置文件中通过如下方式引入来使用:
51 2<configuration>3 <include resource="org/springframework/boot/logging/logback/base.xml"/>4 <logger name="org.springframework.web" level="DEBUG"/>5</configuration>当然,也可以从零开始定义自己的配置:
331 2<configuration >3 <property name="pattern" value="[%-5level] %d{yyyy-MM-dd HH:mm:ss.sss} %c %M %L %thread %m%n"/>4 <!-- 配置文件输出路径 -->5 <property name="logDir" value="./logs"/>6 <!-- 配置控制台 appender -->7 <appender name="consoleAppender" class="ch.qos.logback.core.ConsoleAppender">8 <target>9 System.err10 </target>11 <encoder class="ch.qos.logback.classic.encoder.PatternLayoutEncoder">12 <pattern>${pattern}</pattern>13 </encoder>14 </appender>15 16 <!-- 配置文件 appender -->17 <appender name="fileAppender" class="ch.qos.logback.core.FileAppender">18 <!-- 引入文件位置 -->19 <file>${logDir}/logback.log</file>20 <!-- 配置日志输出格式 -->21 <encoder class="ch.qos.logback.classic.encoder.PatternLayoutEncoder">22 <!-- 引用 输出格式的 通用配置属性 -->23 <pattern>${pattern}</pattern>24 </encoder>25 </appender>26 27 <!-- 配置日志记录器 -->28 <root level="info">29 <!-- 引入appender -->30 <appender-ref ref="consoleAppender"></appender-ref>31 <appender-ref ref="fileAppender"></appender-ref>32 </root>33</configuration>
2) logback-spring.xml配置
如果通过logback-spring.xml或logging.config属性指定的其它文件来配置logback,则可以使用一些SpringBoot提供的扩展功能。
支持profile
通过<springProfile>标签可以方便的将配置切换到不同环境。
111<springProfile name="staging">2    <!-- configuration to be enabled when the "staging" profile is active -->3</springProfile>4
5<springProfile name="dev | staging">6    <!-- configuration to be enabled when the "dev" or "staging" profiles are active -->7</springProfile>8
9<springProfile name="!production">10    <!-- configuration to be enabled when the "production" profile is not active -->11</springProfile>
引入Spring属性
通过<springProperty>标签可以在logback-spring.xml文件中访问Spring环境属性。
71<!--在context范围(scope属性配置,默认为local)配置一个fluentHost变量,引用Spring的myapp.fluentd.host属性值,如未找到,则默认为localhost-->2<springProperty scope="context" name="fluentHost" source="myapp.fluentd.host" defaultValue="localhost"/>3
4<!--在appender中使用fluentHost变量-->5<appender name="FLUENT" class="ch.qos.logback.more.appenders.DataFluentAppender">6    <remoteHost>${fluentHost}</remoteHost>7</appender>
注意:
如果使用logback默认的logback.xml配置文件,将会被过早的加载,无法使用扩展功能。
这些扩展不能与Logback的配置扫描一起使用。
3. 使用SLF4J->Log4j2
1) 替换为Log4j2日志实现
171<!--排除Logback依赖-->2<dependency>3     <groupId>org.springframework.boot</groupId>4     <artifactId>spring-boot-starter-web</artifactId>5     <exclusions>6          <exclusion>7             <groupId>org.springframework.boot</groupId>8             <artifactId>spring-boot-starter-logging</artifactId>9          </exclusion>10     </exclusions>11</dependency>12
13<!--引入Log4j2启动器-->14<dependency>15    <groupId>org.springframework.boot</groupId>16    <artifactId>spring-boot-starter-log4j2</artifactId>17</dependency>
2) log4j2.xml配置
891 2<Configuration status="fatal">3 <!--配置log日志文件路径 -->4 <Properties>5 <!--配置mac或者linux环境下日志文件路径 -->6 <!-- <Property name="baseDir" value="${sys:user.home}/logs"/>-->7 8 <!--配置windows环境下日志文件路径 -->9 <Property name="baseDir" value="D:\Workspace\shoppingproject\shoppingProject\src\main\resources\logs"/>10 </Properties>11 12 <Appenders>13 <Console name="Console" target="SYSTEM_OUT">14 <!--控制台只输出level及以上级别的信息(onMatch),其他的直接拒绝(onMismatch) -->15 <ThresholdFilter level="info" onMatch="ACCEPT"16 onMismatch="DENY"/>17 <PatternLayout18 pattern="[%d{MM:dd HH:mm:ss.SSS}] [%level] [%logger{36}] - %msg%n"/>19 </Console>20 21 <!--debug级别日志文件输出-->22 <RollingFile name="debug_appender" fileName="${baseDir}/debug.log"23 filePattern="${baseDir}/debug_%i.log.%d{yyyy-MM-dd}">24 <!-- 过滤器 -->25 <Filters>26 <!-- 限制日志级别在debug及以上在info以下 -->27 <ThresholdFilter level="debug"/>28 <ThresholdFilter level="info" onMatch="DENY" onMismatch="NEUTRAL"/>29 </Filters>30 <!-- 日志格式 -->31 <PatternLayout pattern="[%d{HH:mm:ss:SSS}] [%p] - %l - %m%n"/>32 <!-- 策略 -->33 <Policies>34 <!-- 每隔一天转存 -->35 <TimeBasedTriggeringPolicy interval="1" modulate="true"/>36 <!-- 文件大小 -->37 <SizeBasedTriggeringPolicy size="100 MB"/>38 </Policies>39 </RollingFile>40 41 <!-- info级别日志文件输出 -->42 <RollingFile name="info_appender" fileName="${baseDir}/info.log"43 filePattern="${baseDir}/info_%i.log.%d{yyyy-MM-dd}">44 <!-- 过滤器 -->45 <Filters>46 <!-- 限制日志级别在info及以上在error以下 -->47 <ThresholdFilter level="info"/>48 <ThresholdFilter level="error" onMatch="DENY" onMismatch="NEUTRAL"/>49 </Filters>50 <!-- 日志格式 -->51 <PatternLayout pattern="[%d{HH:mm:ss:SSS}] [%p] - %l - %m%n"/>52 <!-- 策略 -->53 <Policies>54 <!-- 每隔一天转存 -->55 <TimeBasedTriggeringPolicy interval="1" modulate="true"/>56 <!-- 文件大小 -->57 <SizeBasedTriggeringPolicy size="100 MB"/>58 </Policies>59 </RollingFile>60 61 <!-- error级别日志文件输出 -->62 <RollingFile name="error_appender" fileName="${baseDir}/error.log"63 filePattern="${baseDir}/error_%i.log.%d{yyyy-MM-dd}">64 <!-- 过滤器 -->65 <Filters>66 <!-- 限制日志级别在error及以上 -->67 <ThresholdFilter level="error"/>68 </Filters>69 <!-- 日志格式 -->70 <PatternLayout pattern="[%d{HH:mm:ss:SSS}] [%p] - %l - %m%n"/>71 <Policies>72 <!-- 每隔一天转存 -->73 <TimeBasedTriggeringPolicy interval="1" modulate="true"/>74 <!-- 文件大小 -->75 <SizeBasedTriggeringPolicy size="100 MB"/>76 </Policies>77 </RollingFile>78 </Appenders>79 <Loggers>80 <Root level="debug">81 <AppenderRef ref="Console"/>82 <AppenderRef ref="debug_appender"/>83 <AppenderRef ref="info_appender"/>84 <AppenderRef ref="error_appender"/>85 </Root>86 <!--配置其它Logger...-->87 </Loggers>88</Configuration>89
3) 使用YML或JSON配置(了解)
当引入 com.fasterxml.jackson.core:jackson-databind 依赖后,可以使用JSON格式来配置Log4j2,默认配置文件名为log4j2.jsn。
当引入 jackson-databind和com.fasterxml.jackson.dataformat:jackson-dataformat-yaml 依赖后,可以使用YML格式来配置Log4j2,默认配置文件名为log4j2.yaml(yml)。
4. 其它日志配置
1) 日志组
可以将一些相关的Logger组合为一个日志组,以便同时对它们进行配置。
21# 将tomcat所有顶级Logger配置到tomcat日志组2logging.group.tomcat=org.apache.catalina, org.apache.coyote, org.apache.tomcat定义后,您可以使用一行配置更改该组中所有Logger的级别:
11logging.level.tomcat=TRACE为了方便web和sql相关日志的配置,SpringBoot内置了一些日志组:
| Name | Loggers |
|---|---|
| web | org.springframework.core.codec , org.springframework.http , org.springframework.web |
| sql | org.springframework.jdbc.core , org.hibernate.SQL |
2) 颜色编码的输出
如果终端支持ANSI彩色输出的相关标准,可以通过spring.output.ansi.enabled属性来设置其行为,可选的值有:DETECT(自动检测,默认值)、ALWAYS、NEVER。
在日志中,可以通过使用%clr转换字来配置颜色编码。转换器以最简单的形式根据对数级别为输出着色,如:%clr(%5p)。
下表描述了日志级别到颜色的对应关系:
| Level | Color |
|---|---|
FATAL | Red |
ERROR | Red |
WARN | Yellow |
INFO | Green |
DEBUG | Green |
TRACE | Green |
如果需要对某段文本进行特殊的修改,可以使用如下形式:%clr(%d{yyyy-MM-dd HH:mm:ss.SSS}){yellow},支持的颜色还有:red、blue、green、yellow、cyan、faint和magenta。
第三节 整合JDBC
1. 基本整合案例
首先导入整合 JDBC 的依赖:
121<!-- Spring Boot JDBC 启动器 -->2<dependency>3    <groupId>org.springframework.boot</groupId>4    <artifactId>spring-boot-starter-jdbc</artifactId>5</dependency>6
7<!-- MySql JDBC驱动 -->8<dependency>9 <groupId>mysql</groupId>10 <artifactId>mysql-connector-java</artifactId>11 <version>5.1.47</version>12</dependency>再使用spring.datasource.*前缀配置一个数据源:
81# 通用配置2spring.datasource.driver-class-name=com.mysql.jdbc.Driver3spring.datasource.url=jdbc:mysql://localhost/test4spring.datasource.username=dbuser5spring.datasource.password=dbpass6
7# hikari数据源的个性化配置(其它数据源类似)8spring.datasource.hikari.* = xxxxxSpringBoot会依次查找类路径下的HikariCP、Tomcat PooledDataSource、Commons DBCP2作为数据源实现,你也可以使用spring.datasource.type属性来显式指定。
注意:
如果使用 spring-boot-starter-jdbc 或spring-boot-starter-data-jpa启动器,则会自动获得
HikariCP的依赖项。通常不需要指定driver-class-name,因为Spring Boot可以从url推导大多数数据库。
如果未配置spring.datasource.url属性,则Spring Boot会尝试自动配置嵌入式数据库。
有关更多受支持的选项,请参见
DataSourceProperties。
可以在启动类加上@EnableTransactionManagement注解,开启声明式事务控制,之后就可以通过@Transactional(rollbackFor =Exception.class)开事务控制了。
71public class SpringBootJdbcApplication {4 public static void main(String[] args) {5 SpringApplication.run(SpringBootJdbcApplication.class, args);6 }7}注意:
该注解不是必须加的,在自动配置类
TransactionAutoConfiguration中会默认开启声明式事务。
此外,SpringBoot会自动查找数据源来配置JdbcTemplate和NamedParameterJdbcTemplate,可以直接在代码中注入使用。
91public class MyBean {3 private final JdbcTemplate jdbcTemplate;4
5 6 public MyBean(JdbcTemplate jdbcTemplate) {7 this.jdbcTemplate = jdbcTemplate;8 }9}注意:
当容器中仅存在一个DataSource时(或存在主候选对象),才会配置JdbcTemplate。
当容器中仅存在一个JdbcTemplate时(或存在主候选对象),才会配置NamedParameterJdbcTemplate。
您可以使用spring.jdbc.template.*来自定义模板的某些属性,如以下示例所示,其它属性可参考JdbcProperties.Template属性类。
11spring.jdbc.template.max-rows=500
2. 通过Bean方法创建数据源
如果需要自定义数据源(DataSource),可以手动创建一个DataSource实现,然后注入到容器中即可,Spring会在任何需要的地方使用它(包括数据库初始化时)。
51(prefix="app.datasource")3public DataSource dataSource() {4 return new FancyDataSource();5}和其它常规Bean一样,可以通过@ConfigurationProperties注解或其它方式来进行外部化配置。
71# 数据源配置(驱动类会根据URL自动解析)2# app.datasource.jdbc-url=jdbc:mysql://localhost/test Hikari数据源的URL属性key为jdbc-url3app.datasource.url=jdbc:h2:mem:mydb4app.datasource.username=dbuser5app.datasource.password=dbpass6app.datasource.maximum-pool-size=307app.datasource.first.configuration.maximum-pool-size=30 # Hikari数据源的特殊属性
此外,自定义数据源也可以通过Spring提供的DataSourceBuilder工具类创建。
131// 一般数据源2("app.datasource")4public DataSource dataSource() {5 return DataSourceBuilder.create().build();6}7
8// 针对Hikari数据源9("app.datasource")11public HikariDataSource dataSource() {12 return DataSourceBuilder.create().type(HikariDataSource.class).build();13}或可以直接通过DataSourceProperties映射来创建:
151// 数据源的属性(通用属性,兼容Hikari数据源)2("app.datasource")5public DataSourceProperties dataSourceProperties() {6 return new DataSourceProperties();7}8
9// 创建数据源,并从app.datasource.configuration中注入自定义属性10("app.datasource.configuration")12public HikariDataSource dataSource(DataSourceProperties properties) {13 return properties.initializeDataSourceBuilder().type(HikariDataSource.class)14 .build();15}
3. 配置多个数据源
可以使用同样的方式配置两个数据源,但必须将其中一个标记为@Primary,以便其它地方能够通过类型来获取数据源实例。
231// 第一个数据源的属性2("app.datasource.first")5public DataSourceProperties firstDataSourceProperties() {6 return new DataSourceProperties();7}8
9// 创建第一个数据源(Hikari类型),同时注入一些特定于数据源的配置,并作为主数据源10 11("app.datasource.first.configuration")13public HikariDataSource firstDataSource() {14 return firstDataSourceProperties().initializeDataSourceBuilder()15 .type(HikariDataSource.class).build();16}17
18// 创建第二个数据源,从数据源19("app.datasource.second")21public BasicDataSource secondDataSource() {22 return DataSourceBuilder.create().type(BasicDataSource.class).build();23}下面是一个外部化配置的示例:
121# 配置第一个数据源2app.datasource.first.url=jdbc:mysql://localhost/first3app.datasource.first.username=dbuser4app.datasource.first.password=dbpass5# Hikari数据源的特殊属性6app.datasource.first.configuration.maximum-pool-size=30 7
8# 配置第二个数据源9app.datasource.second.url=jdbc:mysql://localhost/second10app.datasource.second.username=dbuser11app.datasource.second.password=dbpass12app.datasource.second.max-total=30
4. 其它数据源相关操作
1) 使用JNDI数据源
如果您将Spring Boot应用程序部署到应用服务器(如Jboss),则可能需要使用其内置功能来配置和管理数据源,并使用JNDI对其进行访问。
spring.datasource.jndi-name属性可以替代spring.datasource.url,spring.datasource.username和spring.datasource.password属性,以从特定的 JNDI 位置访问DataSource。
例如,application.properties中的以下部分显示了如何访问JBoss定义的DataSource:
11spring.datasource.jndi-name=java:jboss/datasources/customers
2) 使用嵌入式数据库
SpringBoot可以自动配置嵌入式H2,HSQL和Derby数据库,且只需要引入对应依赖即可(无需连接URL、用户名、密码)。
51<dependency>2 <groupId>org.hsqldb</groupId>3 <artifactId>hsqldb</artifactId>4 <scope>runtime</scope>5</dependency>注意:
设置spring.datasource.generate-unique-name属性为true,可以确保测试所使用的每个上下文都有一个单独的嵌入式数据库。
spring-boot-starter-data-jpa启动器仅是将嵌入式数据库暂时拉入,你需要spring-jdbc才能自动配置。
如果自定义嵌入式数据库的连接URL,请确保禁用了数据库的自动关闭功能,而由Spring来进行控制何时关闭。
3) 数据源初始化
SpringBoot在启动时自动加载CLASSPATH根路径下的schema.sql和data.sql文件,使用默认数据源初始化数据库。
如果设置了spring.datasource.platform属性(如hsqldb、h2、oracle、mysql、postgresql等),则会加载对应平台的初始化文件,如schema-mysql.sql和data-mysql.sql等。
注意:
默认情况下,如果初始化错误,则程序将无法启动,你可以通过spring.datasource.continue-on-error属性来修改它。
第四节 整合NoSQL
1. 整合Redis
Redis提供了丰富的键值缓存和消息代理等功能,SpringBoot为其Lettuce和Jedis客户端提供了基本的自动配置,只需引入spring-boot-starter-data-redis启动器即可。
171<dependency>2 <!--引入Redis场景启动器-->3 <groupId>org.springframework.boot</groupId>4 <artifactId>spring-boot-starter-data-redis</artifactId>5 <exclusions>6 <!--排除lettuce客户端-->7 <exclusion>8 <groupId>io.lettuce</groupId>9 <artifactId>lettuce-core</artifactId>10 </exclusion>11 </exclusions>12</dependency>13<!--使用Jedis客户端-->14<dependency>15 <groupId>redis.clients</groupId>16 <artifactId>jedis</artifactId>17</dependency>需要使用时直接注入RedisConnectionFactory或StringRedisTemplate等类型的示例即可。如果需要自定义一些高级配置,可以分别实现JedisClientConfigurationBuilderCustomizer或LettuceClientConfigurationBuilderCustomizer接口。
91public class MyBean {3 private StringRedisTemplate template;4
5 6 public MyBean(StringRedisTemplate template) {7 this.template = template;8 }9}
第五节 整合Junit
1. SpringBootTest简介
SpringBootTest将spring-test与Junit、Mockito等主流测试框架进行了整合及自动配置,并提供了一系列的切片测试注解,简化了SpringBoot程序的测试。
2. 整合案例
1) 引入启动器
161<!--SpringBootTest启动器,在低版本自动引入Junit5,高版本自动引入Junit5,版本号由SpringBoot父工程版本决定-->2<dependency>3    <groupId>org.springframework.boot</groupId>4    <artifactId>spring-boot-starter-test</artifactId>5    <scope>test</scope>6</dependency>7
8<!-- Junit4依赖(仅在高版本SpringBootTest中使用Junit4时需要) -->9<!--        10<dependency>11    <groupId>junit</groupId>12    <artifactId>junit</artifactId>13    <version>4.12</version>14    <scope>test</scope>15</dependency>16-->
2) 编写业务类
61public class UserService {3 public void doService() {4 System.out.println("-------- Service --------");5 }6}
3) 编写测试类
111(SpringRunner.class) // 整合Junit4(如果使用Junit5,可以省略@ExtendWith)2(classes = MyApplication.class) // 引入上下文配置,类似于@ContextConfiguration3public class UserServiceTest {4 5 private UserService userService;6
7 8 public void test01() {9 userService.doService();10 }11}
3. 其它注解参考
针对特定场景的测试,只需要加载相对应的Bean即可,SpringBootTest为此提供了许多基于特定场景的测试配置注解,如@JdbcTest、@JsonTest、@DataRedistest、@WebMvcTest等。
第六节 整合SpringMVC
1. 基本整合案例
引入场景启动器
spring-boot-starter-web即可完成 Spring MVC 的基本整合。默认使用
ServletWebServerApplicationContext作为上下文实现类,它会查找ServletWebServerFactory进行引导启动。常见 Servlet 容器的实现类为:TomcatServletWebServerFactory、JettyServletWebServerFactory、UndertowServletWebServerFactory。
注意:
整合案例的详细步骤请参考“入门案例”章节!
2. 配置MVC组件
1) 配置DispatcherServlet
DispatcherServlet组件将会被自动配置,默认Servlet上下文根路径为/,可通过spring.mvc.servlet.path=/acme属性进行修改。
注意:
如果特别需要,也可以定义自己的DispatcherServlet,但是必须提供
DispatcherServletPath指明Servlet上下文根路径。
2) 配置ViewResolver
SpringBoot将会视情况对如下一些视图解析器进行自动配置:
ContentNegotiatingViewResolver:主视图解析器,也叫内容协商视图解析器,Bean名称为
viewResolver,仅当存在其它视图解析器时才会被创建,其参考Accept请求头来委派给其它视图解析器。
InternalResourceViewResolver:默认视图解析器,Bean名称为
defaultViewResolver,可以用来解析静态资源和JSP页面等,常用的配置有spring.mvc.view.prefix和spring.mvc.view.suffix,默认都为空。
BeanNameViewResolver:
beanNameViewResolver,主要在视图解析器链中使用,用于拾取与要解析的View同名的所有Bean。
ThymeleafViewResolver:Thymeleaf视图解析器,Bean名称为
thymeleafViewResolver,常用的配置有spring.thymeleaf.prefix 和 spring.thymeleaf.suffix,默认值分别为classpath:/templates/和.html。
FreeMarkerViewResolver:FreeMarker视图解析器,Bean名称为
freeMarkerViewResolver,常用的配置有spring.freemarker. templateLoaderPath、spring.freemarker.prefix和spring.freemarker.suffix,默认值分别为classpath:/templates/、空和.ftl。
GroovyMarkupViewResolver:Groovy模板解析器,Bean名称为groovyMarkupViewResolver,常用的配置有spring.groovy.template.prefix和spring.groovy.template.suffix,默认值分别为
classpath:/templates/和.tpl。
注意:
有关视图解析器配置的更多信息,可参考WebMvcAutoConfiguration、ThymeleafAutoConfiguration等自动配置类。
3) 配置HttpMessageConverter
HttpMessageConverter用来转换HTTP请求和响应,如将对象自动转换为JSON等,注册方式如下:
直接添加
HttpMessageConverter到容器,SpringBoot将会自动拾取向SpringMVC注册,并覆盖同名的默认配置。也可以通过
HttpMessageConverters同时添加多个HttpMessageConverter到容器。
91public class MyConfiguration {3 4 public HttpMessageConverters customConverters(){5 HttpMessageConverter<?> additional = ...6 HttpMessageConverter<?> another = ...7 return new HttpMessageConverters(additional, another);8 }9}继承WebMvcConfigurer,覆盖其
configureMessageConverters或extendMessageConverters方法。
121public class MyMessageConverterConfig {3 4 public WebMvcConfigurer webMvcConfigurer(){5 return new WebMvcConfigurer() {6 7 public void extendMessageConverters(List<HttpMessageConverter<?>> converters) {8 converters.add(new MyHttpMessageConverter());9 }10 };11 }12}
4) 配置MessageCodesResolver
MessageCodesResolver是一个从绑定错误中生成错误码的策略,用于渲染错误信息。如果您设置了spring.mvc.message-codes-resolver.format属性值为 PREFIX_ERROR_CODE或POSTFIX_ERROR_CODE,Spring Boot将为你创建该策略。
5) 配置ConfigurableWebBindingInitializer
Spring MVC使用WebBindingInitializer来为特定请求初始化WebDataBinder,如果容器中存在自定义的ConfigurableWebBindingInitializer,那么SpringBoot将会优先使用它。
6) 配置Formatter和Converter
7) 配置RequestMappingHandlerMapping
如果希望提供RequestMappingHandlerMapping、RequestMappingHandlerAdapter或ExceptionHandlerExceptionResolver的自定义实例,则可以声明WebMvcRegistrationsAdapter实例以提供此类组件。
9) 关闭MVC默认配置
可以在配置类上添加@EnableWebMvc注解,关闭所有默认的MVC配置。
3. 静态资源处理
1) 静态资源路径
SpringBoot默认从ClassPath中的/static、/public、/resources、/META-INF/resources四个目录查找静态资源,可以通过spring.resources.static-locations属性来进行覆盖。
11spring.static-locations=[classpath:/haha/]此外,Servlet上下文路径/始终将会被当为静态资源路径。
注意:
静态资源使用
ResourceHttpRequestHandler拦截处理,可以重写WebMvcConfigurer.addResourceHandlers方法来修改。如果您的应用程序要包成 jar,请不要使用src/main/webapp目录。虽然此目录是一个通用标准,但它只适用于war打包,如果生成的是一个jar,它将被绝大多数的构建工具所忽略。
2) 静态资源前缀
默认情况下,请求进来会优先被Controller处理,如果非Controller请求,则会被映射到静态资源处理器,其默认前缀为/**,该前缀可以通过spring.mvc.static-path-pattern属性修改:
11spring.mvc.static-path-pattern=/resources/**
3) 欢迎页和页签图标
Spring Boot 会查找静态资源路径下的index.html 文件或 index 模板,如果找到任何一个,则会用作应用程序的欢迎界面。
同理,也会查找静态路径下的favicon.ico文件,用作程序的页签图标。额外的,如果图标未找到,还会再去查找类路径根目录/。
注意:
修改静态资源前缀后可能导致欢迎页和页面图标失效。
4) webjars
Webjars是一种通过Jar包的形式提供前端资源的协议,SpringBoot默认开启对其的支持。如下引入了jquery的Jar包形式,就可以通过http://localhost:8080/webjars/jquery/3.5.1/jquery.js进行访问。
51<dependency>2 <groupId>org.webjars</groupId>3 <artifactId>jquery</artifactId>4 <version>3.5.1</version>5</dependency>提示:
更多webjar可以访问https://www.webjars.org/。
5) 静态资源其它配置
SpringBoot还支持SpringMVC提供的高级资源处理功能,例如静态资源缓存清除或者Webjar的版本无关URL(URL地址自动添加版本号)。
缓存清除可以通过以下属性配置,它实际是为资源URL添加了一个内容哈希,例如<link href="/css/spring-2a2d595e6ed9a0b24f027f2b63b134d6.css"/>。
21spring.resources.chain.strategy.content.enabled=true2spring.resources.chain.strategy.content.paths=/**
4. 错误页面处理
1) 默认错误响应
SpringBoot提供了一个/error映射,用来处理所有的错误响应,并且在servlet容器中注册为"全局"的错误页面。
对于浏览器客户端,返回一个
whitelabel错误视图,渲染HTTP状态、异常消息等错误信息。如果是非浏览器客户端,则将生成类似的JSON响应。
你可以通过定义ErrorController(BasicErrorController)或ErrorAttributes来修改此默认行为,或使用常规的SpringMVC功能处理,例如@ExceptionHandler和@ControllerAdvice。
3) 自定义错误页面
如需修改状态码所对应的错误页面,可在静态资源目录(/public)或模板目录(/templates)下的error文件夹中设置,文件名为对应的状态码或系列掩码。
141src2 +- main3 +- java4 | + <source code>5 +- resources6 +- public7 | +- error8 | | +- 404.html9 | +- <other public assets>10 +- templates11 +- error12 | +- 5xx.ftl13 +- <other templates>14
如果需要更复杂的状态码-错误页面映射,可以实现ErrorViewResolver接口:
71public class MyErrorViewResolver implements ErrorViewResolver {2 3 public ModelAndView resolveErrorView(HttpServletRequest request, HttpStatus status, Map<String, Object> model) {4 // Use the request or status to optionally return a ModelAndView5 return ...6 }7}
5. 文件上传
1) 上传案例
前端
前端表单必须为multipart/form-data类型。
41<form action="/upload" method="post" enctype="multipart/form-data">2 <input type="file" name="file" /><br/>3 <input type="submit" name="" id="" value="提交" />4</form>
控制器
SpringBoot在SpringMVC的基础上进一步简化了文件上传,将上传的文件抽象为一个MultipartFile对象。
351 /**2 * 文件保存在服务器,url地址保存在数据库3 * 上传成功之后返回成功保存的url地址4 */5("/upload")6public String upload( MultipartFile file, HttpServletRequest request){7 if(!file.isEmpty()){8 String uploadPath = "C:\\uploadFile";9 // 如果目录不存在则创建10 File uploadDir = new File(uploadPath);11 if (!uploadDir.exists()) {12 uploadDir.mkdir();13 }14 String OriginalFilename = file.getOriginalFilename();//获取原文件名15 String suffixName = OriginalFilename.substring(OriginalFilename.lastIndexOf("."));//获取文件后缀名16 //重新随机生成名字17 String filename = UUID.randomUUID().toString() +suffixName;18 File localFile = new File(uploadPath+"\\"+filename);19 try {20 file.transferTo(localFile); //把上传的文件保存至本地21 /**22 * 这里应该把filename保存到数据库,供前端访问时使用23 */24 return filename;//上传成功,返回保存的文件地址25 }catch (IOException e){26 e.printStackTrace();27 System.out.println("上传失败");28 return "";29 }30 }else{31 System.out.println("文件为空");32 return "";33 }34}35
2) 相关配置
可以使用spring.servlet.multipart前缀的属性来进行文件上传配置,更多信息可参考MultipartProperties类。
51#设置单个文件大小2spring.servlet.multipart.max-file-size= 100MB3
4#设置单次请求文件的总大小5spring.servlet.multipart.max-request-size= 100MB
6. Json转换
SpringBoot默认使用Jackson来进行序列化和反序列化JSON数据,可以通过如下方式修改其默认行为。
1) 配置Jackson2ObjectMapperBuilder
Jackson2ObjectMapperBuilder用于创建ObjectMapper 对象,可通过如下一些属性对其进行配置:
231# 序列化时忽略null值字段2spring.jackson.serialization.inclusion=NON_NULL3
4# 日期以字符串形式输出,而非时间戳5spring.jackson.serialization.write-dates-as-timestamps=false6
7# 反序列化时忽略JSON中未知的属性8spring.jackson.deserialization.fail-on-unknown-properties=false9
10# 设置日期格式11spring.jackson.date-format=yyyy-MM-dd HH:mm:ss12
13# 设置时区14spring.jackson.time-zone=Asia/Shanghai15
16# 设置属性命名策略为蛇形命名法17spring.jackson.property-naming-strategy=SNAKE_CASE18
19# 设置国际化语言环境20spring.jackson.locale=zh_CN21
22# 格式化输出JSON23spring.jackson.indent-output=true
或通过 Java 代码实现Jackson2ObjectMapperBuilderCustomizer对其进行配置:
51public Jackson2ObjectMapperBuilderCustomizer jsonCustomizer() {3 return builder -> builder.serializationInclusion(JsonInclude.Include.NON_NULL)4 .serializers(LOCAL_DATETIME_SERIALIZER);5}或注册自定义的Jackson2ObjectMapperBuilder来替代它:
161public class JacksonConfig {3
4 5 public Jackson2ObjectMapperBuilder jackson2ObjectMapperBuilder() {6 return new Jackson2ObjectMapperBuilder()7 .serializationInclusion(JsonInclude.Include.NON_NULL) // 忽略null值字段8 .featuresToDisable(SerializationFeature.WRITE_DATES_AS_TIMESTAMPS) // 日期以字符串形式输出9 .dateFormat(new SimpleDateFormat("yyyy-MM-dd HH:mm:ss")) // 设置日期格式10 .timeZone(TimeZone.getTimeZone("Asia/Shanghai")) // 设置时区11 .modules(new JavaTimeModule()) // 注册Java 8时间日期模块12 .propertyNamingStrategy(PropertyNamingStrategy.SNAKE_CASE) // 设置属性命名策略13 .serializerByType(MyClass.class, new CustomSerializer()) // 自定义序列化器14 .deserializerByType(MyClass.class, new CustomDeserializer()); // 自定义反序列化器15 }16}
2) 配置ObjectMapper
默认情况下,SpringBoot创建的 ObjectMapper 将默认禁用如下一些选项:
MapperFeature.DEFAULT_VIEW_INCLUSION
DeserializationFeature.FAIL_ON_UNKNOWN_PROPERTIES
SerializationFeature.WRITE_DATES_AS_TIMESTAMPS
可以通过@Primary注解,定义一个注入优先级更高ObjectMapper实例来替换它:
91public ObjectMapper objectMapper() {4 JavaTimeModule module = new JavaTimeModule();5 module.addSerializer(LOCAL_DATETIME_SERIALIZER);6 return new ObjectMapper()7 .setSerializationInclusion(JsonInclude.Include.NON_NULL)8 .registerModule(module);9}或注册自定义的MappingJackson2HttpMessageConverter,在其中手动创建ObjectMapper对象:
341// 创建自定义的MappingJackson2HttpMessageConverter2public class CustomMappingJackson2HttpMessageConverter extends MappingJackson2HttpMessageConverter {4
5 public CustomMappingJackson2HttpMessageConverter() {6 // 创建自定义的ObjectMapper7 ObjectMapper objectMapper = new ObjectMapper();8
9 // 配置ObjectMapper10 objectMapper.registerModule(new JavaTimeModule()); // 支持Java 8时间日期类型11 objectMapper.disable(SerializationFeature.WRITE_DATES_AS_TIMESTAMPS); // 以字符串形式输出日期12 objectMapper.configure(com.fasterxml.jackson.core.JsonParser.Feature.ALLOW_UNQUOTED_FIELD_NAMES, true); // 允许未加引号的字段名13
14 // 添加自定义的序列化器和反序列化器15 objectMapper.getSerializerProvider().setNullValueSerializer(new CustomNullSerializer()); // 自定义null值序列化器16 objectMapper.getDeserializationContext().addDeserializers(new CustomDeserializers()); // 自定义反序列化器17
18 // 将自定义的ObjectMapper设置到HttpMessageConverter中19 this.setObjectMapper(objectMapper);20 }21}22
23// 注册自定义的MappingJackson2HttpMessageConverter24public class WebConfig implements WebMvcRegistrations {26
27 28 public List<HttpMessageConverter<?>> getMessageConverters() {29 // 创建自定义的HttpMessageConverter列表30 List<HttpMessageConverter<?>> messageConverters = new ArrayList<>();31 messageConverters.add(new CustomMappingJackson2HttpMessageConverter());32 return messageConverters;33 }34}
3) 注册JsonSerializer/JsonDeserializer
JsonSerializer和JsonDeserializer用来自定义某些类的序列化和反序列化逻辑,可通过@JsonComponent注解进行注册:
201// 自定义 MyClass 的序列化逻辑2public class CustomSerializer extends JsonSerializer<MyClass> {4 5 public void serialize(MyClass value, JsonGenerator gen, SerializerProvider serializers) throws IOException {6 gen.writeStartObject();7 gen.writeStringField("customField", value.getSomeField());8 gen.writeEndObject();9 }10}11
12// 自定义 MyClass 的反序列化逻辑13public class CustomDeserializer extends JsonDeserializer<MyClass> {14 15 public MyClass deserialize(JsonParser jsonParser, DeserializationContext deserializationContext) throws IOException, JsonProcessingException {16 // 自定义反序列化逻辑17 return new MyClass(jsonParser.getText());18 }19}20
此外,Spring Boot还提供了JsonObjectSerializer和JsonObjectDeserializer用于简化上述自定义序列化和反序列化的代码:
241public class MyJsonComponent {3
4 // 自定义序列化器5 public static class Serializer extends JsonObjectSerializer<MyObject> {6
7 8 protected void serializeObject(MyObject value, JsonGenerator jgen, SerializerProvider provider) throws IOException {9 jgen.writeStringField("name", value.getName());10 jgen.writeNumberField("age", value.getAge());11 }12 }13 14 // 自定义反序列化器15 public static class Deserializer extends JsonObjectDeserializer<MyObject> {16
17 18 protected MyObject deserializeObject(JsonParser jsonParser, DeserializationContext context, ObjectCodec codec, JsonNode tree) throws IOException {19 String name = nullSafeValue(tree.get("name"), String.class);20 int age = nullSafeValue(tree.get("age"), Integer.class);21 return new MyObject(name, age);22 }23 }24}
4) Jackson注解
461import com.fasterxml.jackson.annotation.*;2
3import java.util.Date;4
5({"id", "name", "age"}) // 控制字段的序列化顺序6public class User {7 8 // 指定类的构造函数或工厂方法用于反序列化9 10 public MyClass(("name") String name) {}11 12 // 指定字段的 JSON 属性名称13 ("user_id")14 private int id;15
16 // 控制字段是否被序列化,例如忽略 null 值或空值17 (JsonInclude.Include.NON_NULL)18 private String name;19
20 // 忽略字段,使其不参与序列化和反序列化21 22 private String password;23
24 // 格式化日期或时间字段25 (shape = JsonFormat.Shape.STRING, pattern = "yyyy-MM-dd")26 private Date birthDate;27
28 // 为字段指定自定义的序列化器/反序列化器29 (using = CustomSerializer.class)30 (using = CustomDeserializer.class)31 private String customField;32
33 // 基于视图类控制字段的序列化34 (View.Summary.class)35 private String summary;36
37 // 将字段值作为原始 JSON 字符串输出,不进行序列化处理38 39 private String rawJson;40
41 // 为字段指定多个别名,支持反序列化时的别名匹配42 ({"oldName", "alternateName"})43 private String aliasField;44
45 // Getters and Setters46}
7. 原生Servlet组件
1) 向Web容器注册
如果需要向Servlet容器注册原生Servlet、Filter和Listener等组件,可以使用下面两种方式:
从容器中查找:SpringBoot自动扫描容器中的原生Servlet组件,并向Web服务器进行注册(默认的dispatcherType为REQUEST)。
从Classpath扫描:在
@Configuration类上添加@ServletComponentScan注解来扫描指定包下带@WebServlet、@WebFilter或@WebListener注解的Servlet组件,默认扫描当前包。
注意:
如果是Servlet或Filter组件,还可以借助
FilterRegistrationBean或ServletRegistrationBean来注册和设置。@ServletComponentScan在独立容器中无效,而是使用该容器的内置发现机制。
如果依赖了DataSource等其它配置,最好是在初次使用时才进行初始化。
2) 映射规则
默认情况下,如果上下文仅包含一个Servlet,那么将会映射到/,如果有多个Servlet,那么将会使用其Bean名称作为路径前缀。
对于过滤器,将会始终映射到/*。SpringBoot为多种场景所使用的过滤器做了自动配置,下面是一个清单:
| Servlet Filter | Order |
|---|---|
| OrderedCharacterEncodingFilter | Ordered.HIGHEST_PRECEDENC |
| WebMvcMetricsFilter | Ordered.HIGHEST_PRECEDENCE + 1 |
| ErrorPageFilter | Ordered.HIGHEST_PRECEDENCE + 1 |
| HttpTraceFilter | Ordered.LOWEST_PRECEDENCE - 10 |
注意:
这些映射规则可以通过ServletRegistrationBean、FilterRegistrationBean和ServletListenerRegistrationBean来完全控制。
3) 禁止注册
如果不想容器中的某个组件向Web服务器注册,则必须显式声明禁止注册。
61public FilterRegistrationBean registration(MyFilter filter) {3 FilterRegistrationBean registration = new FilterRegistrationBean(filter);4 registration.setEnabled(false);5 return registration;6}
8. 其它自动配置
1) CROS配置
跨域资源共享(Cross-origin resource sharing,CORS)是大多数浏览器实现的一个W3C规范,其可允许您以灵活的方式指定何种跨域请求可以被授权,而不是使用一些不太安全和不太强大的方式(比如IFRAME或者JSONP)。
可在控制器方法上使用@CrossOrigin注解使当前资源支持CORS:
101("/api")3public class MyController {4
5 ("/example")6 (origins = "http://example.com", maxAge = 3600)7 public String example() {8 return "Hello, CORS!";9 }10}或通过重写WebMvcConfigurer的addCorsMappings(CorsRegistry)方法来定义全局CORS配置:
141public class WebConfig implements WebMvcConfigurer {3
4 5 public void addCorsMappings(CorsRegistry registry) {6 registry.addMapping("/**") // 允许所有路径7 .allowedOrigins("http://example.com") // 允许的来源8 .allowedMethods("GET", "POST", "PUT", "DELETE") // 允许的HTTP方法9 .allowedHeaders("*") // 允许的请求头10 .exposedHeaders("Authorization") // 暴露的响应头11 .allowCredentials(true) // 是否允许发送Cookie12 .maxAge(3600); // 预检请求的结果可以被缓存的时间(秒)13 }14}
2) 模板引擎
SpringBoot为FreeMarker、Thymeleaf、Groovy、Mustache、JSP等模板技术提供了自动配置(对应的视图解析器等),默认从src/main/resources/templates目录查找模板文件。
注意:
尽量不要使用JSP作为SpringBoot的模板引擎,它和嵌入式容器一起使用时会有一些问题。
3) 内容协商
SpringMVC 通过解析请求路径将请求映射到不同的控制器方法,但 SpringBoot 默认禁用了其后缀模式匹配。
这意味着GET /projects/spring-boot.json之类的请求将不会与@GetMapping("/projects/spring-boot")所注解的方法相匹配,因为如今基于Accept请求头的内容协商已变得非常可靠。
除此之外,你也可以通过URL参数的形式附带内容信息,如GET /projects/spring-boot?format=json,开启该功能的配置如下:
61# 开启使用URL参数进行内容协商2spring.mvc.contentnegotiation.favor-parameter=true3
4# URL参数名默认为format,可以通过下面属性修改:5spring.mvc.contentnegotiation.parameter-name=myparam6
如果你了解所有注意事项后,仍然希望开启后缀模式匹配,可以使用下面配置:
121# 方式一:开启所有后缀模式匹配2spring.mvc.contentnegotiation.favor-path-extension=true3spring.mvc.pathmatch.use-suffix-pattern=true4
5# 方式二:仅开启手动注册的后缀模式匹配6spring.mvc.contentnegotiation.favor-path-extension=true7spring.mvc.pathmatch.use-registered-suffix-pattern=true8
9# 手动注册后缀类型如下:10spring.mvc.contentnegotiation.media-types.adoc=text/asciidoc11spring.mvc.contentnegotiation.media-types.markdown=text/markdown12
4) RestTemplate
可通过注入RestTemplateBuilder来快速创建RestTemplate实例,并对其进行必要的配置:
151public class MyService {3 private final RestTemplate restTemplate;4
5 6 public MyService(RestTemplateBuilder builder) {7 // 创建一个RestTemplate实例,并添加BASIC身份验证支持8 this.restTemplate = builder.basicAuthentication("user", "password").build()9 }10
11 public Details someRestCall(String name) {12 return this.restTemplate.getForObject("/{name}/details", Details.class, name);13 }14
15}可以实现RestTemplateCustomizer接口,对RestTemplateBuilder创建的RestTemplate进行统一配置:
191// 为除192.168.0.5之外的所有主机配置代理2static class ProxyCustomizer implements RestTemplateCustomizer {3 4 public void customize(RestTemplate restTemplate) {5 HttpHost proxy = new HttpHost("proxy.example.com");6 HttpClient httpClient = HttpClientBuilder.create().setRoutePlanner(7 new DefaultProxyRoutePlanner(proxy) {8 9 public HttpHost determineProxy(HttpHost target, HttpRequest request, HttpContext context) throws HttpException {10 if (target.getHostName().equals("192.168.0.5")) {11 return null;12 }13 return super.determineProxy(target, request, context);14 }15
16 }).build();17 restTemplate.setRequestFactory(new HttpComponentsClientHttpRequestFactory(httpClient));18 }19}注意:
你也可以创建自己的RestTemplateBuilder来实现更多配置,但此时RestTemplateCustomizer将不会被自动注册。
第七节 整合消息队列
1. JMS(ActiveMQ)
2. AMQP(RabbitMQ)
3. Kafka
第八节 其它技术整合
1. 整合JSON
Spring提供了三个JSON库的默认配置:Jackson(默认)、Gson、JSON-B,当类路径下存在对应的Jar包时,将会开启使用。
2. 整合异步任务
SpringBoot中通过@EnableAsync注解开启异步任务支持:
81 // 开启异步任务支持3public class MyApplication {4 public static void main(String[] args) {5 SpringApplication springApplication = new SpringApplication(MyApplication.class);6 ConfigurableApplicationContext context = springApplication.run(args);7 }8}通过@Async注解标记方法为异步方法:
131public class AsyncService {3
4 5 public void doHello() {6 try {7 Thread.sleep(3000);8 } catch (InterruptedException e) {9 e.printStackTrace();10 }11 System.out.println("doHello...");12 }13}当该方法被 Spring 创建的代理类对象调用时,就会异步执行。
3. 整合定时任务
4. 整合邮件
第04章_SpringBoot扩展
第一节 SpringBoot Actuator
1. Actuator简介
1) Actuator和EndPoint
SpringBoot Actuator可以方便的监视和管理你的生产应用程序,并自动配置审计、运行状况、Metrics收集等。
71<!--引入spring-boot-starter-actuator启动器,开启生产监视功能-->2<dependencies>3 <dependency>4 <groupId>org.springframework.boot</groupId>5 <artifactId>spring-boot-starter-actuator</artifactId>6 </dependency>7</dependencies>EndPoint(端点)是 Actuator 与生产应用程序的交互点,常见端点如下:
| 端点ID | 说明 |
|---|---|
| auditevents | 公开当前应用程序的审核事件信息 |
| beans | 显示应用程序中所有SpringBean的完整列表 |
| caches | 公开可用的缓存 |
| conditions | 显示在配置和自动配置类上评估的条件以及它们匹配或不匹配的原因 |
| configprops | 显示所有@ConfigurationProperties的整理列表 |
| env | 从Spring的ConfigurableEnvironment公开属性 |
| flyway | 显示已应用的所有Flyway数据库迁移 |
health | 显示应用程序运行状况信息 |
| httptrace | 显示HTTP跟踪信息(默认情况下,最近100个HTTP请求-响应交换) |
info | 显示任意应用程序信息 |
| integrationgraph | 显示Spring Integration图 |
| loggers | 显示和修改应用程序中Logger的配置 |
| liquibase | 显示已应用的所有Liquibase数据库迁移 |
| metrics | 显示当前应用程序的“Metrics”信息 |
| mappings | 显示所有@RequestMapping路径的整理列表 |
| scheduledtasks | 显示应用程序中的计划任务。 |
| sessions | 允许从Spring Session支持的会话存储中检索和删除用户会话(不适用WebFlux)。 |
| shutdown | 使应用程序正常关闭 |
| threaddump | 执行线程转储 |
如果是Web应用程序(Spring MVC/Spring WebFlux/Jersey),则还提供以下附加端点:
| 端点ID | 说明 |
|---|---|
| heapdump | 返回一个hprof堆转储文件。 |
| jolokia | 通过HTTP公开JMX bean(当 Jolokia在Classpath上时,不适用于WebFlux)。 |
| logfile | 返回日志文件的内容(如果已设置logging.file或logging.path属性)。支持使用 HTTP Range Headers 来检索部分日志文件。 |
| prometheus | 以Prometheus服务器可以抓取的格式公开Metrics。 |
提示:
关于EndPoint的更多信息以及EndPoint的请求和响应格式,请参阅单独的API文档。
2) health端点简介
health端点公开了HealthIndicator收集的基本运行状况信息,监视软件一般通过它来判断系统是否发生故障,常见健康指示器如下:
| Name | Description |
|---|---|
| DiskSpaceHealthIndicator | 检查磁盘空间是否不足 |
| DataSourceHealthIndicator | 检查是否可以创建DataSource的连接 |
| ElasticsearchHealthIndicator | 检查Elasticsearch集群是否已启动 |
| MailHealthIndicator | 检查邮件服务器是否已启动 |
| MongoHealthIndicator | 检查Mongo数据库是否已启动 |
| RabbitHealthIndicator | 检查Rabbit服务器是否已启动 |
| RedisHealthIndicator | 检查Redis服务器是否启动 |
可通过如下一些属性进行配置:
301# 启用健康检查探针2management.endpoint.health.probes.enabled=true3
4# 启用存活状态(Liveness)健康检查5management.endpoint.health.livenessState.enabled=true6
7# 启用就绪状态(Readiness)健康检查8management.endpoint.health.readinessState.enabled=true9
10# 自定义健康状态到 HTTP 状态码的映射11management.endpoint.health.status.httpMapping.UP=20012management.endpoint.health.status.httpMapping.DOWN=50313
14# 定义健康检查分组15management.endpoint.health.group.readiness.include=livenessState,readinessState16
17# 自定义存活状态和就绪状态的健康状态18management.health.livenessState.status=UP19management.health.readinessState.status=UP20
21# 启用存活状态和就绪状态的探针22management.health.livenessState.probes.enabled=true23management.health.readinessState.probes.enabled=true24
25# 配置健康状态明细信息的展示策略26# 可选的值有never(默认值,始终不展示明细)、always(始终展示明细)、when-authorized(仅展示给授权角色)27management.endpoint.health.show-details=when-authorized28
29# 配置授权角色(如果为空(默认),则所有通过身份验证的角色都被视为已授权)30management.endpoint.health.roles=ADMIN,MONITOR
注意:
HealthAggregator会对所有HealthIndicator收集的运行状况信息由进行聚合,通过HealthIndicatorRegistry在运行时注册和注销健康指示器。可以通过
management.health.defaults.enabled属性将上述指示器全部禁用。
可以通过实现HealthIndicator接口来自定义健康指示器,标识符默认为不带HealthIndicator后缀的Bean名称。
211import org.springframework.boot.actuate.health.Health;2import org.springframework.boot.actuate.health.HealthIndicator;3import org.springframework.stereotype.Component;4
5// 自定义健康指示器,标识符为 my6public class MyHealthIndicator implements HealthIndicator {8
9 10 public Health health() {11 // 自定义检查12 int errorCode = check(); 13 if (errorCode != 0) {14 // 检查失败15 return Health.down().withDetail("Error Code", errorCode).build();16 }17 18 // 检查OK19 return Health.up().build();20 }21}一般来说,都会为健康指示器的返回值设置健康状态,内置的健康状态有如下一些:
| Status | Mapping |
|---|---|
| DOWN | SERVICE_UNAVAILABLE(503) |
| OUT_OF_SERVICE | SERVICE_UNAVAILABLE(503) |
| UP | 默认情况下没有Map,http 状态为 200 |
| UNKNOWN | 默认情况下没有Map,http 状态为 200 |
注意:
如需自定义其它健康状态(如FATAL)或修改HTTP响应状态码,可使用HealthStatusHttpMapper类。
3) info端点简介
info端点公开了程序上下文中InfoContributor所收集的各种信息,常见的信息贡献者如下:
| Name | Description |
|---|---|
| EnvironmentInfoContributor | 公开Environment中的任何key |
| GitInfoContributor | 如果git.properties文件可用,则公开git信息git.branch/git.commit.id/git.commit.time |
| BuildInfoContributor | 如果META-INF/build-info.properties文件可用,则公开构建信息 |
可通过如下一些属性进行配置:
161# 确保info端点通过HTTP暴露2management.endpoints.web.exposure.include=info3
4# 启用默认的InfoContributor5management.info.defaults.enabled=true6
7# 修改info信息编码8info.app.encoding=UTF-89
10# 显示完整的Git信息11management.info.git.mode=full12
13# 添加自定义信息14info.app.name=MyApp15info.app.version=1.0.016info.app.description=This is my application.
注意:
可以通过
management.info.defaults.enabled属性将上述信息贡献者全部禁用。
可以通过实现InfoContributor接口来自定义信息贡献者。
141import java.util.Collections;2
3import org.springframework.boot.actuate.info.Info;4import org.springframework.boot.actuate.info.InfoContributor;5import org.springframework.stereotype.Component;6
7public class ExampleInfoContributor implements InfoContributor {9
10 11 public void contribute(Info.Builder builder) {12 builder.withDetail("example01", Collections.singletonMap("key01", "value01"));13 }14}如果到达info端点,则应该看到包含以下附加条目的响应:
51{2 "example01": {3 "key01" : "value01"4 }5}
4) loggers端点简介
loggers端点可以在运行时查看和配置应用程序的日志级别。
如通过/loggers路径查看所有的日志级别,通过/loggers/root路径查看root logger的日志级别信息。
41{2 "configuredLevel":"INFO",3 "effectiveLevel":"INFO"4}要修改为指定的日志级别,请使用POST方式并附带请求体参数,如下修改root logger的日志级别为DEBUG。
41/loggers/root2{3 "configuredLevel": "DEBUG"4}注意:
日志级别可以是TRACE、DEBUG、INFO、WARN、ERROR、FATAL、OFF、null(没有显式配置)等。
5) httptrace端点
httptrace端点将会跟踪最近100次请求-响应交换的基本信息,并存储到InMemoryHttpTraceRepository中,其基本配置可通过management.trace.http.include属性来调整。
如需进行高级的定义,请定义自己的HttpExchangeTracer、InMemoryHttpTraceRepository或HttpTraceRepository实现。
2. 启用和公开端点
1) 启用端点
默认情况下,除shutdown之外的所有端点都处于启用状态,如需启用或禁用某个端点,可以设置其enabled属性。
21# 启用shutdown端点2management.endpoint.shutdown.enabled=true如需批量设置,可以通过management.endpoints.enabled-by-default修改端点是否启用的默认值。
31# 禁用所有端点,再单独开启info端点2management.endpoints.enabled-by-default=false3management.endpoint.info.enabled=true注意:
禁用的端点将从应用程序中完全删除,如果您只想修改端点是否公开,请使用参考下一小节。
2) 公开端点
端点只有公开后才能被访问,如需公开或关闭某个端点,请使用下面特定于公开方式的include和exclude属性:
| 属性 | 默认值 | 说明 |
|---|---|---|
| management.endpoints.jmx.exposure.exclude | JMX方式关闭的端点 | |
| management.endpoints.jmx.exposure.include | * | JMX方式公开的端点 |
| management.endpoints.web.exposure.exclude | HTTP方式关闭的端点 | |
| management.endpoints.web.exposure.include | info, health | HTTP方式公开的端点 |
下面一些使用案例:
61# 修改JMX方式仅公开health和info端点2management.endpoints.jmx.exposure.include=health,info3
4# 修改HTTP方式公开除env和beans之外的所有端点(注意:*在YML中具有特殊含义,使用时请添加引号include: "*")5management.endpoints.web.exposure.include=*6management.endpoints.web.exposure.exclude=env,beans
注意:
如需更加精细的控制端点的公开时间,可以继承
EndpointFilter接口来进行扩展。
3. 访问端点
1) HTTP方式访问端点
访问路径和端口
HTTP端点的访问路径由前缀+端点映射路径组成,前缀默认为/actuator,端点映射路径默认为端点id。
例如health端点默认通过/actuator/health进行访问。
81# 修改前缀,修改后通过 /manage/health 访问health端点2management.endpoints.web.base-path=/manage3
4# 修改端点映射路径,修改后通过 /前缀/healthcheck 访问health端点5management.endpoints.web.path-mapping.health=healthcheck6
7# 修改访问端口8management.server.port=8081
注意:
前缀是相对于
server.servlet.context-path的,但如果配置了management.server.port,则相对于management.server.servlet.context-path。
来源地址
31# 配置自定义端口,并设置仅本地(127.0.0.1)可访问管理服务器2management.server.port=80813management.server.address=127.0.0.1注意:
仅当端口与主服务器端口不同时,您才能在其他地址上侦听!
设置SSL
默认情况下,管理服务器与主应用程序使用相同的SSL配置,但如果自定义了管理服务器端口,则可以分别进行配置。
161# 主应用程序端口和SSL配置(通过HTTPS访问)2server.port=84433server.ssl.enabled=true4server.ssl.key-store=classpath:main.jks5server.ssl.key-password=secret6
7# 自定义管理服务器端口,并单独禁用SSL(通过HTTP访问)8# management.server.port=80809# management.server.ssl.enabled=false10
11# 自定义管理服务器端口,并设置单独的SSL12management.server.port=808013management.server.ssl.enabled=true14management.server.ssl.key-store=classpath:management.jks15management.server.ssl.key-password=secret16
Security配置
由于端点暴露信息的敏感性,你应该像其它敏感URL一样,保护HTTP端点的安全,使用 Spring Security 时的参考配置如下:
121public class ActuatorSecurity extends WebSecurityConfigurerAdapter {3 4 protected void configure(HttpSecurity http) throws Exception {5 http.requestMatcher(EndpointRequest.toAnyEndpoint()) // 匹配任何端点6 .authorizeRequests()7 .anyRequest()8 .hasRole("ENDPOINT_ADMIN") // 仅支持ENDPOINT_ADMIN角色访问9 .and()10 .httpBasic();11 }12}如果允许未经身份验证的端点访问,可以配置如下:
111public class ActuatorSecurity extends WebSecurityConfigurerAdapter {3
4 5 protected void configure(HttpSecurity http) throws Exception {6 http.requestMatcher(EndpointRequest.toAnyEndpoint()) // 匹配任何端点7 .authorizeRequests()8 .anyRequest()9 .permitAll();10 }11}
CROS支持
如果使用Spring MVC或Spring WebFlux,可以通过下面方式支持HTTP端点的CROS。
31# 允许来自example.com域的GET和POST调用2management.endpoints.web.cors.allowed-origins=http://example.com3management.endpoints.web.cors.allowed-methods=GET,POST有关选项的完整列表,请参见CorsEndpointProperties。
禁用HTTP方式访问
如果您不想通过HTTP方式公开端点,则可以将Management端口设置为-1:
31# 禁用HTTP方式访问管理服务器2management.server.port=-13
或使用management.endpoints.web.exposure.exclude属性关闭所有HTTP端点:
21# 所有HTTP端点都不暴露2management.endpoints.web.exposure.exclude=*
2) JMX方式访问端点
MBean名称
MBean名称由端点id生成,例如health端点公开为org.springframework.boot:type=Endpoint,name=Health。但是,当应用程序包含多个ApplicationContext时,可能会出现名称冲突,可通过下面属性生成唯一的MBean名称。
21# MBean生成唯一名称2spring.jmx.unique-names=true
暴露的JMX域
默认情况下,SpringBoot将Management端点暴露在org.springframework.boot域下,可通过下面属性进行修改。
21# 暴露端点的JMX域2management.endpoints.jmx.domain=com.huangyuanxin.notes.springboot
转换为HTTP端点
Jolokia(JMX-HTTP bridge)可以让你以HTTP方式访问JMX Bean。首先导入依赖如下:
41<dependency>2 <groupId>org.jolokia</groupId>3 <artifactId>jolokia-core</artifactId>4</dependency>再通过management.endpoints.web.exposure.include=jolokia来暴露Jolokia端点,然后就可以通过/actuator/jolokia来访问它。
禁用JMX方式访问
21# 关闭所有JMX端点2management.endpoints.jmx.exposure.exclude=*
3) 隐藏敏感信息
默认情况下,对以
password、secret、key或token结尾的属性值进行隐藏,显示******,以防止端点泄露敏感信息。可通过
management.endpoint.env.keys-to-sanitize或management.endpoint.configprops.keys-to-sanitize配置。
4. 自定义端点
1) @Endpoint
使用@Endpoint注解可以将Bean声明为一个端点:
Bean中被
@ReadOperation、@WriteOperation或@DeleteOperation注解的方法将通过HTTP或JMX进行公开。在端点被公开后(management.endpoints.web.exposure.include=*),即可通过
/actuator/testEndpoint或JMX方式进行访问。
特别的,对于 Web 端点,可使用@WebEndpoint或@EndpointWebExtension进行定义:
HTTP请求类型由Operation类型决定,@ReadOperation为GET、@WriteOperation为POST、@DeleteOperation为DELETE方式。
可以接收当前的
java.security.Principal作为参数,与@Nullable结合使用,根据是否经过身份验证为用户提供不同的行为。可以接收当前的
SecurityContext作为方法参数,用于使用其isUserInRole(String)方法执行授权检查。对于
@ReadOperation,在返回值时,响应状态将为200,如果未返回值,则响应状态将为404(未发现)。对于
@WriteOperation或@DeleteOperation,在返回值时,响应状态为200,如果未返回值,则响应状态将为204(无内容)。
191import org.springframework.boot.actuate.endpoint.annotation.ReadOperation;2import org.springframework.boot.actuate.endpoint.web.annotation.WebEndpoint;3import org.springframework.context.annotation.Configuration;4
5import java.util.HashMap;6import java.util.Map;7
8(id = "testEndpoint")10public class WebEndpointTest {11
12 13 public Map<String, String> test() {14 Map<String, String> result = new HashMap<String, String>();15 result.put("name", "hello");16 result.put("age", "18");17 return result;18 }19}注意:
对于JMX 端点,也可使用
@JmxEndpoint或@EndpointJmxExtension进行定义。可以通过
@ServletEndpoint注解将Servlet公开为端点,但其与Servlet容器深度集成,可移植性差,不推荐使用。
2) 端点参数
端点支持接收简单类型的参数,HTTP端点通过URL查询参数或JSON格式的请求体参数传入,JMX端点通过MBean传入,示例如下:
41{2 "name": "test",3 "counter": 424}对于Web端点,还可使用@Selector注解方法参数,将其标识为路径变量,效果与Spring MVC的@PathVariable注解类似。
注意:
参数映射要求开启Java的
-parameters编译参数,如果使用了SpringBoot父工程和Maven插件,将会自动开启。如果类型不匹配,将会使用
ApplicationConversionService实例进行类型转换,转换失败则响应400(错误请求)。默认情况下,端点参数都是必选项,可以通过
@org.springframework.lang.Nullable注解是其变为可选。
3) Controller端点
@ControllerEndpoint和@RestControllerEndpoint用于公开特定于Spring Web框架的端点,其使用@GetMapping、@PostMapping、@DeleteMapping、@RequestMapping等Spring MVC/Spring WebFlux的标准注解进行方法和参数的映射。
101(id = "user")3public class UserEndpointController {4 ("getUser")5 public String getUser() {6 return "I am admin";7 }8}9
10// 访问地址:http://localhost:9002/actuator/user/getUser注意:
@RestControllerEndpoint不会注册Bean,仍需要添加@Component注解。
Controller端点提供了与Spring Web框架的更深层集成,但可移植性变差。因此,尽可能使用@Endpoint和@WebEndpoint注解。
5. Micrometer
1) Micrometer简介
Micrometer是Java平台上的一种通用应用程序指标接口,类似于日志体系中的SLF4J,它提供了Timers、Guauges、Counters等多种度量指标类型,并支持Elastic、Influx、JMX、Prometheus等众多的监视系统。
Micrometer中有两个最核心的概念,分别是计量器(Meter)和计量器注册表(MeterRegistry)。其中计量器用来收集不同类型的性能指标信息,Micrometer提供了如下几种不同类型的计量器:
计数器(Counter):表示收集的数据是按照某个趋势(增加/减少)一直变化的,也是最常用的一种计量器,例如接口请求总数、请求错误总数、队列数量变化等。
计量仪(Gauge):表示搜集的瞬时的数据,可以任意变化的,例如CPU负载、Mem使用量、Network使用量、实时在线人数统计等。
计时器(Timer):用来记录事件的持续时间,这个用的比较少。
分布概要(Distribution summary):用来记录事件的分布情况,表示一段时间范围内对数据进行采样,可以用于统计网络请求平均延迟、请求延迟占比等。
SpringBoot Actuator内置了Micrometer依赖,并自动配置CompositeMeterRegistry,查找类路径下支持的计量器注册表(MeterRegistry),这些计量器注册表由micrometer-registry-Xxxx依赖引入。
61 <!--集成prometheus-->2 <dependency>3 <groupId>io.micrometer</groupId>4 <artifactId>micrometer-registry-prometheus</artifactId>5 <version>1.1.4</version>6 </dependency>下面是一些相关的属性配置:
61# 禁用类路径下的某个计量器注册表,如Datadog2management.metrics.export.datadog.enabled=false3
4# 禁止添加到Metrics类的全局静态CompositeMeterRegistry,默认为true5management.metrics.use-global-registry=false6
您可以注册任意数量的MeterRegistryCustomizer来进一步配置计量器注册表,例如在向计量器注册表注册任何计量器之前应用通用标签(tag):
111MeterRegistryCustomizer<MeterRegistry> metricsCommonTags() {3 return registry -> registry.config().commonTags("region", "us-east-1");4}5
6
7// MeterRegistryCustomizer配置支持泛型兼容8MeterRegistryCustomizer<GraphiteMeterRegistry> graphiteMetricsNamingConvention() {10 return registry -> registry.config().namingConvention(MY_CUSTOM_CONVENTION);11}完成计量器注册表配置后,可以通过注入的方式获取计量器注册表并注册计量器,如下注册一个 Counter 类型的计量器统计core接口的访问次数。
281("/v1")3public class IndexController {4 5 MeterRegistry registry;6
7 // 计量器引用8 private Counter counter_core;9
10 11 private void init(){12 // 注册一个 Counter 类型的计量器13 counter_core = registry.counter("app_requests_method_count", "method", "IndexController.core");14 }15
16 (value = "/core")17 public Object coreUrl(){18 try{19 // 计量器+120 counter_core.increment();21 } catch (Exception e) {22 return e;23 }24 return counter_core.count() + " coreUrl Monitor by Prometheus.";25 }26}27
28
提示:可以通过MeterBinder来向Spring管理的MeterRegistry自动注册Metrics。
2) 支持的监视系统
SpringBoot Actuator支持将指标数据导出到众多的监视系统,如导出到本地的Elastic,配置如下:
21management.metrics.export.elastic.host=http://elastic.example.com:80862
或者通过提供/actuator/prometheus端点(默认关闭)的方式让Prometheus主动获取监控数据:
61scrape_configs2job_name'spring'3 metrics_path'/actuator/prometheus'4 static_configs5targets'HOST:PORT'6 更多监视系统配置请参考相应的官方文档!
3) 支持的指标(Metrics)
SpringBoot将根据当前环境配置如下一些核心Metrics:
JVM Metrics(包括各种内存和缓冲池、与垃圾收集有关的统计数据、Threads utilization、加载/卸载的类数等)
CPU Metrics
文件描述符
Kafka Metrics
Log4j2 Metrics(记录每个级别记录到Log4j2的事件数)
Logback Metrics(记录每个级别记录到Logback的事件数)
运行时间 Metrics(程序正常运行时间和程序绝对启动时间)
Tomcat Metrics
Spring Integration Metrics
SpringMVC Metrics
数据源 Metrics
缓存 Metrics
......
4) 配置计量器(Meter)
指标属性
211# 通用标签(通常用于在操作环境(如主机,实例,区域,堆栈等)上进行维度深入分析,适用于所有监视系统)2# 将region和stack标签添加到所有监视系统3management.metrics.tags.region=us-east-14management.metrics.tags.stack=prod5
6# 禁用所有ID以example.remote开头的指标7management.metrics.enable.example.remote=false8
9# 是否发布适合计算可凝集(跨维度)百分位数逼近的直方图10# management.metrics.distribution.percentiles-histogram11
12# 通过限制期望值的范围来发布较少的直方图桶13# management.metrics.distribution.minimum-expected-value14# management.metrics.distribution.maximum-expected-value    15
16# 发布在应用程序中计算的百分位值17management.metrics.distribution.percentiles 18
19# 发布包含您的 SLA 定义的存储区的累积直方图20management.metrics.distribution.sla 21
注意:如果使用Graphite,则通用标签的顺序很重要,由于使用这种方法不能保证通用标签的顺序,因此建议Graphite用户定义自定义MeterFilter。
MeterFilter
可以通过io.micrometer.core.instrument.config.MeterFilter接口配置Meter,如将所有ID以com.example开头的Meter的mytag.region标签重命名为mytag.area:
51public MeterFilter renameRegionTagMeterFilter() {3 return MeterFilter.renameTag("com.example", "mytag.region", "mytag.area");4}5
5) Metrics端点
Metrics端点可用于诊断检查应用程序收集的Metrics,如/actuator/metrics将显示可用监视系统的名称列表,/actuator/metrics/jvm.memory.max将显示JMX监视器的信息。
如果需要更加深入的了解相应的监视信息,可以通过tag=KEY:VALUE形式的查询参数,如/actuator/metrics/jvm.memory.max?tag=area:nonheap&tag=id:Metaspace。
第二节 SpringBoot开发套件
1. Developer Tools
1) Developer Tools简介
Spring Boot Developer Tools在开发阶段提供了一些额外的功能,如默认属性、全局配置、自动重启、远程调试和更新等,解决开发中的一些繁琐问题。如果需要使用,可以通过如下依赖来引入:
71<dependencies>2 <dependency>3 <groupId>org.springframework.boot</groupId>4 <artifactId>spring-boot-devtools</artifactId>5 <optional>true</optional>6 </dependency>7</dependencies>注意:
开发者工具仅适用于开发或测试环境,当使用java -jar 命令启动,或使用特殊的类加载器启动时被视为“完全打包”的应用程序,开发者工具将会被移除。
2) 默认属性
开发者工具修改了一些默认属性,使其更适用于开发和测试环境,如通过在application.properties中添加配置spring.thymeleaf.cache=false为thymeleaf禁用默认的缓存等。
注意:
开发者工具的所有默认属性可在DevToolsPropertyDefaultsPostProcessor查找。
如果想禁用默认属性,可配置
spring.devtools.add-properties属性为false。
3) 全局配置
开发者工具会自动扫描HOME目录下的.spring-boot-devtools.properties文件,读取其中的全局配置,并且优先采用。
注意:
如果是windows用户,可能需要设置一个环境变量HOME。
4) 自动重启
开发者工具为应用创建两个类加载器,分别是加载不变类(例如来自第三方jar的类)的基础类加载器和加载可变类(当前正在开发的类)的重启类加载器。当classpath上有文件被修改时,程序将自动重启,并创建新的重启类加载器。这种方式相较于应用平时使用的“冷启动”要快得多,毕竟基础类加载器已经处于可用的状态。关于详细配置请参考官方文档!
注意:
如果想体验更加强大的"热部署"功能,推荐使用商业软件Jrebel。
5) 远程调试和更新
开发者工具支持远程调试功能,详细配置请参考官方文档!
2. Spring Initializer
Spring Initializer是一个创建SpringBoot项目的快速向导,它根据用户所选择的场景,自动引入对应的场景启动器,并进行一些基础配置。
3. SpringBoot Cli
Spring Boot CLI 是一个命令行工具,用于运行Groovy脚本,快速开发SpringBoot应用程序。更多资料请参考官方文档!
第三节 SpringBoot相关插件
1. SpringBoot Maven Plugin
SpringBoot Maven Plugin在Maven打包SpringBoot应用时提供了一些额外的支持,如下是它的功能列表:
| Goal | Description |
|---|---|
| spring-boot:repackage | 重新打包为可执行的Jar包或war包 |
| spring-boot:run | 本地运行应用程序 |
| spring-boot:build-info | 基于当前MavenProject的内容生成build-info.properties信息 |
| spring-boot:build-image | 使用buildpack将应用程序打包到OCI映像中 |
| spring-boot:start | 启动一个应用程序,一般在集成测试之前执行 |
| spring-boot:stop | 停止由start启动的程序,一般在集成测试之后执行 |
| spring-boot:help | 在终端显示插件的帮助信息,如mvn spring-boot:help -Ddetail=true -Dgoal=<goal-name> |
1) 重新打包(repackage)
重新打包(repackage)功能可以将当前项目代码及所有依赖项打包为一个可执行的Jar包,下面是一个较完整的配置示例:
461<!--可执行Jar包的主启动类-->2<properties>3    <start-class>com.szkingdom.kfms.KfmsBootApplication</start-class>4</properties>5
6<build>7    <!--生成的可执行jar包名-->8    <finalName>my-app</finalName>9    <plugins>10        <!--引入SpringBoot Maven Plugin-->11        <plugin>12            <groupId>org.springframework.boot</groupId>13            <artifactId>spring-boot-maven-plugin</artifactId>14            <executions>15                <!--执行重新打包-->16                <execution>17                    <id>repackage</id>18                    <goals>19                        <goal>repackage</goal>20                    </goals>21                    <configuration>22                        <!--默认情况下,repackage生成一个可执行的Jar包,并将原始Jar包以.origin后缀命名-->23                        <!--如果添加classifier属性,则保留原始Jar包,额外生成一个以`-exec.jar`结尾的可执行Jar包-->24                        <classifier>exec</classifier>25                        <!--是否使用可执行Jar包安装到仓库,默认为true(注意:如果未配置classifier,这将导致该Jar包不可依赖)-->26                        <attach>false</attach>27                    </configuration>28                </execution>29            </executions>30            <configuration>31                <!--可执行Jar包的主启动类-->32                <mainClass>${start-class}</mainClass>33                <!--排除一些不打包的依赖-->34                <excludes>35                    <exclude>36                        <groupId>com.example1</groupId>37                        <artifactId>module1</artifactId>38                    </exclude>39                </excludes>40                <!--排除一组不打包的依赖-->41                <excludeGroupIds>com.example2</excludeGroupIds>42            </configuration>43        </plugin>44    </plugins>45</build>46
注意:
更多属性和分层打包请参考官方文档:https://docs.spring.io/spring-boot/docs/current/maven-plugin/reference/htmlsingle/#goals-repackage。
分层打包也可以使用
maven-assembly-plugin插件。
2) 生成build-info
如果SpringBoot Maven Plugin包含build-info目标,则在执行Maven打包时,自动生成META-INF/build-info.properties文件。
221<plugin>2 <groupId>org.springframework.boot</groupId>3 <artifactId>spring-boot-maven-plugin</artifactId>4 <executions>5 <!--生成build-info-->6 <execution>7 <goals>8 <goal>build-info</goal>9 </goals>10 </execution>11 </executions>12 <configuration>13 <!--build-info中附加如下4个属性-->14 <additionalProperties>15 <encoding.source>UTF-8</encoding.source>16 <encoding.reporting>UTF-8</encoding.reporting>17 <java.source>${maven.compiler.source}</java.source>18 <java.target>${maven.compiler.target}</java.target>19 </additionalProperties>20 </configuration>21</plugin>22
当项目引入了spring-boot-starter-actuator启动器时,可以访问http://localhost:8080/actuactor/info来查看编译信息。
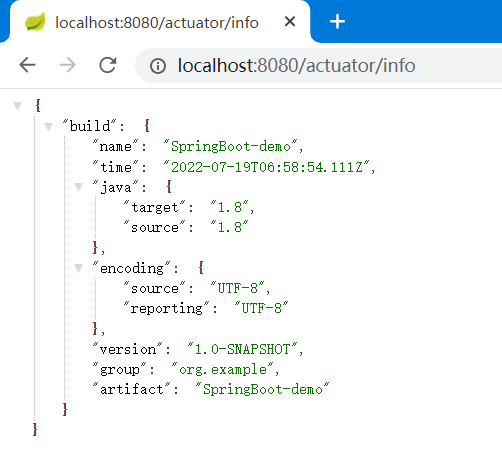
3) 本地运行
SpringBoot Maven Plugin的run目标可以在本地启动SpringBoot应用程序,并自定义JVM参数、系统属性、环境变量、程序参数和profile等。
更多资料请查阅官方文档:https://docs.spring.io/spring-boot/docs/current/maven-plugin/reference/htmlsingle/#run。
4) 跳过测试
本节请查阅官方文档:https://docs.spring.io/spring-boot/docs/current/maven-plugin/reference/htmlsingle/#integration-tests。
如果需要在打包时跳过测试,可使用如下几种方式:
mvn clean install -DskipTests(跳过单元测试)。
mvn clean install -Dmaven.test.skip=true(跳过单元测试及测试代码的编译)。
使用Maven控制台的"闪电"图标。
使用maven-surefire-plugin插件。
131<build>2<plugins>3<!-- maven 打包时跳过测试 -->4<plugin>5<groupId>org.apache.maven.plugins</groupId>6<artifactId>maven-surefire-plugin</artifactId>7<configuration>8<skip>true</skip>9</configuration>10</plugin>11</plugins>12<build>13
5) 打包为OCI镜像
本节请查阅官方文档:https://docs.spring.io/spring-boot/docs/current/maven-plugin/reference/htmlsingle/#build-image。
2. maven-resources-plugin
继承自spring-boot-starter-parent的项目,可以在**/application*.yml(yaml/properties)中通过@...@占位符的方式来使用Maven中的扩展属性。
31expanded.project.version=@project.version@2expanded.project.property=@custom.property@3
如果没有继承spring-boot-starter-parent,我们需要手动配置这个过滤和扩展。
271<build>2 <resources>3 <resource>4 <directory>${basedir}/src/main/resources</directory>5 <filtering>true</filtering>6 <includes>7 <include>**/application*.yml</include>8 <include>**/application*.yaml</include>9 <include>**/application*.properties</include>10 </includes>11 </resource>12 </resources> 13 <plugins>14 <plugin>15 <groupId>org.apache.maven.plugins</groupId>16 <artifactId>maven-resources-plugin</artifactId>17 <version>2.7</version>18 <configuration>19 <delimiters>20 <delimiter>@</delimiter>21 </delimiters>22 <useDefaultDelimiters>false</useDefaultDelimiters>23 </configuration>24 </plugin>25 </plugins>26</build>27
如果需要使用${variable.name}类型的标准占位符,我们需要将useDefaultDelimeters设置为true,并且您的application.properties将如下所示:
31expanded.project.version=${project.version}2expanded.project.property=${custom.property} 3