第02篇_Spring基础应用
第01章_SpringIOC
第一节 SpringIOC简介
1. 什么是SpringIOC?
IOC(Inversion of Control,控制反转)是一种编程范式,指将程序的某些流程(如对象创建、方法调用等)交由外部容器来控制。
x1// 正常流程:程序自己控制2AccountDao accountDao = new AccountDaoImpl(); // 直接创建对象3
4// 控制反转:由外部容器控制5AccountDao accountDao = BeanFactory.getBean("accountDao"); // 通过容器获取对象SpringIOC是 IOC 的一种实现,通过容器来管理和控制应用程序中对象的生命周期和依赖关系,从而实现对象之间的解耦和灵活的配置。
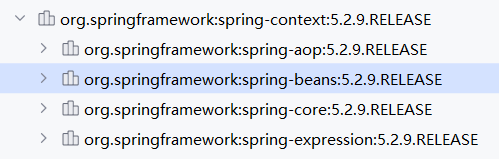
spring-context:提供国际化、事件传播、资源加载等功能的支持。
spring-aop:提供面向切面编程、AspectJ等功能的支持,后文将会详细讲解。
spring-beans:提供对 bean 的创建、配置和管理等功能的支持。
spring-core:主要包括核心类和工具类等,此外,提供ASM、CGLIB等功能的支持。
spring-expression:提供表达式语言 SpEL (Spring Expression Language)的支持。
注意:
Guice 是由 Google 开发的一个轻量级依赖注入框架,通过注解和简单的配置来实现依赖注入,也是 IOC 的一种实现。
2. SpringIOC入门案例
1) 导入IOC依赖
231 2<project xmlns="http://maven.apache.org/POM/4.0.0"3 xmlns:xsi="http://www.w3.org/2001/XMLSchema-instance"4 xsi:schemaLocation="http://maven.apache.org/POM/4.0.0 http://maven.apache.org/xsd/maven-4.0.0.xsd">5 <modelVersion>4.0.0</modelVersion>6
7 <groupId>org.example</groupId>8 <artifactId>Spring-demo01</artifactId>9 <version>1.0-SNAPSHOT</version>10
11 <dependencies>12 13 <!-- 引入spring-context依赖 -->14 <!-- 同时会引入spring-core、spring-beans、spring-aop、spring-expression -->15 <dependency>16 <groupId>org.springframework</groupId>17 <artifactId>spring-context</artifactId>18 <version>5.2.9.RELEASE</version>19 </dependency>20 21 </dependencies>22 23</project>注意:
如果使用 Spring 5 版本,需要保证JDK 1.8+和 Tomcat 8.5+;如果使用 Spring 6 版本,则需要 JDK17+。
2) 配置IOC容器
需要一个配置文件用来配置 key 和全类名的映射关系,这个文件名一般为application.xml,放在任意类路径下即可。
101 2<beans xmlns="http://www.springframework.org/schema/beans"3 xmlns:xsi="http://www.w3.org/2001/XMLSchema-instance"4 xsi:schemaLocation="http://www.springframework.org/schema/beans5http://www.springframework.org/schema/beans/spring-beans.xsd">6
7 <!-- 配置accountDao -->8 <bean id="accountDao" class="org.example.dao.impl.AccountDaoImpl"/>9 10</beans>
3) 使用IOC容器
在业务代码中通过容器来获取所需的依赖,而不是直接创建依赖对象。
101public class AccountServiceImpl implements AccountService {2 3 public void saveAccount() {4 // 通过Spring的IOC容器来获取accountDao实现类5 ApplicationContext ctx = new ClassPathXmlApplicationContext("application.xml");6 AccountDao accountDao = (AccountDao)ctx.getBean("accountDao");7 8 accountDao.saveAccount();9 }10}
第二节 容器详解
1. 什么是容器?
容器用于管理和控制应用程序中对象的生命周期和依赖关系,顶层接口为ApplicationContext,常见实现类如下:
ClassPathXmlApplicationContext:从类路径下加载配置文件,独立应用程序一般使用此种方式。
AnnotationConfigApplicationContext:从Java代码加载配置注解,一般适用于基于Java配置的注解开发模式。
FileSystemXmlApplicationContext:从磁盘位置加载配置文件,受限于操作系统,一般不常用。
注意:
ApplicationContext 继承 BeanFactory 接口,扩展了AOP、Web、国际化、事件传递等功能,并在启动时初始化所有单例Bean。
2. 容器的创建和关闭
1) 通过XML配置创建
加载XML配置文件,创建一个 Spring 的 IOC 容器:
21// 创建容器2ApplicationContext context = new ClassPathXmlApplicationContext("services.xml", "daos.xml");XML配置文件示例如下:
231 2<beans xmlns="http://www.springframework.org/schema/beans"3 xmlns:xsi="http://www.w3.org/2001/XMLSchema-instance"4 xsi:schemaLocation="http://www.springframework.org/schema/beans5http://www.springframework.org/schema/beans/spring-beans.xsd">6
7 <!-- Bean配置 -->8 <bean id="bean1" class="com.example.Test01"/>9 <bean id="bean2" class="com.example.Test02"/>10 11 <!-- 引入根标签为beans的外部配置文件-->12 <import resource="services.xml"/>13 <import resource="resources/messageSource.xml"/>14 <import resource="/resources/themeSource.xml"/>15 16 <!-- 使用 * 作为通配符 (注意:必须保证父配置文件名不能满足 * 所能匹配的格式,否则将出现循环递归包含)-->17 <import resource="dao/spring-*-dao.xml"/>18
19 <!-- 引入外部属性配置文件-->20 <context:property-placeholder location="classpath:/com/acme/jdbc.properties"/>21 22</beans>23
2) 通过注解配置创建
加载配置类上的注解创建容器:
91// 创建容器2ApplicationContext ac = new AnnotationConfigApplicationContext(SpringConfiguration.class);3
4// 配置类5(basePackages = "org.example") // 扫描 org.example 包中的其它组件7({ JdbcConfig.class }) // 导入其它类中的配置信息8("classpath:/com/${my.placeholder:default/path}/app.properties") // 引入外部属性配置文件9public class SpringConfiguration {}注意:
配置类必须带有
@Configuration或@Component等注解。
3) 通过Java代码创建
161public static void main(String[] args) {2 // 创建容器3 AnnotationConfigApplicationContext ctx = new AnnotationConfigApplicationContext();4 5 // 注册配置类6 ctx.register(AppConfig.class, OtherConfig.class);7 ctx.register(AdditionalConfig.class);8 9 // 扫描配置类并刷新容器10 ctx.scan("com.acme");11 ctx.refresh();12 13 // 使用容器14 MyService myService = ctx.getBean(MyService.class);15 myService.show();16}
4) 关闭容器
一般只会在程序退出时关闭容器,可以向 JVM 注册一个关闭钩子,让 Spring 在程序退出时调用 Bean 的生命周期相关方法。
121import org.springframework.context.ConfigurableApplicationContext;2import org.springframework.context.support.ClassPathXmlApplicationContext;3
4public final class Boot {5    public static void main(final String[] args) throws Exception {6        // 创建容器7        ConfigurableApplicationContext ctx = new ClassPathXmlApplicationContext("beans.xml");8
9        // 注册关闭钩子10        ctx.registerShutdownHook(); 11    }12}
注意:
在 Web 环境中,基于 Web 的容器实现默认注册了关闭钩子,无需重复注册。
关闭钩子生效场景有:正常退出、System.exit()、Ctrl+C中断、OutofMemory宕机、Kill pid杀死进程(kill -9除外)、系统关闭等。
3. 容器的基本使用
1) 获取对象
可以通过T getBean(String name, Class<T> requiredType)等方法获取 Bean 的实例:
81// 通过 key + 类型 获取2PetStoreService service = context.getBean("petStore", PetStoreService.class);3
4// 通过 key 获取(需要强转)5Person person = (Person)ctx.getBean("person");6
7// 通过 类型 获取(必须保证该类型只有一个Bean)8Person person = ctx.getBean(Person.class);
2) 获取容器信息
151// 获取Bean总数2int count = ctx.getBeanDefinitionCount();3
4// 获取所有Bean的id5String[] beanDefinitionNames = ctx.getBeanDefinitionNames();6
7// 获取所有某类型Bean的id8String[] beanNamesForType = ctx.getBeanNamesForType(UserDao.class);9
10// 判断是否存在指定id的Bean(可以判断name指定的别名)11boolean isExist = ctx.containsBean("userDao")12    13// 判断是否存在指定id的Bean(不能判断name指定的别名)14boolean isExist = ctx.containsBeanDefinition("userDao")15
4. 容器的环境配置
1) 环境与策略
Environment接口用来表示整个应用运行时的环境,是当前Bean集合及相关属性在容器中的一个抽象。
Profile用于控制哪些 Bean 被注册,哪些 Bean 不被注册,只有处于活动状态的 Bean 才会被注册。
2) 配置环境(@Profile)
@Profile 注解可以作用于配置类或方法之上,表示只有对应的环境被激活时,被注解的Bean才会被注册到Spring容器。
261// 开发环境需注册的Bean2("development")4public class StandaloneDataConfig {5
6 7 public DataSource dataSource() {8 return new EmbeddedDatabaseBuilder()9 .setType(EmbeddedDatabaseType.HSQL)10 .addScript("classpath:com/bank/config/sql/schema.sql")11 .addScript("classpath:com/bank/config/sql/test-data.sql")12 .build();13 }14}15
16// 生产环境需注册的Bean17("production")19public class JndiDataConfig {20
21 (destroyMethod="")22 public DataSource dataSource() throws Exception {23 Context ctx = new InitialContext();24 return (DataSource) ctx.lookup("java:comp/env/jdbc/datasource");25 }26}221public class AppConfig {3
4 // 开发环境需注册的Bean5 ("dataSource")6 ("development")7 public DataSource standaloneDataSource() {8 return new EmbeddedDatabaseBuilder()9 .setType(EmbeddedDatabaseType.HSQL)10 .addScript("classpath:com/bank/config/sql/schema.sql")11 .addScript("classpath:com/bank/config/sql/test-data.sql")12 .build();13 }14
15 // 生产环境需注册的Bean16 ("dataSource")17 ("production")18 public DataSource jndiDataSource() throws Exception {19 Context ctx = new InitialContext();20 return (DataSource) ctx.lookup("java:comp/env/jdbc/datasource");21 }22}提示
可以使用一些基本运算符来配置Bean的环境。如
production & (us-east | eu-central)。可以同时配置多个环境。如
@Profile({"p1", "!p2"})表示在p1活动状态或p2未活动状态进行注册。如果 @Profile 注解作用于同名的@Bean方法(方法重载)之上,则它们之间的配置最好相同。
在XML配置中,可以使用 beans 标签的profile属性来配置Bean的环境,但可能会有一些限制。
111<beans profile="development"2    xmlns="http://www.springframework.org/schema/beans"3    xmlns:xsi="http://www.w3.org/2001/XMLSchema-instance"4    xmlns:jdbc="http://www.springframework.org/schema/jdbc"5    xsi:schemaLocation="...">6
7    <jdbc:embedded-database id="dataSource">8        <jdbc:script location="classpath:com/bank/config/sql/schema.sql"/>9        <jdbc:script location="classpath:com/bank/config/sql/test-data.sql"/>10    </jdbc:embedded-database>11</beans>
3) 激活环境
我们在启动容器时,可以指定激活的环境,最直接的方法是通过 Environment API 以编程方式进行配置。
41AnnotationConfigApplicationContext ctx = new AnnotationConfigApplicationContext();2ctx.getEnvironment().setActiveProfiles("profile1", "profile2");3ctx.register(SomeConfig.class, StandaloneDataConfig.class, JndiDataConfig.class);4ctx.refresh();当然,也可以使用声明式的方式,通过系统环境变量、JVM系统属性等方式设置 spring.profiles.active 属性的值。
11-Dspring.profiles.active="profile1,profile2"在特定环境,如WEB开发中也可以设置 web.xml 中的 servlet 上下文参数,或测试环境中通过 @ActiveProfiles 注解来声明。
4) 默认环境
当spring.profiles.active没有被设置时,那么 Spring 会根据spring.profiles.default属性的值(默认为default)来激活环境,可以使用 setDefaultProfiles() 方法或 spring.profiles.default 属性来修改。
121("default")3public class DefaultDataConfig {4
5 6 public DataSource dataSource() {7 return new EmbeddedDatabaseBuilder()8 .setType(EmbeddedDatabaseType.HSQL)9 .addScript("classpath:com/bank/config/sql/schema.sql")10 .build();11 }12}
5. 容器的事件处理
1) 事件处理简介
ApplicationContext 中的事件处理是通过ApplicationEvent类和ApplicationListener接口提供的,属于典型的观察者设计模式。
支持的标准事件如下:
| 事件类型 | 描述 |
|---|---|
ContextRefreshedEvent | 在Spring上下文初始化或刷新时发布,例如在应用启动或上下文重新加载时触发 |
ContextStartedEvent | 当Spring上下文启动时发布,表示上下文已准备好并可以开始使用 |
ContextStoppedEvent | 当Spring上下文停止时发布,表示上下文即将关闭 |
ContextClosedEvent | 在Spring上下文关闭时发布,通常在应用关闭时触发 |
RequestHandledEvent | 在Spring MVC框架中,当一个HTTP请求被处理完成后发布 |
下面是一个监听示例:
191// 1. 实现ApplicationListener接口方式2public class ContextRefreshedEventListener implements ApplicationListener<ContextRefreshedEvent> {4
5 6 public void onApplicationEvent(ContextRefreshedEvent event) {7 System.out.println("ContextRefreshedEvent received: " + event.getApplicationContext().getId());8 }9}10
11// 2. @EventListener注解方式12public class ContextRefreshedEventListener {14
15 16 public void handleContextRefreshedEvent(ContextRefreshedEvent event) {17 System.out.println("ContextRefreshedEvent received: " + event.getApplicationContext().getId());18 }19}@EventListener注解可以对接收的事件进行更加精细的控制,示例如下:
191// 通过事件类型限定接收的事件2({ContextStartedEvent.class, ContextRefreshedEvent.class})3public void handleContextStart() {4}5
6// 通过泛型限定接收的事件7public void onPersonCreated(EntityCreatedEvent<Person> event) {9}10
11// 通过SPEL表达式限定接收的事件12(condition = "#blEvent.content == 'my-event'")13public void processBlackListEvent(BlackListEvent blEvent) {14}15
16// 事件传递:处理完当前事件后,通过返回值再发布新的事件(可以返回集合类型)17public ListUpdateEvent handleBlackListEvent(BlackListEvent event) {19}注意:
默认情况下,事件侦听器会同步接收事件,这意味着publishEvent()方法将阻塞,直到所有侦听器都已完成对事件的处理为止。
这种同步和单线程方法的优点是:当侦听器收到事件时,如果有可用的事务上下文,它将在发布者的事务中进行操作。
2) 自定义事件
可以实现ApplicationEvent接口自定义事件:
121// BlackListEvent事件2public class BlackListEvent extends ApplicationEvent {3    // 事件属性4    private final String address; // 邮箱地址5    private final String content; // 邮箱内容6
7 public BlackListEvent(Object source, String address, String content) {8 super(source);9 this.address = address;10 this.content = content;11 }12}并通过ApplicationEventPublisher来发布:
241// 邮箱服务2public class EmailService implements ApplicationEventPublisherAware {4 private List<String> blackList;5 private ApplicationEventPublisher publisher;6
7 public void setBlackList(List<String> blackList) {8 this.blackList = blackList;9 }10
11 // 通过感知接口获得ApplicationEventPublisher12 public void setApplicationEventPublisher(ApplicationEventPublisher publisher) {13 this.publisher = publisher;14 }15
16 // 业务方法17 public void sendEmail(String address, String content) {18 if (blackList.contains(address)) {19 // 发布BlackListEvent事件20 publisher.publishEvent(new BlackListEvent(this, address, content));21 return;22 }23 }24}
3) 监听器配置
异步监听
41 // 异步监听3public void processBlackListEvent(BlackListEvent event) {4}注意:
如果事件监听器抛出Exception,则它不会传播到调用者。有关更多详细信息,请参见AsyncUncaughtExceptionHandler。
此类事件侦听器无法发送答复。如果您需要发送另一个事件作为处理结果,请注入ApplicationEventPublisher以手动发送事件。
调用顺序
如果需要先调用一个侦听器,则可以将@Order注解添加到方法声明中,如以下示例所示:
41public void processBlackListEvent(BlackListEvent event) {4}
6. 容器的扩展接口
1) BeanFactoryPostProcessor
BeanFactoryPostProcessor 可以在容器初始化阶段动态地调整 Bean 的配置信息,而无需修改原始的配置文件或注解。
51public interface BeanFactoryPostProcessor {3 // 在 加载Bean定义之后,实际创建 Bean 实例之前 调用4 void postProcessBeanFactory(ConfigurableListableBeanFactory beanFactory) throws BeansException;5}注意:
可以实现
Ordered接口或使用@Order注解来控制多个 BeanFactoryPostProcessor 实例的执行顺序。AOP 等功能是基于 BeanFactoryPostProcessor 实现的,因此不能对 BeanFactoryPostProcessor 的实现类对象进行织入。
PropertyPlaceholderConfigurer
PropertyPlaceholderConfigurer用于解析配置文件中的占位符,并进行字符串替换操作。
151<!-- 注册一个内置的BeanFactoryPostProcessor:PropertyPlaceholderConfigurer 2     locations:指定外部属性配置文件,一般为properties格式3     properties:指定一些键值对形式的属性值4     systemPropertiesMode:是否检查System属性5        * never                 从不查找System属性6        * fallback              如果从properties-ref和location中未找到需要的属性值,则去System属性查找7        * override/evironment   始终查找System属性,并覆盖其他方式配置的值8-->9<bean class="org.springframework.beans.factory.config.PropertyPlaceholderConfigurer">10    <property name="locations" value="classpath:com/something/strategy.properties"></property>11    <property name="properties" value="custom.strategy.class=com.something.DefaultStrategy"></property>12</bean>13
14<!-- 使用占位符来获取配置的属性值,这将会在Bean实例化之前进行替换-->15<bean id="serviceStrategy" class="${custom.strategy.class}"/>
PropertyOverrideConfigurer
PropertyOverrideConfigurer用于对配置的属性进行覆盖操作。
41<!-- 注册一个内置的BeanFactoryPostProcessor:PropertyOverrideConfigurer 2 location:指定一个外部配置文件,存放需要覆盖的属性和值,以 beanName.property=value 的格式,并支持复合属性3--> 4<context:property-override location="classpath:override.properties"/>一个 override.properties 配置文件的示例如下:
41# 覆盖 dataSource 的 driverClassName 属性值为 com.mysql.jdbc.Driver2dataSource.driverClassName=com.mysql.jdbc.Driver3# 覆盖 tom 的 fred.bob.sammy 属性值为 1234tom.fred.bob.sammy=123
2) BeanPostProcessor
BeanPostProcessor 可以在创建 Bean 实例之后对其进行进一步的处理,植入一些自定义逻辑。
281// 1. 创建一个 BeanPostProcessor2public class MyBeanPostProcessor implements BeanPostProcessor {3 4 /**5 * 在Bean完成实例化和注入之后、初始化之前执行6 *7 * @bean 已完成注入后的Bean对象8 * @beanName bean的id属性9 * @return 修改后的Bean对象10 */11 12 public Object postProcessBeforeInitialization(Object bean, String beanName) throws BeansException {13 return bean;14 }15
16 /**17 * 在Bean完成初始化之后执行18 *19 * @bean 已完成初始化后的Bean对象20 * @beanName bean的id属性21 * @return 修改后的Bean对象22 */23 24 public Object postProcessAfterInitialization(Object bean, String beanName) throws BeansException {25 System.out.println("Bean '" + beanName + "' created : " + bean.toString());26 return categroy;27 }28}21<!-- 2. 将自定义BeanPostProcessor注册到Spring容器-->2<bean id="myBeanPostProcessor" class="xxx.MyBeanPostProcessor"/>
3) Lifecycle/SmartLifecycle接口
在容器启动和关闭时,会检索所有实现了Lifecycle和SmartLifecycle接口的Bean,对其进行批量处理。
Lifecycle
251public class MyLifecycleBean implements Lifecycle {3 private boolean running = false;4
5 // 在容器启动时,如果 isRunning==false,则执行6 7 public void start() {8 System.out.println("Starting the bean...");9 running = true;10 }11
12 // 在容器关闭时,如果 isRunning==true,则执行13 14 public void stop() {15 System.out.println("Stopping the bean...");16 running = false;17 }18
19 // 判断Bean是否正在运行20 21 public boolean isRunning() {22 return running;23 }24}25
SmartLifecycle
431public class MySmartLifecycleBean implements SmartLifecycle {2 private boolean running = false;3
4 // 在容器启动时,如果 isRunning==false&&isAutoStartup==true,则执行5 6 public void start() {7 System.out.println("Starting the bean...");8 running = true;9 }10
11 // 在容器关闭时,如果 isRunning==true,则执行12 13 public void stop() {14 System.out.println("Stopping the bean...");15 running = false;16 }17
18 // 判断Bean是否正在运行19 20 public boolean isRunning() {21 return running;22 }23
24 // 指定启动和停止的顺序25 26 public int getPhase() {27 return 0; 28 }29
30 // 是否自动启动31 32 public boolean isAutoStartup() {33 return true; 34 }35
36 // 提供停止后的回调方法37 38 public void stop(Runnable callback) {39 stop();40 callback.run(); // 执行回调41 }42}43
第三节 Bean详解
1. 什么是Bean?
Bean 是被 Spring 容器管理的 Java 对象,是实现 Spring IoC 和依赖注入的基础。
2. Bean的定义方式
1) 基于构造方法的定义
一般用于可以直接通过构造方法实例化并配置的对象:
81<!-- 基于无参构造定义 -->2<bean id="accountService" class="org.example.service.impl.AccountServiceImpl"/>3
4<!-- 基于有参构造定义 -->5<bean id="exampleBean" class="com.example.ExampleBean">6    <constructor-arg value="参数字面值"/>7    <constructor-arg ref="被引用的其它Bean"/>8</bean>
2) 基于FactoryBean的定义
一般用于构建复杂对象,如DataSource、SqlSessionFactory等。首先需要一个FactoryBean,用来描述复杂对象的构建过程:
431import org.springframework.beans.factory.FactoryBean;2import com.zaxxer.hikari.HikariDataSource;3
4// 用于创建数据源的FactoryBean5public class DataSourceFactoryBean implements FactoryBean<HikariDataSource> {6 // 属性配置7 private String jdbcUrl;8 private String username;9 private String password;10 private String driverClassName;11
12 // 传入属性13 public DataSourceFactoryBean(String jdbcUrl, String username, String password, String driverClassName) {14 this.jdbcUrl = jdbcUrl;15 this.username = username;16 this.password = password;17 this.driverClassName = driverClassName;18 }19
20 // 获取目标对象21 22 public HikariDataSource getObject() throws Exception {23 HikariDataSource dataSource = new HikariDataSource();24 dataSource.setJdbcUrl(jdbcUrl);25 dataSource.setUsername(username);26 dataSource.setPassword(password);27 dataSource.setDriverClassName(driverClassName);28 return dataSource;29 }30
31 // 获取目标对象类型32 33 public Class<?> getObjectType() {34 return HikariDataSource.class;35 }36
37 // 是否为单例Bean38 39 public boolean isSingleton() {40 return true;41 }42}43
然后,基于FactoryBean来定义复杂对象:
21<!-- 基于FactoryBean定义复杂对象 -->2<bean id="dataSource" class="org.example.DataSourceFactoryBean"/>当实例化复杂对象时,如果发现是FactoryBean类型,则会调用其getObject()方法创建复杂对象。
注意:
FactoryBean本质上是一个工厂类,如果需要获取FactoryBean本身,可以通过
ctx.getBean("&dataSource")的方式获取。
3) 基于普通工厂类定义
一般用于第三方模块复杂对象的构建,基于未实现 FacotryBean 接口的普通工厂类:
静态工厂
静态工厂类如下:
61public class StaticFactory {2 // 创建对象的静态方法3 public static IAccountService createAccountService() {4 return new AccountServiceImpl();5 }6}通过工厂类的静态方法构建对象:
21<bean id="accountService" class="org.example.StaticFactory" 2 factory-method="createAccountService"></bean>
实例工厂
实例工厂类如下:
61public class InstanceFactory {2 // 创建对象的非静态方法3 public IAccountService createAccountService(){ 4 return new AccountServiceImpl(); 5 } 6} 通过工厂类的实例方法构建对象:
101<!-- 创建工厂类对象 -->2<bean id="instancFactory" class="org.example.InstanceFactory"></bean>  3
4<!-- 创建业务对象5        * factory-bean 属性:用于指定工厂类bean的id6        * factory-method 属性:用于指定实例工厂中创建对象的方法7-->8 <bean id="accountService"   9       factory-bean="instancFactory"   10       factory-method="createAccountService"></bean>
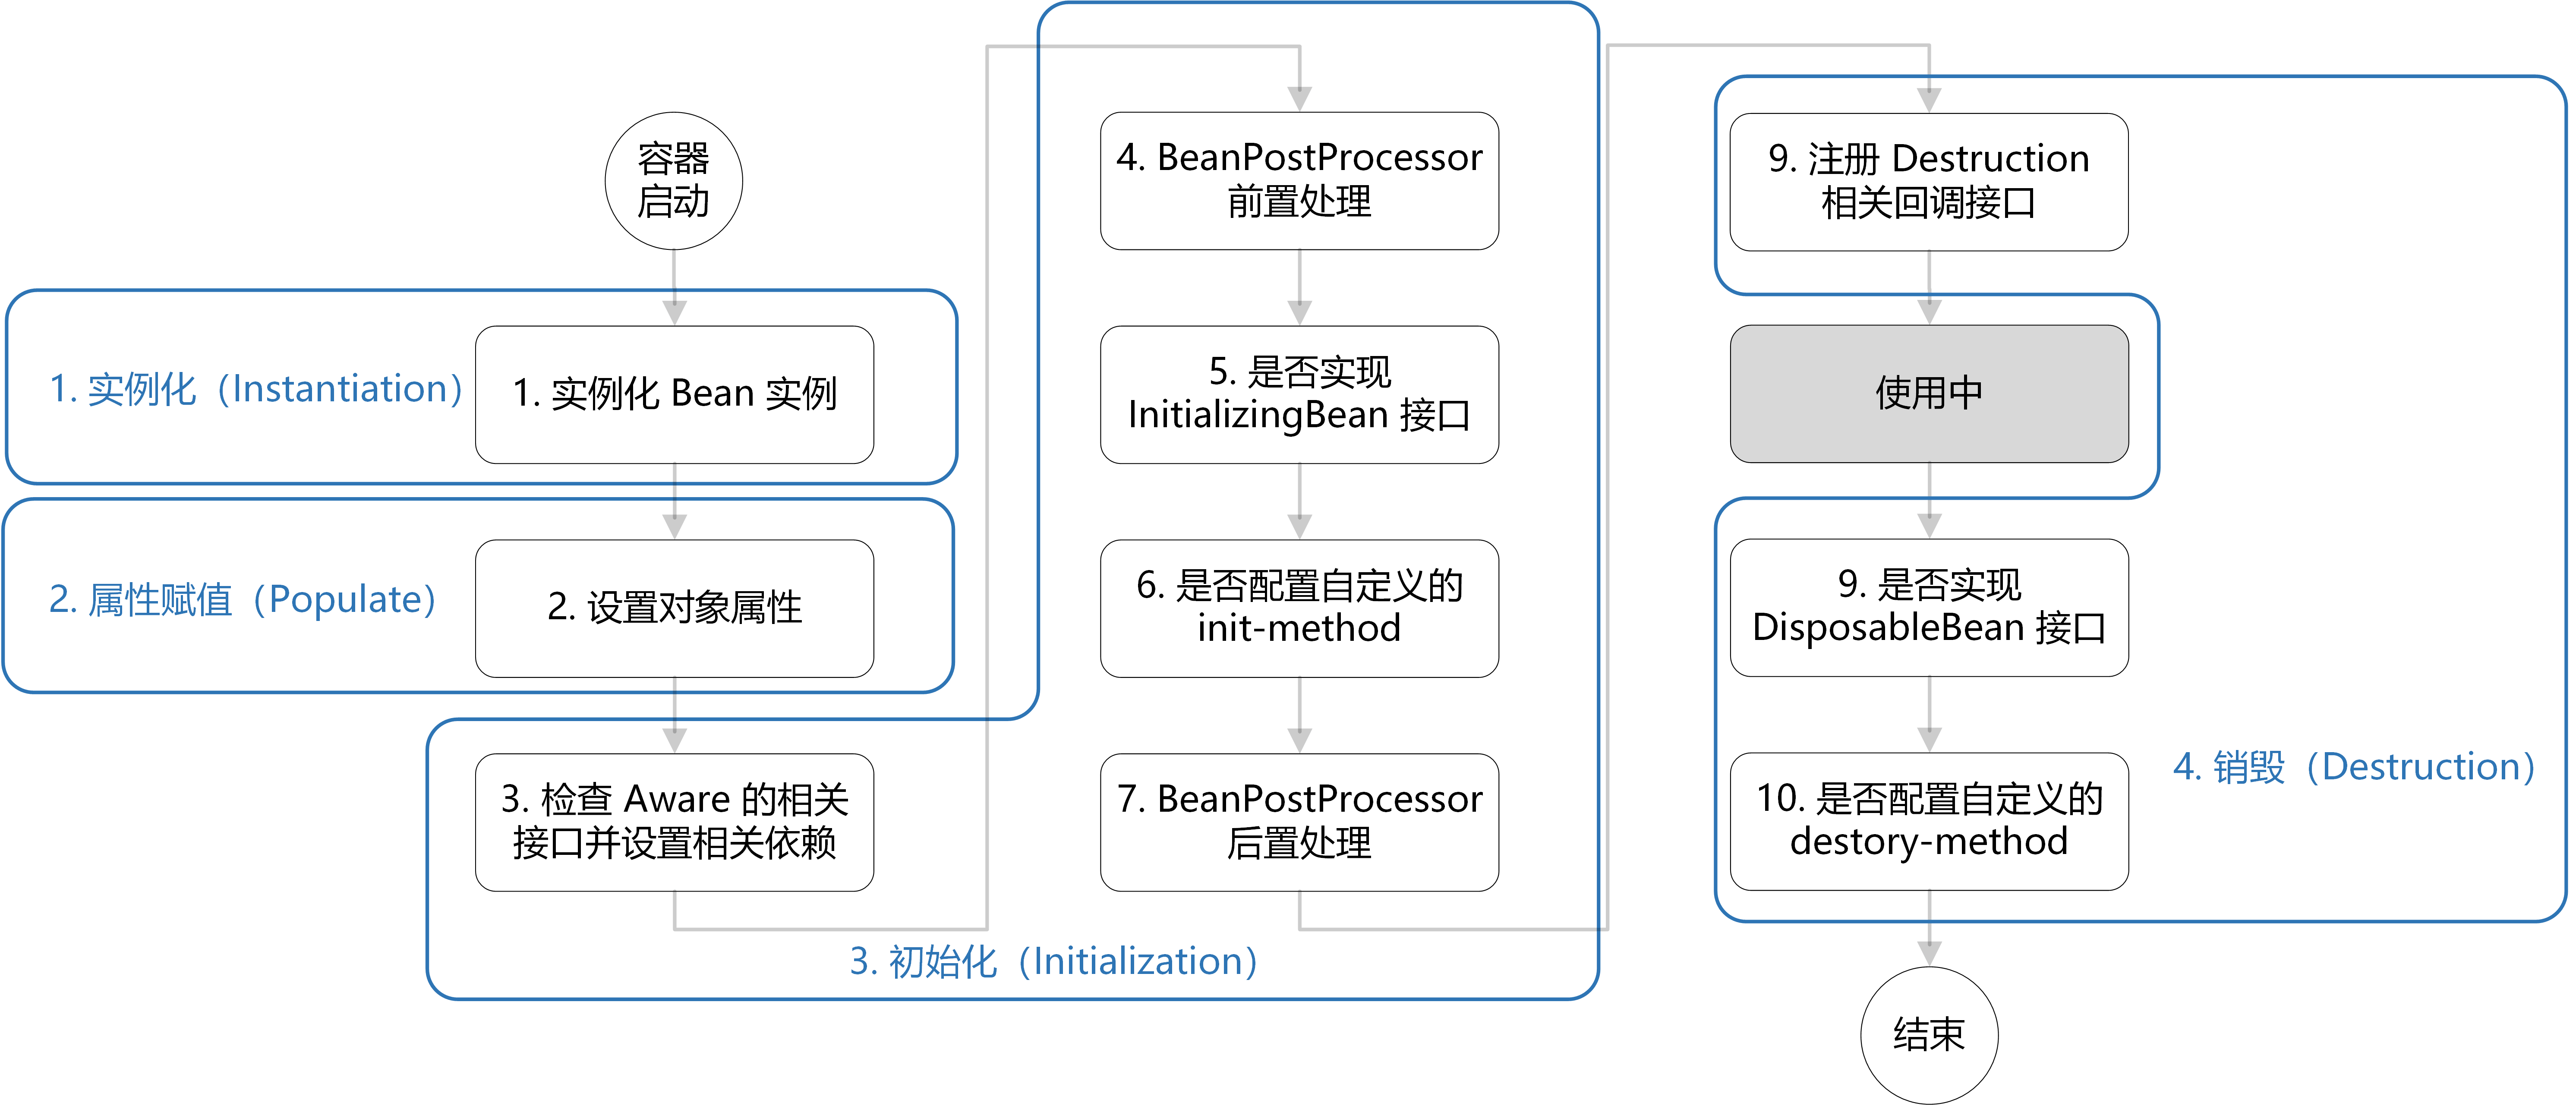
3. Bean的生命周期
Bean的生命周期指 Bean 从创建到销毁的整个过程,Spring提供了一些机制允许我们对生命周期的管理进行干预。
1) @PostConstruct/@PreDestroy注解
@PostConstruct 和 @PreDestroy 基于内置的CommonAnnotationBeanPostProcessor实现,在Bean的初始化前后调用相应方法。
121public class CachingMovieLister {2
3 4 public void populateMovieCache() {5 // populates the movie cache upon initialization...6 }7
8 9 public void clearMovieCache() {10 // clears the movie cache upon destruction...11 }12}注意:
被
@PostConstruct和@PreDestroy注解的方法不能是抽象方法,必须无参无返回值,建议使用public static修饰。
2) InitializingBean/DisposableBean接口
如果实现了InitializingBean或DisposableBean接口,则会在初始化和销毁时分别调用其相应方法。
101public class AnotherExampleBean implements InitializingBean, DisposableBean {2
3    public void afterPropertiesSet() {4        // do some initialization work5    }6
7    public void destroy() {8        // do some destruction work (like releasing pooled connections)9    }10}
3) init-method/destroy-method属性
使用init-method和destroy-method属性可以指定无参无返回值方法的名称作为初始化方法和销毁方法。
81public class ExampleBean {2 // 初始化方法3 public void init() {4 }5 // 销毁方法6 public void cleanup() {7 }8}21<!-- 指定初始化方法和销毁方法 -->2<bean id="exampleInitBean" class="examples.ExampleBean" init-method="init" destroy-method="cleanup"/>使用Java代码配置元数据时,使用@Bean的initMethod和destroyMethod属性来指定初始化和销毁方法:
71public class AppConfig {3 (initMethod = "init", destroyMethod = "cleanup")4 public ExampleBean bean01() {5 return new ExampleBean();6 }7}注意:
<beans>标签的default-init-method/default-destroy-method属性可以指定所有Bean的默认初始化和销毁方法。
4) 执行顺序总结
如果一个 Bean 同时配置了多种方式的初始化和销毁方法,初始化和销毁都会按照注解->接口->属性的顺序执行:
调用 @PostConstruct 注解的初始化方法
调用 InitializingBean 接口定义的 afterPropertiesSet()方法
调用属性配置的初始化方法
调用 @PreDestroy 注解的销毁方法
调用 DisposableBean 接口定义的 destroy()方法
调用属性配置的销毁方法
注意:
同一个初始化或销毁方法即使被多种方式配置,也只会被执行1次。
3. Bean的作用范围
Bean的作用范围决定了 Bean 的作用域以及在获取对象时是否创建新的实例等,通过scope属性进行配置。
1) singleton
singleton表示单例范围(默认),只会创建一次,一般在容器启动时创建,容器销毁时随之销毁,适合无状态的 Bean。
21<!---定义单例Bean->2<bean id="accountDao" class="org.example.dao.impl.AccountDaoImpl" scope="singleton"/>
2) prototype
prototype表示原型范围(多例),在每次从容器获取对象时,始终会创建新的实例返回,适合有状态的 Bean。
11<bean id="accountDao" class="org.example.dao.impl.AccountDaoImpl" scope="prototype"/>注意:
对于原型Bean,Spring不会管理其完整的生命周期,不会调用已配置的生命周期销毁回调。
3) web
在 Web 应用中,提供了一些特殊的作用范围:
request:在 HTTP 请求的生命周期内共享,每个 HTTP 请求都会创建一个新的 Bean 实例。
session:在 HTTP 会话的生命周期内共享,同一个会话中,每次请求都会返回同一个 Bean 实例。
application:在整个 Web 应用的生命周期内共享,无论多少个会话或请求,都共享同一个 Bean 实例。
websocket:一个特殊的会话级作用域,用于管理 WebSocket 会话中的 Bean 实例。
4) 自定义作用范围
可以通过实现 Scope 接口来创建自定义的作用范围:
281public class MyCustomScope implements Scope {2 3 public Object get(String name, ObjectFactory<?> objectFactory) {4 // 实现获取 Bean 的逻辑5 }6
7 8 public Object remove(String name) {9 // 实现移除 Bean 的逻辑10 }11
12 13 public void registerDestructionCallback(String name, Runnable callback) {14 // 实现注册销毁回调的逻辑15 }16
17 18 public Object resolveContextualObject(String key) {19 // 实现解析上下文对象的逻辑20 return null;21 }22
23 24 public String getConversationId() {25 // 实现获取会话 ID 的逻辑26 return null;27 }28}注册自定义作用范围:
101// 通过Java配置注册自定义作用范围2public class AppConfig {4 5 public static CustomScopeConfigurer customScopeConfigurer() {6 CustomScopeConfigurer configurer = new CustomScopeConfigurer();7 configurer.addScope("myCustomScope", new MyCustomScope());8 return configurer;9 }10}使用自定义作用范围:
51("myCustomScope")3public class MyCustomScopeBean {4
5}注意:
Spring内部提供了一些未启用的作用范围,如
SimpleThreadScope,可以手动注册并使用它们。
4. Bean的常见属性
1) 别名(name/alias)
Bean除了具有唯一性的 id 属性外,还可以定义若干个别名,以兼容不同的业务系统:
51<!-- 配置service,并指定别名,别名以逗号、分号或空格间隔-->2<bean id="accountService" name="accountService2,accountService3" class="org.example.service.impl.AccountServiceImpl"/>3
4<!--使用alias标签定义别名-->5<alias name="accountService2" alias="accountServiceA"/>81public class AppConfig {3 // 配置id及多个别名4 (name = {"myBean", "myBeanAlias1", "myBeanAlias2"})5 public MyBean myBean() {6 return new MyBean();7 }8}
2) 依赖项(depends-on)
depends-on属性可以指定初始化时的依赖项,也可以在Bean是单例的的情况下指定销毁时的依赖项。
81<!-- 被依赖的Bean -->2<bean id="manager" class="ManagerBean" />3<bean id="accountDao" class="x.y.jdbc.JdbcAccountDao" />4
5<!-- 在初始化beanOne之前强制先初始化manager和accountDao,在销毁时先销毁manager和accountDao -->6<bean id="beanOne" class="ExampleBean" depends-on="manager,accountDao">7 <property name="manager" ref="manager" />8</bean>141// BeanA依赖BeanB和BeanC2({"beanB", "beanC"})4public class BeanA {5}6
7// BeanB和BeanC8public class BeanB {10}11public class BeanC {13}14
3) 懒加载(lazy-init)
单例Bean默认在容器创建时进行实例化,如果想让Bean在使用时再创建,则可指定lazy-init属性为true。
21<!-- 配置 ExpensiveToCreateBean 延迟加载 -->2<bean id="lazy" class="com.something.ExpensiveToCreateBean" lazy-init="true"/>81public class AppConfig {3 4 5 public MyBean myBean() {6 return new MyBean();7 }8}如果需要对多个Bean进行配置,也可以选择beans标签的default-lazy-init属性,为其内部的所有Bean设置可覆盖的默认值。
31<beans default-lazy-init="true">2 <!-- no beans will be pre-instantiated... -->3</beans>注意:
@Lazy注解还可以放置在标有@Autowired的注入点上,在这种情况下,它会注入一个惰性解析代理。
4) 继承(abstract/parent)
在 Bean 的配置中,可以通过parent属性来指定另一个 Bean 作为该 Bean 的 ParentBean, 从而继承一些可复用的配置数据,并可以覆盖某些值或根据需要添加其他值,这是一种模板方法模式的一种体现。
121<!-- ParentBean的定义。一般将 ParentBean 标记为 abstract,用作纯模板 Bean 使用,同时可以省略 class 属性 -->2<bean id="inheritedTestBean" abstract="true" >3    <property name="name" value="parent"/>4    <property name="age" value="1"/>5</bean>6
7<!-- ChildBean的定义-->8<bean id="inheritsWithDifferentClass" class="org.springframework.beans.DerivedTestBean" init-method="initialize"9      parent="inheritedTestBean"> 10    <property name="name" value="override"/>11    <!-- 将从 ParentBean 继承 age 属性的注入 -->12</bean>
ChildBean 可以从 ParentBean 继承Bean的作用范围、生命周期、属性注入等信息,但依赖项、自动装配模式等一些信息始终从子类获取,这需要我们在开发过程中多加关注。
注意:
Bean的继承是对象层面的继承,子类继承父类对象的属性值。因此,不同类之间可以互相继承。
Java是类层面的继承,继承的是父类的类结构信息。
如果用 Java 代码的方式来配置元数据,那么可以直接使用 Java 的继承机制来复用元数据的配置信息。
第四节 依赖注入详解
1. 什么是依赖注入?
依赖注入 (Dependency Inject)是控制反转思想的一种实现方式,指的是程序运行过程中,若需要调用另一个对象协助时,无须在代码中创建被调用者,而是依赖于外部容器,由外部容器创建后传递给程序。
2. 依赖注入的方式
1) 构造函数注入
基于构造函数的注入是通过容器调用有参构造函数来完成的,每个参数代表了一个依赖项。
111<!--构造注入,使用name属性2 1. name:指定构造函数参数名称。(在进行set注入时可以使用复合属性名,如student.birthday.year)3 2. value:用于注入基本属性值和String4 3. ref:用于注入引用类型5 4. 集合、空值、内联Bean的注入应使用子标签来完成6-->7<bean id="myStudent" class="com.bjpowernode.ba03.Student">8 <constructor-arg name="myage" value="22" />9 <constructor-arg name="myname" value="李四"/>10 <constructor-arg name="mySchool" ref="mySchool"/>11</bean>如果编译时没有带上调试信息,还可以通过参数索引进行构造函数的匹配,并且允许在能够推断的情况下省略索引属性。
131<!--构造注入,使用index,参数的位置,构造方法参数从左往右位置是0,1,2-->2<bean id="myStudent2" class="com.bjpowernode.ba03.Student">3    <constructor-arg index="1" value="28"/>4    <constructor-arg index="0" value="张三"/>5    <constructor-arg index="2" ref="mySchool" />6</bean>7
8<!--构造注入,省略index属性-->9<bean id="myStudent3" class="com.bjpowernode.ba03.Student">10 <constructor-arg value="张峰"/>11 <constructor-arg value="28"/>12 <constructor-arg ref="mySchool" />13</bean>此外,还支持使用c名称空间简化构造注入的书写方式 ,了解即可:
181<beans xmlns="http://www.springframework.org/schema/beans"2    xmlns:xsi="http://www.w3.org/2001/XMLSchema-instance"3    xmlns:c="http://www.springframework.org/schema/c"4    xsi:schemaLocation="http://www.springframework.org/schema/beans5        http://www.springframework.org/schema/beans/spring-beans.xsd">6
7    <bean id="thingOne" class="x.y.ThingTwo"/>8    <bean id="thingTwo" class="x.y.ThingThree"/>9
10 <!-- 使用c名称空间简化构造注入的书写方式 11 1. 基本类型使用 c:属性名="属性值"12 2. 引用类型使用 c:属性名_ref="属性值"13 -->14 <bean id="thingOne" class="x.y.ThingOne" 15 c:thingTwo-ref="thingTwo" 16 c:thingThree-ref="thingThree" 17 c:email="[emailprotected]"/>18</beans>使用Java配置时的注入方式如下:
91public class MyComponent {3 private final MyService myService;4
5 6 public MyComponent(MyService myService) {7 this.myService = myService;8 }9}提示:
使用工厂创建Bean对象时,可以通过
constructor-arg标签进行工厂方法的参数注入,使用方式同构造函数注入一致。
value属性用于注入基本属性值和String,ref用于注入引用类型,集合、空值、内联Bean的注入应使用子标签来完成。
2) Set方法注入
基于Set方法的注入是在对象创建完成后,调用对象的set方法来进行属性注入。
81<bean id="now" class="java.util.Date"></bean> 2
3<bean id="accountService" class="com.itheima.service.impl.AccountServiceImpl">4    <property name="name" value="test"></property>5    <property name="age" value="21"></property>6    <property name="birthday" ref="now"></property>7</bean>8
类似的,可以使用p名称空间来进行简化书写。
121<beans xmlns="http://www.Springframework.org/schema/beans"2    xmlns:p="http://www.Springframework.org/schema/p"3    xmlns:xsi="http://www.w3.org/2001/XMLSchema-instance" xsi:schemaLocation=" http://www.Springframework.org/schema/beans        4                    http://www.Springframework.org/schema/beans/Spring-beans.xsd">5
6 <bean id="now" class="java.util.Date"></bean> 7 8 <bean id="accountService" class="com.itheima.service.impl.AccountServiceImpl4" 9 p:name="test" 10 p:age="21" 11 p:birthday-ref="now"/>12</beans> 使用Java配置时的注入方式如下:
91public class MyComponent {3 private MyService myService;4
5 6 public void setMyService(MyService myService) {7 this.myService = myService;8 }9}注意:
@Autowired注解也可用于普通方法上,但该方法必须被public void修饰,且每一个参数都是容器中的某个依赖项。
3) 字段注解注入
基于 Java 配置的@Autowired注解支持直接对字段进行注入,且无需 Set 方法:
51public class MyComponent {3 4 private MyService myService;5}
4) 自动注入(不推荐)
Spring 支持对 Bean 的属性进行自动注入,并且当类中新增依赖项时,无需修改配置即可自动满足该依赖项。
自动注入的模式共有四种,通过 bean 标签的autowire属性来指定:
| Mode | Explanation |
|---|---|
| no(默认) | 不进行自动装配, 仅由 ref 属性来定义 Bean 之间的依赖关系,可以提供更好的控制和清晰度。 |
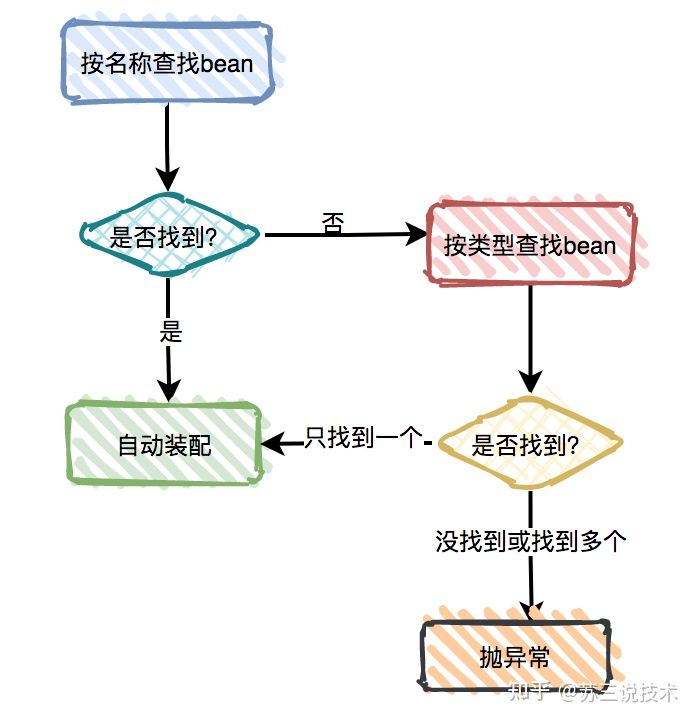
| byName | 按属性名称自动装配,Spring通过属性名在容器中查找匹配的依赖 Bean 进行注入。 |
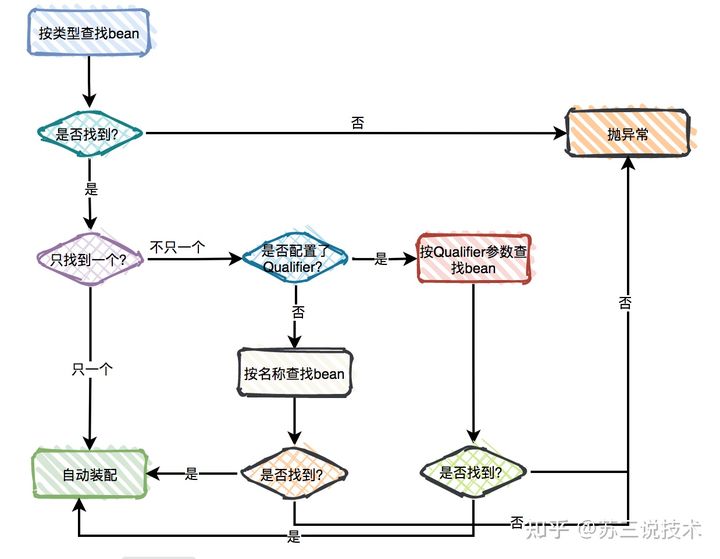
| byType | 按属性类型自动装配,如果查找到唯一匹配的依赖Bean,则进行注入。但如果查找到多个,则引发致命异常。 |
| constructor | 类似于byType,适用于构造函数参数的自动装配。不同的是,如果未查找到匹配的依赖Bean也会引发致命异常。 |
151<!-- byName 自动注入 -->2<bean id="myStudent" class="com.bjpowernode.ba04.Student" autowire="byName">3    <property name="name" value="李四"/>4    <property name="age" value="22" />5    <!--引用类型的赋值-->6    <!--<property name="school" ref="mySchool" />-->7</bean>8
9<!-- byType 自动注入 -->10<bean id="myStudent" class="com.bjpowernode.ba05.Student" autowire="byType">11    <property name="name" value="张三"/>12    <property name="age" value="26" />13    <!--引用类型的赋值-->14    <!--<property name="school" ref="mySchool" />-->15</bean>
使用Java配置时的自动注入方式如下:
71public class AppConfig {3 (autowire = Autowire.BY_TYPE)4 public MyComponent myComponent() {5 return new MyComponent();6 }7}注意:
对按类型自动注入的方式(byType/Constructor),可以设置候选(autowire-candidate)或优先(primary)属性,减少注入报错。
autowire属性已经被标记为废弃(@Deprecated),并且在实际开发中不推荐使用它。
3. 特殊注入场景
1) 注入集合属性
顾名思义,就是给类中的集合成员进行属性注入,用的也是set方法注入的方式,只不过变量的数据类型都是集合。
471<bean id="accountService" class="com.itheima.service.impl.AccountServiceImpl">2    <!-- 给数组注入数据 -->3    <property name="myStrs">4        <set>5            <value>AAA</value>6            <value>BBB</value>7            <value>CCC</value>8        </set>9    </property>10
11    <!-- 注入list 集合数据 -->12    <property name="myList">13        <array>14            <value>AAA</value>15            <value>BBB</value>16            <value>CCC</value>17        </array>18    </property>19
20    <!-- 注入set 集合数据 -->21    <property name="mySet">22        <list>23            <value>AAA</value>24            <value>BBB</value>25            <value>CCC</value>26        </list>27    </property>28
29    <!-- 注入Map 数据 -->30    <property name="myMap">31        <props>32            <prop key="testA">aaa</prop>33            <prop key="testB">bbb</prop>34        </props>35    </property>36
37    <!-- 注入properties 数据 -->38    <property name="myProps">39        <map>40            <entry key="testA" value="aaa"></entry>41            <entry key="testB">42                <value>bbb</value>43            </entry>44        </map>45    </property>46</bean> 47
如果Bean存在继承关系,则可以通过merge属性来合并父类的集合。
231<!-- 定义一个ParentBean,并给adminEmails集合进行注入 -->2<beans>3    <bean id="parent" abstract="true" class="example.ComplexObject">4        <property name="adminEmails">5            <props>6                <prop key="administrator">[emailprotected]</prop>7                <prop key="support">[emailprotected]</prop>8            </props>9        </property>10    </bean>11
12<!-- 定义一个ChildBean,同样给adminEmails集合进行注入 13 1. merge:继承父类集合中的属性,并进行选择性覆盖14-->15 <bean id="child" parent="parent">16 <property name="adminEmails">17 <props merge="true">18 <prop key="sales">[emailprotected]</prop>19 <prop key="support">[emailprotected]</prop>20 </props>21 </property>22 </bean>23<beans>在使用Java配置时,@Autowired注解可以收集所有匹配的 Bean 并注入到指定的集合中,更加方便。
51public class MyComponent {3 4 private List<MyService> services;5}注意:
集合数据分两种,单列集合(array,list,set)和双列集合(map,entry,props,prop),同类型集合注入方式可以兼容。
2) 注入原型Bean
如果某个Bean是单例的,并且依赖了原型Bean,则该原型Bean不能使用上述方式直接注入,必须在每次使用时都创建新的实例。
实现感知接口方式
通过实现感知接口ApplicationContextAware或BeanFactoryAware获取容器的引用,进而调用getBean方法创建原型Bean。
201public class SingleBeanDemo implements BeanFactoryAware {2 private BeanFactory beanFactory;3
4 // 实现感知接口的抽象方法,在创建Bean的时候回调,注入容器的引用5 6 public void setBeanFactory(BeanFactory beanFactory) throws BeansException {7 this.beanFactory = beanFactory;8 }9 10 // 从容器获取原型Bean实例11 protected PrototypeBeanDemo getPrototypeBeanDemo(){12 this.beanFactory.getBean("prototypeBeanDemo", PrototypeBeanDemo.class)();13 }14 15 // 在业务方法中使用原型Bean16 public void bizMethod() {17 PrototypeBeanDemo prototypeBeanDemo = getPrototypeBeanDemo();18 }19}20
使用Lookup方式
上述方式依赖了Spring框架,并且由程序代码主动获取对象,不符合控制反转的原则,下面将使用XML配置方式由Spring来完成上述代码。
81// SingleBeanDemo 创建为抽象类,并设置 getPrototypeBeanDemo() 方法为抽象方法,待Spring为我们实现2public abstract class SingleBeanDemo {3 protected abstract PrototypeBeanDemo getPrototypeBeanDemo();4 5 public void bizMethod() {6 PrototypeBeanDemo prototypeBeanDemo = getPrototypeBeanDemo();7 }8}101<!-- PrototypeBeanDemo 定义-->2<bean id="prototypeBeanDemo" class="fiona.apple.PrototypeBeanDemo" scope="prototype">3</bean>4
5<!-- SingleBeanDemo 定义6 lookup-method:指定查找方法和查找的原型Bean7-->8<bean id="singleBeanDemo" class="fiona.apple.SingleBeanDemo">9 <lookup-method name="getPrototypeBeanDemo" bean="prototypeBeanDemo"/>10</bean>也可以使用注解方式来配置,并且@Lookup的 value 属性可以根据查找方法声明的返回类型来解析。
91public abstract class SingleBeanDemo {3 /*("prototypeBeanDemo")*/4 protected abstract PrototypeBeanDemo getPrototypeBeanDemo();5
6 public void bizMethod() {7 PrototypeBeanDemo prototypeBeanDemo = getPrototypeBeanDemo();8 }9}注意:
查找方法的签名必须是
<public|protected> [abstract] <return-type> theMethodName(no-arguments)形式。查找方法允许是非 abstract 的,Spring会将原来的方法覆盖。
由于Spring是通过CGLib来实现该方式的,因此该类和查找方法都不能被final修饰。
查找方法不适用于工厂方法和配置类中的@Bean方法,因此在这种情况下,实例并不是由Spring创建的,无法进行动态代理。
注入ObjectFactory
101// 先注入单例的ObjectFactory,再通过getObject方法获取原型Bean的实例2public class SingleBeanDemo {4 5 ObjectFactory<PrototypeBeanDemo> prototypeBeanDemoFactory;6
7 public void bizMethod() {8 PrototypeBeanDemo prototypeBeanDemo = (PrototypeBeanDemo)factory.getObject();9 }10}
3) 静态变量注入
我们封装工具类的时候,大多数提供的是静态方法,而静态方法只能访问静态变量,此时,则需要将我们所需的依赖注入到静态变量中。
通过Set方法注入
91public class RedisLockUtil {3 private static RedisTemplate<Object, Object> redisTemplate;4 5 6 public void setRedisTemplate(RedisTemplate<Object, Object> redisTemplate) {7 RedisLockUtil.redisTemplate = redisTemplate;8 }9 }
使用@PostConstruct注解
121public class RedisLockUtil {3 private static RedisTemplate<Object, Object> redisTemplate;4 5 6 private RedisTemplate<Object,Object> redisTemplate_copy;7
8 9 public void init(){10 RedisLockUtil.redisTemplate=redisTemplate_copy;11 }12 }
4) 普通类使用Bean
如果某个类是一个普通的Java,并且并没有被Spring容器所管理,那么如何使用Spring容器创建的Bean实例呢?
SpringUtils工具类
定义一个工具类,实现容器的感知接口,通过静态方法向外部提供获取Bean的功能。
371public class SpringUtils implements ApplicationContextAware {3 private static ApplicationContext applicationContext;4
5 6 public void setApplicationContext(ApplicationContext applicationContext) throws BeansException {7 SpringUtils.applicationContext = applicationContext;8 }9
10 public static <T> T getBean(Class<T> requiredType) {11 return applicationContext.getBean(requiredType);12 }13
14 public static <T> T getBean(String beanName) {15 return (T) applicationContext.getBean(beanName);16 }17
18 public static <T> T getBean(Class<T> requiredType, Object... args) {19 return applicationContext.getBean(requiredType, args);20 }21
22 public static <T> T getBean(String beanName, Object... args) {23 return (T) applicationContext.getBean(beanName, args);24 }25
26 public static <T> T getBean(String beanName, Class<T> requiredType) {27 return (T) applicationContext.getBean(beanName, requiredType);28 }29
30 public int getBeanDefinitionCount(){31 return applicationContext.getBeanDefinitionCount();32 }33
34 public String[] getBeanDefinitionNames(){35 return applicationContext.getBeanDefinitionNames();36 }37}
静态化Bean
修改 Bean 的代码,在初始化回调时将 Bean 的 this 指针设置到一个静态变量中。
161public class FundDispatchLogUtils {3 // 定义一个静态变量,用于保存this指针4 private static FundDispatchLogUtils instance;5
6 // 把this保存在静态变量中7 8 public void init() {9 instance = this;10 }11
12 // 提供获取this的静态方法13 public static FundDispatchLogUtils getInstance() {14 return instance;15 }16}
4. 关于循环依赖
1) 什么是循环依赖?
如果创建A对象时,依赖B对象,创建B对象时,又依赖A对象,就会出现循环依赖,抛出BeanCurrentlyInCreationException异常。
注意:
容器维护了
singletonsCurrentlyInCreation和prototypesCurrentlyInCreation集合来检测是否出现循环依赖。
2) 循环依赖的解决方式
Spring 定义了三级缓存,来解决单例对象非构造函数注入时的循环依赖问题,并且支持AOP代理对象的创建:
一级缓存(singletonObjects):存储已经完全初始化完成的单例 Bean 对象。
二级缓存(earlySingletonObjects):存储提前暴露的早期 Bean 对象(已实例化但未完成依赖注入和初始化),用于解决循环依赖问题。
三级缓存(singletonFactories):存储 Bean 的 ObjectFactory,用于在需要时创建 Bean 的代理对象,解决AOP代理对象的创建问题。
3) 循环依赖解决流程分析
创建 A 对象时,先将 A 对象的 ObjectFactory 放入三级缓存,再触发 B 对象的创建。
创建 B 对象时,从二级缓存获取 A 对象的早期对象,完成 B 对象的初始化,将 B 对象放入一级缓存。
如果二级缓存未找到 A 对象的早期对象,则从三级缓存获取 A 对象的 ObjectFactory,创建 A 对象的早期对象,放入二级缓存。
最后,A 对象从一级缓存获取 B 对象进行注入,完成 A 对象的初始化,将 A 对象也放入一级缓存。
注意:
引入三级缓存的目的,主要是为了暴漏早期对象时,能够通过 ObjectFactory 创建 AOP 代理对象。
如果是原型对象或使用构造函数注入,由于无法暴露早期对象,无法解决相应的循环依赖问题。
5. 关于感知接口
1) 什么是感知接口?
感知接口(Aware)用于注入一些基础 Bean,主要是通过ApplicationContextAwareProcessor实现的,在Bean 初始化之前执行。
2) 常见感知接口
| 接口名称 | 主要功能 |
|---|---|
ApplicationContextAware | 注入 ApplicationContext,用于访问 Spring 容器上下文信息。 |
BeanFactoryAware | 注入 BeanFactory,用于直接访问和操作 Bean。 |
BeanNameAware | 注入 Bean 的名称(id 或 name),用于在 Bean 中使用自己的名称。 |
ResourceLoaderAware | 注入 ResourceLoader,用于加载资源文件。 |
EnvironmentAware | 注入 Environment,用于获取环境配置信息。 |
MessageSourceAware | 注入 MessageSource,用于国际化支持。 |
ApplicationEventPublisherAware | 注入 ApplicationEventPublisher,用于发布自定义事件。 |
ServletContextAware | 注入 ServletContext,用于访问 Servlet 容器上下文信息(仅限 Web 应用)。 |
ServletConfigAware | 注入 ServletConfig,用于访问 Servlet 配置信息(仅限 Web 应用)。 |
3) 使用示例
231// 通过感知接口获取 ApplicationContext2public class ApplicationContextAwareExample implements ApplicationContextAware {4 private ApplicationContext applicationContext;5
6 7 public void setApplicationContext(ApplicationContext applicationContext) {8 this.applicationContext = applicationContext;9 System.out.println("ApplicationContext injected: " + applicationContext);10 }11}12
13// 通过感知接口获取 BeanName14("myBean")15public class BeanNameAwareExample implements BeanNameAware {16 private String beanName;17
18 19 public void setBeanName(String name) {20 this.beanName = name;21 System.out.println("Bean name: " + beanName);22 }23}
6. 关于类型处理器
1) 什么是类型处理器
类型处理器可以将一种类型的对象转换为另一种类型的对象,Spring框架中分为如下两类:
PropertyEditor:JDK 提供的类型转换接口,主支持将字符串转换为其他类型,通常用于处理属性注入时的类型转换问题。
Converter:支持任意两种类型之间的转换,通常也用于处理属性注入时的类型转换问题。
Formatter:支持任意类型和字符串之间的双向转换,并且支持国际化,通常用于处理 Spring MVC 中的数据绑定问题。
注意:
上述三种类型处理器的生效顺序为:
Formatter -> Converter -> PropertyEditor。
2) 内置类型处理器
内置PropertyEditor
| PropertyEditor | 功能描述 |
|---|---|
BooleanEditor | 将字符串 "true" 或 "false" 转换为 Boolean 类型。 |
IntegerEditor | 将字符串转换为 Integer 类型。 |
LongEditor | 将字符串转换为 Long 类型。 |
FloatEditor | 将字符串转换为 Float 类型。 |
DoubleEditor | 将字符串转换为 Double 类型。 |
StringTrimmerEditor | 去除字符串前后的空白,并可选地将空字符串转换为 null。 |
StringArrayPropertyEditor | 将逗号分隔的字符串转换为字符串数组。 |
PropertiesEditor | 将字符串转换为 java.util.Properties 对象。 |
PatternEditor | 将字符串转换为 java.util.regex.Pattern 对象。 |
ResourceEditor | 将字符串转换为 Resource 对象。 |
URLEditor | 将字符串转换为 java.net.URL 对象。 |
URIEditor | 将字符串转换为 java.net.URI 对象。 |
FileEditor | 将字符串转换为 java.io.File 对象。 |
PathEditor | 将字符串转换为 java.nio.file.Path 对象。 |
ClassEditor | 将字符串转换为 Class 对象。 |
LocaleEditor | 将字符串转换为 java.util.Locale 对象。 |
TimeZoneEditor | 将字符串转换为 java.util.TimeZone 对象。 |
ZoneIdEditor | 将字符串转换为 java.time.ZoneId 对象。 |
CustomDateEditor | 将字符串转换为 java.util.Date 对象,支持自定义日期格式。 |
UUIDEditor | 将字符串转换为 java.util.UUID 对象。 |
内置Converter
| 类型处理器名称 | 功能描述 |
|---|---|
StringToBooleanConverter | 将字符串转换为布尔值(如 "true" 转换为 true) |
ObjectToStringConverter | 将对象转换为字符串,调用对象的 toString 方法 |
StringToNumberConverterFactory | 将字符串转换为数字类型(如 Integer、Long 等) |
NumberToNumberConverterFactory | 将数字子类型(基本类型)转换为数字包装类型 |
StringToCharacterConverter | 将字符串的第一个字符转换为 Character 类型 |
NumberToCharacterConverter | 将数字转换为 Character 类型 |
CharacterToNumberFactory | 将 Character 类型转换为数字类型 |
StringToEnumConverterFactory | 将字符串转换为枚举类型(通过 Enum.valueOf) |
EnumToStringConverter | 将枚举类型转换为字符串(返回枚举的 name 值) |
StringToLocaleConverter | 将字符串转换为 java.util.Locale 对象 |
PropertiesToStringConverter | 将 java.util.Properties 转换为字符串(默认使用 ISO-8859-1 编码) |
StringToPropertiesConverter | 将字符串转换为 java.util.Properties 对象(默认使用 ISO-8859-1 解码) |
内置Formatter
| Formatter | 功能描述 |
|---|---|
NumberFormatter | 格式化和解析数字类型(如 Integer、Double)。支持国际化。 |
DateTimeFormatter | 格式化和解析日期时间类型(如 LocalDate、LocalDateTime)。支持国际化。 |
NumberStyleFormatter | 格式化和解析数字,支持不同的数字风格(如货币、百分比)。支持国际化。 |
PercentFormatter | 格式化和解析百分比值。支持国际化。 |
CurrencyFormatter | 格式化和解析货币值。支持国际化。 |
BooleanFormatter | 格式化和解析布尔值(如 "true" 和 "false")。 |
EnumFormatter | 格式化和解析枚举类型。 |
StringFormatter | 格式化和解析字符串类型(通常用于简单的字符串处理)。 |
LocalizedFormatter | 根据 Locale 格式化和解析数据,支持国际化。 |
3) 自定义类型处理器
自定义Converter
实现Converter<S, T>接口,覆盖 convert方法,完成从源类型 S 到目标类型 T 的转换。
201// 自定义Converter,完成String->Date的转换。2public class MyDateConverter implements Converter<String, Date> {3 private String pattern;4
5 public void setPattern(String pattern) {6 this.pattern = pattern;7 }8 9 10 public Date convert(String source) {11 Date date = null;12 try {13 SimpleDateFormat sdf = new SimpleDateFormat(pattern);14 date = sdf.parse(source);15 } catch (ParseException e) {16 e.printStackTrace();17 }18 return date;19 }20}将自定义的 Converter 注册到 Spring 的 ConversionService 中:
121<!-- 创建 MyDateConverter 的对象-->2<bean id="myDateConverter" class="com.baizhiedu.converter.MyDateConverter">3    <property name="pattern" value="yyyy-MM-dd"/>4</bean>5
6<!-- 注册类型转换器7    1. 目的:告知Spring框架,我们所创建的MyDateConverter是一个类型转换器8    2. 注意:ConversionSeviceFactoryBean 定义 id属性 值必须是 conversionService9-->10<bean id="conversionService" class="org.springframework.context.support.ConversionServiceFactoryBean">11  <property name="converters" ref="myDateConverter"></property>12</bean>
使用 Java 配置方式如下:
91public class ConversionConfig {3 4 public GenericConversionService conversionService() {5 GenericConversionService conversionService = new GenericConversionService();6 conversionService.addConverter(new MyDateConverter());7 return conversionService;8 }9}
自定义Formatter
实现Formatter<T>接口,覆盖 print和parse方法,完成类型 T 和字符串之间的双向转换。
171import org.springframework.format.Formatter;2import java.util.Locale;3
4// 枚举类Status <-> 字符串5public class StatusFormatter implements Formatter<Status> {6 7 public String print(Status status, Locale locale) {8 // 将枚举值转换为字符串9 return status.getCode();10 }11
12 13 public Status parse(String text, Locale locale) {14 // 将字符串解析为枚举值15 return Status.fromCode(text);16 }17}将自定义的 Formatter 注册到 Spring 的 FormattingConversionService 中:
71<bean id="conversionService" class="org.springframework.format.support.FormattingConversionServiceFactoryBean">2 <property name="formatters">3 <set>4 <bean class="com.example.StatusFormatter"/>5 </set>6 </property>7</bean>使用 Java 配置如下:
71public class WebConfig implements WebMvcConfigurer {3 4 public void addFormatters(FormatterRegistry registry) {5 registry.addFormatter(new StatusFormatter());6 }7}
第五节 基于注解的IOC配置
1. 开启注解IOC支持
1) XML配置为主
在使用基于XML配置的ClassPathXmlApplicationContext来构建 IOC 容器时,需要在XML中开启注解配置开关。
131 2<beans xmlns="http://www.springframework.org/schema/beans"3 xmlns:xsi="http://www.w3.org/2001/XMLSchema-instance"4 xmlns:context="http://www.springframework.org/schema/context"5 xsi:schemaLocation="http://www.springframework.org/schema/beans6 http://www.springframework.org/schema/beans/spring-beans.xsd7 http://www.springframework.org/schema/context8 http://www.springframework.org/schema/context/spring-context.xsd">9
10 <!-- 开启注解配置开关 -->11 <context:annotation-config/>12
13</beans>开启注解配置开关后,会自动注册下面一些BeanPostProcessor,并且在定义它的应用程序上下文中扫描Bean上的注解。
AutowiredAnnotationBeanPostProcessor:处理
@Autowired注解,用于依赖注入。CommonAnnotationBeanPostProcessor:处理 Java 标准注解(如
@PostConstruct、@PreDestroy和@Resource)。PersistenceAnnotationBeanPostProcessor:处理JPA相关的注解(如
@PersistenceContext和@PersistenceUnit)。RequiredAnnotationBeanPostProcessor:处理
@Required注解,确保某些属性必须被配置。
2) 注解配置为主
直接使用AnnotationConfigApplicationContext基于注解配置来构建容器,然后使用@ImportResuorce注解导入其它XML配置。
51("classpath:beans.xml")3public class AppConfig {4
5}注意
Spring优先对注解配置的属性进行注入,如果在XML中配置了相同的属性,那么将会对之前的配置进行覆盖。
2. 注册组件(Bean)
1) 组件标记(@Component)
@Component 注解作用于类、接口、枚举或其它注解之上,标记该元素为 Spring 的一个组件,唯一的 value 属性用于指定组件的名称。
@Scope注解可跟随组件标记使用,用于指定组件的作用范围,可选:singleton(默认)、prototype、session等。
51// 定义一个Bean,id为类名的首字母小写(userServiceImpl)2("userServiceImpl")3("prototype")4public class UserServiceImpl implements UserService {5}注意:
如需区分控制层、服务层、持久层组件,可使用
@Controller、@Service、@Repository这三个语义性注解。
2) 组件扫描(@ComponnetScan)
@ComponentScan 一般作用于 @Configuration 类上,用于自动检测标记的组件,并注册相应的 BeanDefinition 实例。
141/**2 @ComponentScan:组件扫描3 basePackages:扫描的包名(默认扫描当前包及其子包)4 name-generator:Bean名称生成器5 includeFilters:包含过滤器,仅扫描满足条件的组件6 excludeFilters:排除过滤器,不扫描满足条件的组件7*/8(basePackages = "org.example", name-generator="org.example.MyNameGenerator"10 includeFilters = (type = FilterType.REGEX, pattern = ".*Stub.*Repository"), // 按正则包含11 excludeFilters = (Repository.class)) // 按注解排除12public class AppConfig {13 ...14}等效的XML配置如下:
51<!-- 配置组件扫描,并隐式开启注解配置功能(<context:annotation-config>) -->2<context:component-scan base-package="org.example" name-generator="org.example.MyNameGenerator" >3 <context:include-filter type="regex" expression=".*Stub.*Repository"/>4 <context:exclude-filter type="annotation" expression="org.springframework.stereotype.Repository"/>5</context:component-scan>注意:
如未在组件标记时指定组件名称,则会由
BeanNameGenerator策略生成,默认为类名的首字母小写。内置的过滤类型有:按类注解(默认)、按基类/接口、 按AspectJ表达式、按正则表达式等,需自定义可实现TypeFilter接口。
可引入
spring-context-indexer包生成组件索引(META-INF/spring.components 文),提高大型应用程序的启动性能。
3. 依赖注入
1)@Autowired(推荐)
@Autowired 注解一般用于引用类型属性的自动注入,可作用于成员变量、构造函数、普通方法、函数参数和注解上。
@Qualifier注解用于指定限定符(一般是Bean的名称),以在多个类型匹配的对象中找到唯一确定的 Bean 进行注入。
371// 1. 普通引用类型变量:进行唯一性匹配,即优先按类型进行匹配,如果存在多个匹配的类型,再使用变量名称进行匹配2("dependencyA")4private CustomerPreferenceDao customerPreferenceDao;5
6// 2. 数组或单列集合变量:将该类型的所有 Bean 按照定义顺序依次注入到其中7private MovieCatalog[] movieCatalogs;9private Set<MovieCatalog> movieCatalogs;11
12// 3. 双列集合变量(Key为String类型):注入所有该类型的 Bean,并且使用 Bean 的 id 属性作为键值对的key值。13private Map<String, MovieCatalog> movieCatalogs;15
16// 4. 构造函数:使用该函数来实例化 Bean 对象,通过构造参数来进行属性注入(参数必须是Bean类型)。17// 可以同时对多个构造函数添加@Autowired(required属性都设置为false),会优先选择参数最多的那个。18public class MovieRecommender {19 private final CustomerPreferenceDao customerPreferenceDao;20
21 22 public MovieRecommender(("dependencyA") CustomerPreferenceDao customerPreferenceDao) {23 this.customerPreferenceDao = customerPreferenceDao;24 }25}26
27// 5. 普通方法:通过普通方法的参数来进行属性注入,可以是任意 void 方法(一般使用 Setter 方法)28(required = false)29public void setMovieFinder(("dependencyA") MovieFinder movieFinder) {30 this.movieFinder = movieFinder;31}32
33// 6. 泛型变量:泛型类型也会用作自动装配的匹配条件,泛型类型必须一致才会进行注入。34private Store<String> s1; // 注入StringStore36private Store<Integer> s2; // 注入 IntegerStore注意:
数据注入注解
@Autowired、@Resource、@Value等由 BeanPostProcessor 处理,不可在 BeanPostProcessor 的子类中使用。如果无法找到合适的 Bean,则抛出
NoSuchBeanDefinitionException异常,可以通过required属性对此进行修改。对于数组或有序集合注入,如果想精确控制注入顺序,可以实现
Ordered接口或使用@Order/@Priority注解。
2) @Resource
@Resource 是 JSR-250 定义的注解,也用于属性注入,可以作用于类、成员变量和方法上,但不支持在构造函数或参数上使用。
该注解优先按名称查找,如未找到则再按类型查找,最终未查找到唯一对象则报错。
如果设置了name或type属性,则只会按name或type属性查找,未查找到唯一对象则报错。
151public class SimpleMovieLister {2 private MovieFinder movieFinder;3
4 // 仅按 myMovieFinder 名称匹配,失败则抛异常5 (name="myMovieFinder")6 public void setMovieFinder(MovieFinder movieFinder) {7 this.movieFinder = movieFinder;8 }9 10 // 优先按 movieFinder 名称匹配,失败则按类型匹配11 12 public void setMovieFinder(MovieFinder movieFinder) {13 this.movieFinder = movieFinder;14 }15}注意:
Spring 中也可使用 JSR-330 注解进行组件扫描和自动注入,如
ManagedBean、@Inject、Named等,但需引入额外的依赖:61<!--引入JSR-330注解的相关依赖-->2<dependency>3<groupId>javax.inject</groupId>4<artifactId>javax.inject</artifactId>5<version>1</version>6</dependency>
3) @Value
@Value注解一般用于字面量的注入,并且会解析${}从环境中取值进行替换。
181("classpath:beans.xml")3public class AppConfig {4
5 ("${jdbc.url}")6 private String url;7
8 ("${jdbc.username}")9 private String username;10
11 ("${jdbc.password}")12 private String password;13
14 15 public DataSource dataSource() {16 return new DriverManagerDataSource(url, username, password);17 }18}注意:
@Value注解会优先去容器中查找名称一致的 Bean进行注入,只有未找到合适的 Bean 时,才会进行字面量注入。
4) @Qualifier
声明和使用
@Qualifier 用于指定一个限定符,以缩小自动装配的匹配范围,可作用于成员变量、构造方法参数或其它方法参数之上。
141public class MovieRecommender {2 private CustomerPreferenceDao customerPreferenceDao;3 4 // 成员变量上使用@Qualifier(指定匹配的限定符为main)5 6 ("main") 7 private MovieCatalog movieCatalog;8
9 // 方法参数上使用@Qualifier10 11 public void prepare(("main") CustomerPreferenceDao customerPreferenceDao) {12 this.customerPreferenceDao = customerPreferenceDao;13 }14}假设 MovieCatalog 类型的 Bean 配置如下,两个对象分别声明了 main 和 action 两个限定符,则会注入 SimpleMovieCatalog1 对象。
101("main")3public class MovieCatalog extends SimpleMovieCatalog1{4}5
6("action")8public class MovieCatalog extends SimpleMovieCatalog2{9}10
提示:
每个Bean都会将 id 属性作为默认的限定符值,如上例也可以使用@Qualifier("simpleMovieCatalog2")来连接另一个实例。
@Qualifier对集合类型变量也有效,将会在注入前限定匹配的范围(注意:Bean的限定符值并不是唯一的)。
自定义限定符
可以基于 @Qualifier 自定义一些组合注解,并对属性做一些修改,只有当全部属性都匹配时,才会加入候选列表。
81// 定义组合注解 @MovieQualifier2({ElementType.FIELD, ElementType.PARAMETER})3(RetentionPolicy.RUNTIME)4public @interface MovieQualifier {6 String genre();7 Format format();8}41// 限定自动注入的匹配范围,只有当format=Format.VHS, genre="Action"时才进行匹配2(format=Format.VHS, genre="Action")4private MovieCatalog actionVhsCatalog;
5)@Primary
@Primary 注解可以指定某个 Bean 作为该类型的优先 Bean,如果候选对象列表中存在唯一的优先 Bean,则使用该值进行注入。
91public class MovieConfiguration {3 4 // 指定该Bean为主Bean,优先进行注入5 public MovieCatalog firstMovieCatalog() { ... }6
7 8 public MovieCatalog secondMovieCatalog() { ... }9}
6)@Required(不常用)
@Required 注解只能作用于 setter 方法之上,标记某个属性在实例化 时必须被注入,否则就会抛出 BeanInitializationException 异常,具体请参考 RequiredAnnotationBeanPostProcessor 的实现。
91public class Student {2 private String name;3
4 // 标记 name 属性必须被注入(注意:即使注入 NULL 也算被注入了,@Required 不做空指针检测)5 6 public void setName(String name) {7 this.name = name;8 }9}
第六节 基于 Java 的IOC配置
1. 开启Java配置支持
1) 以XML配置为主
使用 ClassPathXmlApplicationContext 创建容器,在 XML 中注册被@Configuration标注的配置类:
71<beans>2    <!-- 打开注解配置开关 -->3    <context:annotation-config/>4
5 <!-- 定义配置类作为一个Bean -->6 <bean class="com.acme.AppConfig"/>7</beans>此外,也可直接通过注解扫描,扫描被@Configuration标注的配置类:
41<beans>2 <!-- 配置注解扫描(隐式打开注解配置开关) -->3 <context:component-scan base-package="com.acme"/>4</beans>
2) 以注解配置为主
使用 AnnotationConfigApplicationContext 创建容器,在@Configuration类上使用@ImportResource注解来导入XML配置:
181("classpath:/com/acme/properties-config.xml")3public class AppConfig {4
5 ("${jdbc.url}")6 private String url;7
8 ("${jdbc.username}")9 private String username;10
11 ("${jdbc.password}")12 private String password;13
14 15 public DataSource dataSource() {16 return new DriverManagerDataSource(url, username, password);17 }18}
3) 导入其它组件
在 Java 配置中,可以使用 @Import 注解来导入其它配置类或常规组件类。且无需对应类添加 @Component 组件注解。
251// 配置类A2public class ConfigA {4
5 6 public A a() {7 return new A();8 }9}10
11// 常规组件类12public class UserService {14}15
16// 在配置类B中导入配置类A和普通组件类17({ConfigA.class,UserService.class})19public class ConfigB {20
21 22 public B b() {23 return new B();24 }25}如果需要导入的类数量比较多,还可以使用ImportSelector或ImportBeanDefinitionRegistrar接口来辅助导入。
141public class Myclass implements ImportSelector {2 3 public String[] selectImports(AnnotationMetadata annotationMetadata) {4 // 返回全类名数组(注意不能返回null) 5 return new String[]{"com.yc.Test.TestDemo3"}; // 也可以这样写TestDemo3.class.getName()6 }7}8
9public class WaiterRegistrar implements ImportBeanDefinitionRegistrar {10 11 public void registerBeanDefinitions(AnnotationMetadata metadata, BeanDefinitionRegistry registry){12 registry.registerBeanDefinition("waiter", new RootBeanDefinition(Waiter.class));13 }14}如果想对某些配置类或Bean进行选择性导入,即在dev环境导入指定类,在test环境导入另外的类,可以使用@Profile注解,详见下文。
注意:
ImportSelector通常用于简单的条件导入,而 ImportBeanDefinitionRegistrar 用于动态注册或修改 bean 定义等更复杂的场景。
ImportSelector和ImportBeanDefinitionRegistrar实现类要被@Import导入后才会生效,并且该实现类不会被注册到IOC容器中。
ImportSelector的子类
DeferredImportSelector用于延迟导入,在配置类的解析完成后才生效,主要用于条件装配场景。
4) 加载属性文件
@PropertySource 注解用于加载属性配置文件(properties/xml/yml)到容器中,方便通过${}或env.getProperty("")方式取值。
171("classpath:/com/${my.placeholder:default/path}/app.properties") // 使用${}取值3public class AppConfig {4 5 Environment env;6
7 // 使用${}取值并注入8 ("${demo.name}")9 private String name;10 11 12 public TestBean testBean() {13 TestBean testBean = new TestBean();14 testBean.setName(env.getProperty("testbean.name")); // 使用env.getProperty("")取值15 return testBean;16 }17}在 SpringBoot 中,还可以将属性文件与一个Java类绑定,非常方便的将属性文件中的变量值注入到该Java类的成员变量中。
441(value = {"demo/props/demo.properties"})3(prefix = "demo")4public class ReadByPropertySourceAndConfProperties {5
6 private String name;7
8 private int sex;9
10 private String type;11
12 public void setName(String name) {13 this.name = name;14 }15
16 public void setSex(int sex) {17 this.sex = sex;18 }19
20 public void setType(String type) {21 this.type = type;22 }23
24 public String getName() {25 return name;26 }27
28 public int getSex() {29 return sex;30 }31
32 public String getType() {33 return type;34 }35
36 37 public String toString() {38 return "ReadByPropertySourceAndConfProperties{" +39 "name='" + name + '\'' +40 ", sex=" + sex +41 ", type='" + type + '\'' +42 '}';43 }44}
2. 注册组件(Bean)
1) @Bean
@Bean注解用于注册组件,默认情况下,beanName 为方法名称,value 为返回的对象,类型为返回值类型。
81public class AppConfig {3 // 定义一个Bean:transferService -> com.acme.TransferServiceImpl4 5 public TransferServiceImpl transferService() {6 return new TransferServiceImpl();7 }8}等效的 XML 配置如下:
31<beans>2 <bean id="transferService" class="com.acme.TransferServiceImpl"/>3</beans>
2) Bean的属性
名称和别名
可以使用name属性来指定bean的名称,或通过指定多个名称来设置别名。
181public class AppConfig {3
4 // 定义一个Bean指定名称为:myThing5 (name = "myThing")6 public Thing thing() {7 return new Thing();8 }9}10
11public class AppConfig {13 // 定义一个Bean,并指定多个名称(第一个名称为ID属性)14 ({"dataSource", "subsystemA-dataSource", "subsystemB-dataSource"})15 public DataSource dataSource() {16 // instantiate, configure and return DataSource bean...17 }18}在必要的时候,也可以通过@Description提供更详细的文本描述。
101public class AppConfig {3
4 // 定义一个Bean,并添加描述信息5 6 ("Provides a basic example of a bean")7 public Thing thing() {8 return new Thing();9 }10}
作用范围
使用 @Scope 注解可以修改 Bean 的作用范围,默认为 singleton。
91public class MyConfiguration {3
4 5 ("prototype")6 public Encryptor encryptor() {7 // ...8 }9}
生命周期回调
@Bean 注解支持指定任意的初始化和销毁回调方法,就像 XML 配置中的init-method和destroy-method属性一样。
291public class BeanOne {2
3 public void init() {4 // initialization logic5 }6}7
8public class BeanTwo {9
10 public void cleanup() {11 // destruction logic12 }13}14
15public class AppConfig {17
18 // 指定初始化方法19 (initMethod = "init")20 public BeanOne beanOne() {21 return new BeanOne();22 }23
24 // 指定销毁方法25 (destroyMethod = "cleanup")26 public BeanTwo beanTwo() {27 return new BeanTwo();28 }29}你也可以在构造期间直接调用 init() 方法同样有效。
101public class AppConfig {3 4 5 public BeanOne beanOne() {6 BeanOne beanOne = new BeanOne();7 beanOne.init();8 return beanOne;9 }10}除上之外,任何使用 @Bean 注解定义的类都支持常规的生命周期回调,并且可以使用 JSR-250 中的@PostConstruct和@PreDestroy注解。同样的,如果 bean 实现了InitializingBean,DisposableBean或Lifecycle,则容器将调用它们各自的方法。
注意:默认情况下,使用Java 配置时会自动将公共的
close或shutdown方法注册为销毁回调,可以使用下面方式去除。41(destroyMethod="")2public DataSource dataSource() throws NamingException {3return (DataSource) jndiTemplate.lookup("MyDS");4}
3. 依赖注入
1) 方法参数方式
创建 Bean 的方法可以具有任意数量的参数,这些参数描述构建该 bean 所需的依赖关系,解析机制与基于构造函数的依赖注入几乎相同。
91public class AppConfig {3
4 // 通过方法参数注入AccountRepository5 6 public TransferService transferService(AccountRepository accountRepository) {7 return new TransferServiceImpl(accountRepository);8 }9}
2) 方法调用方式
除了使用方法参数来定义依赖外,还可以通过方法调用来定义 Bean 之间的依赖,且每次方法调用返回的是同一个实例。
211public class AppConfig {3
4 // 定义一个 beanT015 6 public BeanT01 beanT01() {7 return new BeanT01();8 }9 10 // 定义一个 beanT02,并通过方法调用依赖 beanT0111 12 public BeanT02 beanT02() {13 return new BeanT02(beanT01());14 }15
16 // 定义一个 beanT03,也通过方法调用依赖 beanT0117 18 public BeanT03 beanT03() {19 return new BeanT03(beanT01()); // beanT01()调用获取的是同一实例20 }21}等效的 XML 配置如下:
111<beans>2    <bean id="beanT01" class="com.acme.services.BeanT01"></bean>3    4    <bean id="beanT02" class="com.acme.services.BeanT02">5        <constructor-arg name="beanT01" ref="beanT01"/>6    </bean>7
8    <bean id="beanT03" class="com.acme.services.BeanT03">9        <constructor-arg name="beanT01" ref="beanT01"/>10    </bean>11</beans>
注意:
方法调用方式仅在
@Configuration类中有效,而不能在普通@Component类中使用,因为后者未被 CGLIB 拦截处理。
3) 类成员注入(不推荐)
@Configuration类也是一个Bean,因此可以使用@Autowired或@Value注入需要的依赖,在方法中使用。
351// 1. 成员变量注入2public class ServiceConfig {4
5 // 注入依赖:accountRepository6 7 private AccountRepository accountRepository;8
9 // 定义一个bean10 11 public TransferService transferService() {12 // 使用注入的依赖13 return new TransferServiceImpl(accountRepository);14 }15}16
17// 2. 构造方法注入18public class RepositoryConfig {20 private final DataSource dataSource;21
22 // 注入依赖:dataSource23 24 public RepositoryConfig(DataSource dataSource) {25 this.dataSource = dataSource;26 }27
28 // 定义一个Bean29 30 public AccountRepository accountRepository() {31 // 使用注入的依赖32 return new JdbcAccountRepository(dataSource);33 }34}35
注意:
不推荐使用此种方式,因为会@Configuration类的处理时机非常早,会导致注入的依赖性被过早的初始化。
相应的,如果创建的
BeanPostProcessor或BeanFactoryPostProcessor等特殊类,应该使用静态方法。
4) 注入原型Bean
在单例作用域的 bean 依赖于原型作用域的 bean 的情况下,通过使用 Java 配置注入如下:
141// 单例Bean2public abstract class CommandManager {3    public Object process(Object commandState) {4        // 获取一个新实例,并初始化5        Command command = createCommand();6        command.setState(commandState);7        8        // 使用新实例来执行业务逻辑9        return command.execute();10    }11
12 // 查找方法13 protected abstract Command createCommand();14}181// 被依赖的原型Bean2("prototype")4public AsyncCommand asyncCommand() {5 AsyncCommand command = new AsyncCommand();6 return command;7}8
9// 依赖原型Bean的单例Bean10public CommandManager commandManager() {12 // 返回单例Bean实例,并实现查找方法:createCommand()13 return new CommandManager() {14 protected Command createCommand() {15 return asyncCommand();16 }17 }18}
第02章_SpringAOP
第一节 SpringAOP简介
1. 什么是SpringAOP?
AOP(Aspect Oriented Programming,面向切面编程是一种通过预编译或动态代理的方式在不修改源代码的情况下给程序动态添加某种特定功能的技术,用来弥补面向对象编程(OOP)中的一些不足,它更关注于多个类之间的共同问题,如日志记录,性能统计,安全控制,事务处理,异常处理等。
下面表格列举了AOP中的一些常用概念:
| 名词 | 解释 |
|---|---|
| 目标(Target) | 被通知的对象 |
| 代理(Proxy) | 向目标对象应用通知之后创建的代理对象 |
| 连接点(JoinPoint) | 目标对象的所属类中,定义的所有方法均为连接点 |
| 切入点(Pointcut) | 被切面拦截 / 增强的连接点(切入点一定是连接点,连接点不一定是切入点) |
| 通知(Advice) | 增强的逻辑 / 代码,也即拦截到目标对象的连接点之后要做的事情 |
| 引介(Introduction) | 一种特殊的通知,可以为现有对象添加任何接口的实现 |
| 切面(Aspect) | 切入点(Pointcut)+通知(Advice) |
| 顾问(Advisors) | 一种特殊的切面,只包含一个通知(引介),是SpringAOP中独有的概念 |
| 织入(Weaving) | 将通知应用到目标对象,进而生成代理对象的过程动作 |
Spring框架以IOC容器为基础,引入AspectJ相关注解和类库,采用运行期动态代理织入,实现了基于方法拦截的AOP支持。
Spring AOP 和 AspectJ 框架对比如下:
| 特性 | Spring AOP | AspectJ |
|---|---|---|
| 增强方式 | 运行时增强(基于动态代理) | 编译时增强、类加载时增强(直接操作字节码) |
| 切入点支持 | 方法级(Spring Bean 范围内,不支持 final 和 staic 方法) | 方法级、字段、构造器、静态方法等 |
| 性能 | 运行时依赖代理,有一定开销,切面多时性能较低 | 运行时无代理开销,性能更高 |
| 复杂性 | 简单,易用,适合大多数场景 | 功能强大,但相对复杂 |
| 使用场景 | Spring 应用下比较简单的 AOP 需求 | 高性能、高复杂度的 AOP 需求 |
注意:
Spring AOP 默认通过运行期的动态代理来实现AOP的,可额外导入 spring-aspects 依赖来支持通过类加载时编织实现AOP。
如果需要对字段或非 Spring 管理的对象进行拦截,需额外在开发和编译过程中引入 AspectJ 编译器/编织器。
2. SpringAOP入门案例
1) 导入AOP依赖
首先导入SpringAOP开发过程中需要使用的jar包spring-aop.jar和aspectjweaver.jar等:
131<!-- 直接导入 spring-context 模块,包含了 AOP 和 IOC 相关依赖 -->2<dependency>3    <groupId>org.springframework</groupId>4    <artifactId>spring-context</artifactId> <!-- 间接导入 spring-aop 模块 -->5    <version>5.2.9.RELEASE</version>6</dependency>7
8<!--AspectJ依赖包:AspectJ所定义的AOP注解和切入点表达式支持等-->9<dependency>10    <groupId>org.aspectj</groupId>11    <artifactId>aspectjweaver</artifactId>12    <version>1.9.6</version>13</dependency>
2) 开启AOP支持
基于Java配置的项目,可以在配置类上加@EnableAspectJAutoProxy注解开启注解AOP支持:
51 // 开启注解AOP支持3(basePackages = "org.example")4public class SpringConfig {5}基于XML配置的项目,可以在Spring配置文件中加入<aop:aspectj-autoproxy/>元素开启注解AOP支持:
121 2<beans xmlns="http://www.springframework.org/schema/beans"3 xmlns:xsi="http://www.w3.org/2001/XMLSchema-instance"4 xmlns:aop="http://www.springframework.org/schema/aop"5 xsi:schemaLocation="6 http://www.springframework.org/schema/beans https://www.springframework.org/schema/beans/spring-beans.xsd7 http://www.springframework.org/schema/aop https://www.springframework.org/schema/aop/spring-aop.xsd">8
9 <!-- 开启注解AOP支持 -->10 <aop:aspectj-autoproxy/>11
12</beans>
3) 业务代码示例(注意包名)
81package org.example.vo;2
3// 账户实体类4public class Account {6 private Integer id;7 private String name;8}101package org.example.dao;2
3import org.example.vo.Account;4import org.springframework.stereotype.Component;5
6// 账户的持久层接口7public interface AccountDao {8 void save(Account account);9}10
141package org.example.dao;2
3import org.example.vo.Account;4import org.springframework.stereotype.Component;5
6// 账户的持久层实现类7("accountDao")8public class AccountDaoImpl implements AccountDao {9
10 11 public void save(Account account) {12 System.out.println("保存了" + account);13 }14}81package org.example.service;2
3import org.example.vo.Account;4
5// 账户的业务层接口6public interface AccountService {7 void saveAccount(Account account);8}221package org.example.service;2
3import org.example.dao.AccountDao;4import org.example.vo.Account;5import org.springframework.beans.factory.annotation.Autowired;6import org.springframework.stereotype.Component;7
8// 账户的业务层实现类9("accountService")10public class AccountServiceImpl implements AccountService {11 12 private AccountDao accountDao;13
14 public void setAccountDao(AccountDao accountDao) {15 this.accountDao = accountDao;16 }17
18 19 public void saveAccount(Account account) {20 accountDao.save(account);21 }22}
4) 配置切面进行拦截
通过注解方式配置切面如下:
591// 事务切面2 // 1. 配置切面3public class TransactionManager {5
6 // 2. 配置切入点7 ("execution ( public void org.example.service..*.*(..))")8 public void pt1() {9 }10
11 // 3.1 配置前置通知12 ("pt1()")13 public void beginTransaction() {14 System.out.println("开启事务...");15 }16
17 // 3.2 配置后置通知18 ("pt1()")19 public void commit() {20 System.out.println("提交事务...");21 }22
23 // 3.3 配置异常通知24 ("pt1()")25 public void rollback() {26 System.out.println("回滚事务...");27 }28
29 // 3.4 配置最终通知30 ("pt1()")31 public void release() {32 System.out.println("释放资源...");33 }34
35 // 3.5 配置环绕通知(与上面四种通知二选一配置即可)36 ("pt1()")37 public Object transactionAround(ProceedingJoinPoint pjp) {38 Object rtValue = null;39 try {40 //获取方法执行所需的参数41 Object[] args = pjp.getArgs();42 //前置通知:开启事务43 beginTransaction();44 //执行方法45 rtValue = pjp.proceed(args);46 //后置通知:提交事务47 commit();48 } catch (Throwable e) {49 //异常通知:回滚事务50 rollback();51 e.printStackTrace();52 } finally {53 //最终通知:释放资源54 release();55 }56 return rtValue;57 }58
59}等效的XML配置如下:
351 2<beans xmlns="http://www.springframework.org/schema/beans"3 xmlns:xsi="http://www.w3.org/2001/XMLSchema-instance"4 xmlns:aop="http://www.springframework.org/schema/aop" xsi:schemaLocation="5 http://www.springframework.org/schema/beans http://www.springframework.org/schema/beans/spring-beans.xsd6 http://www.springframework.org/schema/aop http://www.springframework.org/schema/aop/spring-aop.xsd">7
8 <!-- 配置service -->9 <bean id="accountService" class="org.example.service.AccountServiceImpl">10 <property name="accountDao" ref="accountDao"/>11 </bean>12
13 <!-- 配置dao -->14 <bean id="accountDao" class="org.example.dao.AccountDaoImpl"/>15
16 <!-- 配置TransactionManager -->17 <bean id="txManager" class="org.example.aspect.TransactionManager">18 </bean>19
20 <!-- 切面配置 -->21 <aop:config>22 <!-- 配置切入点表达式 -->23 <aop:pointcut id="pt1" expression="execution ( public void org.example.service..*.*(..))"/>24
25 <!--配置切面和通知-->26 <aop:aspect id="txAdvice" ref="txManager"> <!-- 引用txManager作为切面 -->27 <!-- 各种通知 -->28 <aop:before method="beginTransaction" pointcut-ref="pt1"/>29 <aop:after-returning method="commit" pointcut-ref="pt1"/>30 <aop:after-throwing method="rollback" pointcut-ref="pt1"/>31 <aop:after method="release" pointcut-ref="pt1"/>32 </aop:aspect>33 </aop:config>34
35</beans>
5) 测试拦截效果
181// 测试类2public class Test {3    public static void main(String[] args) {4        ApplicationContext applicationContext = new AnnotationConfigApplicationContext(SpringConfig.class);5        AccountService accountService = applicationContext.getBean("accountService", AccountService.class);6
7        accountService.saveAccount(new Account(1, "张三"));8    }9}10
11// 测试结果如下(四种基础通知+环绕通知):12开启事务...13开启事务...14保存了Account{id=1, name='张三'}15提交事务...16释放资源...17提交事务...18释放资源...
第二节 相关组件详解
1. 切面
1) 声明切面
切面是切入点和通知(引介)的结合,可通过@Aspect注解声明切面:
41 // 将该Bean声明为一个切面2 3public class NotVeryUsefulAspect {4}等效的XML配置如下:
91<!--将通知所在类配置为一个Bean,id为loggingAspect-->2<bean id="loggingAspect" class="com.szkingdom.kfms.base.LoggingAspect"/>3
4<!--AOP配置标签(可以存在多个)-->5<aop:config>6    <!--配置 loggingAspect(Bean) 作为切面-->7    <aop:aspect id="myAspect" ref="loggingAspect">8    </aop:aspect>9</aop:config>
注意:
Spring在创建 Bean 对象时,如果发现带有
@Aspect注解,则会使用动态代理织入拦截逻辑。切面本身不能成为其他切面的目标,标记某个类为切面的同时,会自动从其它切面的动态代理列表排除。
2) 切面的实例化
切面本身是一个Bean,默认是单例的,通过perthis和pertarget参数,可以为每个符合条件的对象创建一个新的切面实例:
211// 如果某个类的"代理对象"符合指定的切面表达式,那么就会为每个符合条件的代理对象声明一个切面实例2("perthis(this(com.example.MyService))")3public class MyAspect {4 private int someState;5
6 ("this(com.example.MyService)")7 public void beforeAdvice() {8 // Advice logic9 }10}11
12// 如果某个"目标对象"符合指定的切面表达式,那么就会为每个符合条件的目标对象声明一个切面实例13("pertarget(target(com.example.MyService))")14public class MyAspect {15 private int someState;16
17 ("target(com.example.MyService)")18 public void beforeAdvice() {19 // Advice logic20 }21}注意:
使用CGLIB代理时,代理对象和目标对象是同一个对象(代理类继承目标类),但使用JDK动态代理时不是(同接口不同类)。
2. 切入点
切入点指想要拦截的方法或字段,通过切入点表达式来确定哪些连接点作为切入点。
1) 声明切入点
可以直接在通知上配置切入点表达式来声明内联切入点:
31// 在通知上直接声明切入点2("execution(* org.example.service.impl.*.*(..))")3public void doSome() {} 也可以在 void 方法上加@Pointcut注解来定义共享切入点,然后在通知上进行引用(注意加小括号):
121// 在单独方法上声明共享切入点2("execution(* org.example.service.impl.*.*(..))") 3private void pt1() {} 4
5// 在通知上通过“方法名()”引用共享切入点6("pt1()")7public void doSome() {} 8
9// 在通知上引用其它切面类 Aspect02 中的共享切入点10("com.example.aspect.Aspect02.pt2()")11public void beforeAdvice() {12}等效的XML配置如下:
241<!-- 方式1:内联切入点-->2<aop:config>3    <aop:aspect id="myAspect" ref="loggingAspect">4        <!-- 定义一个通知,直接使用 pointcut 属性配置切入点表达式-->5        <aop:before method="before01" pointcut="execution(* com.xyz.myapp.service.*.*(..))"/>6    </aop:aspect>7</aop:config>8
9<!-- 方式2:共享切入点-->10<aop:config>11    <aop:aspect id="myAspect" ref="loggingAspect">12        <!--事先定义切入点businessService,匹配service包下的所有方法-->13        <aop:pointcut id="businessService" expression="execution(* com.xyz.myapp.service.*.*(..))"/>14
15        <!--在通知中引用配置的切入点businessService-->16        <aop:before pointcut-ref="businessService" method="before01"/>17    </aop:aspect>18</aop:config>19
20<!-- 方式3:顶级切入点(切面外切入点)-->21<aop:config>22 <!--定义一个顶级切入点businessService,匹配service包下的所有方法-->23 <aop:pointcut id="businessService" expression="execution(* com.xyz.myapp.service.*.*(..))"/>24</aop:config>注意:
如果共享切入点需要被其它切面类引用,则需要被
public void修饰,不能只是private void。Spring 还提供了
Pointcut、AspectJExpressionPointcut、JdkRegexpMethodPointcut等接口来配置切入点,但不推荐使用。
2) 切入点表达式
SpringAOP 支持多种类型的切入点表达式,并支持..、*、+等通配符。
| 类型 | 示例 | 说明 |
|---|---|---|
execution | execution(* com.example.service.*.*(..)) | 匹配指定类的指定方法 |
| within | within(com.example.service.*) | 匹配指定类的所有方法 |
| this | this(com.example.service.UserService) | 匹配代理对象类型为指定类型的方法 |
| target | target(com.example.service.UserService) | 匹配目标对象类型为指定类型的方法 |
| args | args(java.lang.String) | 匹配方法参数类型为指定类型的方法 |
| @annotation | @annotation(org.springframework.transaction.annotation.Transactional) | 匹配方法本身带有指定注解的方法 |
| @within | @within(org.springframework.stereotype.Service) | 匹配类带有指定注解的方法 |
| @target | @target(org.springframework.stereotype.Repository) | 匹配目标类带有指定注解的方法 |
| @args | @args(com.example.annotation.Validated) | 匹配参数类型带有指定注解的方法 |
| bean | bean(userService) | 匹配指定Bean的所有方法 |
其中最常用的切入点表达式类型为execution,常用示例如下:
221// 匹配所有的public方法2// 注意:3//     ()         匹配不带参数的方法4//     (..)       匹配任意参数和类型的方法5//     (*)        匹配任意类型的单参数方法;6//     (*,String) 匹配第二个参数为String的双参数方法7execution(public * *(..))  8
9// 匹配所有set开头的方法10execution(* set*(..))  11
12// 匹配com.xyz.service.AccountService类中的所有方法13execution(* com.xyz.service.AccountService.*(..)) 14
15// 匹配 Sample 类及其子类中的 sampleMethod 方法16execution(* com.example..Sample+.sampleMethod())17
18// 匹配com.xyz.service包下的所有方法,也可使用 within(com.xyz.service.*)19execution(* com.xyz.service.*.*(..))  20
21// 匹配com.xyz.service包及其子包下的所有方法,也可以使用 within(com.xyz.service..*)22execution(* com.xyz.service..*.*(..))
注意:
SpringAOP仅支持普通方法的拦截,不支持字段和构造器的拦截。
3) 表达式的组合运算
可以使用&&, ||和!对切入点表达式进行组合运算,如下例所示:
141public class AspectA {3 // 匹配 com.example.service 包下的所有方法4 ("execution(* com.example.service.*.*(..))")5 public void serviceMethods() {}6
7 // 匹配 com.example.service.UserService 类中的所有方法8 ("execution(* com.example.service.UserService.*(..))")9 public void userServiceMethods() {}10
11 // 组合切入点,匹配 service 包下的所有方法,但排除 UserService 类中的方法12 ("serviceMethods() && !userServiceMethods()")13 public void serviceExceptUserServiceMethods() {}14}
3. 通知
通知指拦截后要执行的公共逻辑,一般与切入点表达式关联使用。
1) 前置通知(Before Advice)
前置通知在切入点方法执行之前织入一些自定义逻辑,但不能更改返回值,如果前置通知出现异常,则会传播回拦截器链。
可以使用@Before注解标识切面中的某个方法为前置通知:
181import org.aspectj.lang.annotation.Aspect;2import org.aspectj.lang.annotation.Before;3
4public class BeforeExample {6 // 前置通知7 // 直接定义切入点表达式8 ("execution(* com.xyz.myapp.dao.*.*(..))")9 public void doAccessCheck01() {10 }11 12 // 前置通知13 // 引用定义好的切入点表达式)14 ("com.xyz.myapp.SystemArchitecture.dataAccessOperation()")15 public void doAccessCheck02() {16 }17}18
类似的XML配置如下:
41<aop:aspect id="beforeExample" ref="loggingAspect">2 <!--前置通知-->3 <aop:before method="doAccessCheck" pointcut-ref="dataAccessOperation"/>4</aop:aspect>此外,也可以通过实现org.springframework.aop.MethodBeforeAdvice接口定义一个前置通知:
151// 接口定义2public interface MethodBeforeAdvice extends BeforeAdvice {3    void before(Method m, Object[] args, Object target) throws Throwable;4}5
6// 使用示例7public class CountingBeforeAdvice implements MethodBeforeAdvice {8    private int count;9    public void before(Method m, Object[] args, Object target) throws Throwable {10        ++count;11    }12    public int getCount() {13        return count;14    }15}
2) 后置通知(AfterReturning Advice)
后置通知在切入点方法执行之后执行,可以访问返回值(不能被修改),方法的参数和目标对象等运行时信息。
可以使用@AfterReturning注解标识切面中的某个方法为后置通知,并用returning属性指定参数名称用于接收返回值:
131import org.aspectj.lang.annotation.Aspect;2import org.aspectj.lang.annotation.AfterReturning;3
4public class AfterReturningExample {6 // 后置通知7 // 使用 returning 属性指定参数名称用于接收返回值(要求类型兼容)8 (9 pointcut="com.xyz.myapp.SystemArchitecture.dataAccessOperation()",10 returning="retVal")11 public void doAccessCheck04(Object retVal) {12 }13}类似的XML配置如下:
41<aop:aspect id="afterReturningExample" ref="aBean">2 <!--将切面的 doAccessCheck04 方法配置为后置通知,拦截 dataAccessOperation 表达式匹配的方法,并将方法的返回值传递给通知的retVal参数-->3 <aop:after-returning method="doAccessCheck04" pointcut-ref="dataAccessOperation" returning="retVal"/>4</aop:aspect>此外,也通过实现org.springframework.aop.AfterReturningAdvice接口定义一个后置通知:
191// 接口定义2public interface AfterReturningAdvice extends Advice {3    void afterReturning(Object returnValue, Method m, Object[] args, Object target)4            throws Throwable;5}6
7// 使用示例8public class CountingAfterReturningAdvice implements AfterReturningAdvice {9    private int count;10
11    public void afterReturning(Object returnValue, Method m, Object[] args, Object target)12            throws Throwable {13        ++count;14    }15
16    public int getCount() {17        return count;18    }19}
3) 异常通知(AfterThrowing Advice)
异常通知在切入点方法抛出异常时执行,与 catch 代码块执行时机类似。
可以使用@AfterThrowing注解标识切面中的某个方法为异常通知,并通过throwing属性来指定一个参数名称接收抛出的异常:
131import org.aspectj.lang.annotation.Aspect;2import org.aspectj.lang.annotation.AfterThrowing;3
4public class AfterThrowingExample {6 // 异常通知7 // 使用 throwing 属性指定参数名称用于接收抛出的异常(只接受类型兼容的异常)8 (9 pointcut="com.xyz.myapp.SystemArchitecture.dataAccessOperation()",10 throwing="dataAccessEx")11 public void doRecoveryActions(DataAccessException dataAccessEx) {12 }13}类似的XML配置如下:
41<aop:aspect id="afterThrowingExample" ref="aBean">2 <!--将切面的 doRecoveryActions 方法配置为异常通知,拦截 dataAccessOperation 表达式匹配的方法,并将引发的异常传递给通知的dataAccessEx参数-->3 <aop:after-throwing method="doRecoveryActions" pointcut-ref="dataAccessOperation" throwing="dataAccessEx" />4</aop:aspect>此外,也通过实现org.springframework.aop.ThrowsAdvice接口定义一个异常通知:
171// 接口定义2// 由于为了兼容类型化参数,因此ThrowsAdvice接口中无任何抽象方法。3public interface ThrowsAdvice extends AfterAdvice {4   // afterThrowing([Method, args, target], subclassOfThrowable)5}6
7// 使用示例:可以定义一个或四个参数的afterThrowing方法来适应不同的处理场景,并支持定义在一个类中,如下示例8// 异常通知类,分别处理RemoteException和ServletException异常9public static class CombinedThrowsAdvice implements ThrowsAdvice {10    // 处理RemoteException异常11    public void afterThrowing(RemoteException ex) throws Throwable {   12    }13
14    // 处理ServletException异常,并接入运行时信息15    public void afterThrowing(Method m, Object[] args, Object target, ServletException ex) {16    }17}
注意:
如果异常通知本身引发异常,则它将覆盖原始异常,通常重写为 RuntimeException 类型,与任何方法签名都能够兼容。
4) 最终通知(After Advice)
最终通知在方法执行完毕退出时执行(与finally代码块执行时机类似),可以使用@After注解标识切面中的某个方法为最终通知。
101import org.aspectj.lang.annotation.Aspect;2import org.aspectj.lang.annotation.After;3
4public class AfterFinallyExample {6 // 最终通知7 ("com.xyz.myapp.SystemArchitecture.dataAccessOperation()")8 public void doReleaseLock() {9 }10}类似的XML配置如下:
41<aop:aspect id="afterFinallyExample" ref="aBean">2 <!--将切面的 doReleaseLock 方法配置为最终通知,拦截 dataAccessOperation 表达式匹配的方法-->3 <aop:after method="doReleaseLock" pointcut-ref="dataAccessOperation"/>4</aop:aspect>此外,也通过实现org.springframework.aop.AfterAdvice接口定义一个最终通知:
71// 注意:下面代码未测试,可能有问题2public class MyAfterAdvice implements AfterAdvice {3 4 public void afterReturning(Object returnValue, Method method, Object[] args, Object target) throws Throwable {5 System.out.println("AfterAdvice - Method: " + method.getName() + " returned: " + returnValue);6 }7}
5) 环绕通知(Around Advice)
环绕通知可以在方法执行的四个阶段都添加额外逻辑,相当于前四种通知的集合。
可以使用@Around注解标识切面中的某个方法为环绕通知,通常用于启动和停止计时器等需要方法前后协同的特殊公共逻辑。
201import org.aspectj.lang.annotation.Aspect;2import org.aspectj.lang.annotation.Around;3import org.aspectj.lang.ProceedingJoinPoint;4
5public class AroundExample {7 // 环绕通知8 // 参数要求:第一个参数必须为ProceedingJoinPoint类型,用于调用 proceed() 执行原业务逻辑9 // 返回值要求:应该与业务方法的返回值类型一致或是其子类,否则将会出现类型转换异常10 ("com.xyz.myapp.SystemArchitecture.businessService()")11 public Object doBasicProfiling(ProceedingJoinPoint pjp) throws Throwable {12 long begin = System.currentTimeMillis();13 14 // 执行业务方法15 Object retVal = pjp.proceed();16 17 System.out.println("方法总耗时:"+(System.currentTimeMillis()-begin)+"ms");18 return retVal;19 }20}类似的XML配置如下:
41<aop:aspect id="aroundExample" ref="aBean">2 <!--将切面的 doBasicProfiling 方法配置为环绕通知,拦截 businessService 表达式匹配的方法-->3 <aop:around method="doBasicProfiling" pointcut-ref="businessService" />4</aop:aspect>此外,也通过实现org.aopalliance.intercept.MethodInterceptor接口定义一个环绕通知,并通过MethodInvocation来获取运行时相关信息和进行连接点方法的调用。
151// 接口定义2public interface MethodInterceptor extends Interceptor {3    Object invoke(MethodInvocation invocation) throws Throwable;4}5
6// 使用示例7public class DebugInterceptor implements MethodInterceptor {8    public Object invoke(MethodInvocation invocation) throws Throwable {9        System.out.println("Before: invocation=[" + invocation + "]");10        Object rval = invocation.proceed();11        System.out.println("Invocation returned");12        return rval;13    }14}15
注意:
如果前四种通知能够满足你的需求,那么尽量不要使用环绕通知。
6) 通知的顺序
可通过实现
org.springframework.core.Ordered接口或使用Order注解来指定切面的优先级。当某一切入点存在多个相同类型的通知时,前置通知按照优先级从高到低执行,其它通知按照优先级从低到高执行。
如果这些通知存在于同一个切面时,无法指定其之间优先级,只能考虑将这些通知合并为一个通知,或者重构为单独的切面类。
特殊的,相同优先级时,环绕通知会在最外层执行,以包含其他类型通知。
7) 通知的参数
获取连接点信息
可以将通知的第一个参数声明为org.aspectj.lang.JoinPoint类型,用于获取当前连接点对象,包括如下一些信息:
111// 获取方法参数2Object[] getArgs()3
4// 获取代理对象5Object getThis()6
7// 获取目标对象8Object getTarget()9
10// 获取通知使用的方法的签名11Signature getSignature()
获取方法实参
如果需要在通知中使用方法实参,可通过args(参数名称...)进行绑定,在调用通知时会传递相应的实参值:
141// 1. 在内联切入点使用方法实参:2// args(account,..) 将限制匹配第一个参数类型为Account的方法,并且将方法的account参数传递给通知3("com.xyz.myapp.SystemArchitecture.dataAccessOperation() && args(account,..)")4public void validateAccount(Account account) {5}6
7// 2. 在共享切入点使用方法实参:8// 共享切入点9("com.xyz.myapp.SystemArchitecture.dataAccessOperation() && args(account,..)")10private void accountDataAccessOperation(Account account) {}11// 引用共享切入点12("accountDataAccessOperation(account)")13public void validateAccount(Account account) {14}业务方法的参数可以是泛型参数,Spring AOP会检查实参类型并进行兼容性绑定,但集合中的泛型除外,因为逐个元素检查性能低。
161// 带泛型的业务类和业务方法(需要对指定类型进行拦截)2public interface Sample<T> {3 void sampleGenericMethod(T param);4 void sampleGenericCollectionMethod(Collection<T> param);5}6
7// 前置通知,在传递的 param 参数为 MyType 类型时,拦截上面的 sampleGenericMethod 方法8("execution(* ..Sample+.sampleGenericMethod(*)) && args(param)")9public void beforeSampleMethod(MyType param) {10}11
12// 前置通知,不能在传递的 param 参数为 Collection<MyType> 类型时,拦截上面的 sampleGenericCollectionMethod 方法13// 为了避免检查实参集合中的每个元素是否类型兼容(太耗性能),需要将参数键入 Collection<?> 类型,并手动检查元素的类型14("execution(* ..Sample+.sampleGenericCollectionMethod(*)) && args(param)")15public void beforeSampleMethod(Collection<MyType> param) {16}
获取其它实参
代理对象(this),目标对象(target)和注解(@within,@target,@annotation和@args)都可以以类似的方式绑定实参:
141// 如下示例展示了如何匹配带@Auditable注解的方法,并获取注解中的AuditCode值2
3// @Auditable注解的定义4(RetentionPolicy.RUNTIME)5(ElementType.METHOD)6public @interface Auditable {7 AuditCode value(); // 注解参数8}9
10// 匹配带@Auditable注解的方法,并将方法的Auditable注解传递给通知11("com.xyz.lib.Pointcuts.anyPublicMethod() && @annotation(auditable)")12public void audit(Auditable auditable) {13 AuditCode code = auditable.value();14}
修改方法实参
方法的实参可以被修改,并允许将修改后的实参传递给业务方法进行调用:
91// 拦截并绑定方法参数 accountHolderNamePattern 2("execution(List<Account> find*(..)) && com.xyz.myapp.SystemArchitecture.inDataAccessLayer() && args(accountHolderNamePattern)")3public Object preProcessQueryPattern(ProceedingJoinPoint pjp, String accountHolderNamePattern) throws Throwable {4 // 修改方法实参5 String newPattern = preProcess(accountHolderNamePattern);6 7 // 使用修改后的方法实参调用方法8 return pjp.proceed(new Object[] {newPattern});9}
注意事项
如果未开启调试信息,可能无法获取方法参数名,则需要通过argNames参数显示声明方法参数名称。
91// 通过 argNames 属性指定通知的参数名称2// 如果第一个参数是JoinPoint,ProceedingJoinPoint或JoinPoint.StaticPart类型,可直接跳过不写3// 如果切入点表达式中仅绑定了一个变量,并且通知方法仅接受一个参数,则可自动推断4// 如果无法确定参数绑定情况或参数绑定不明确,则会抛出IllegalArgumentException或AmbiguousBindingException。5(value="com.xyz.lib.Pointcuts.anyPublicMethod() && target(bean) && @annotation(auditable)", 6 argNames="bean,auditable")7public void audit(JoinPoint jp, Object bean, Auditable auditable) {8 AuditCode code = auditable.value();9}注意:
XML配置也可使用类似方式绑定实参,但
&&可能会导致XML解析错误,可以使用and,or和not分别代替&&,||和!。SpringAOP可以处理方法参数中的泛型,并进行兼容性匹配拦截,但集合中的泛型除外。
4. 其它AOP组件
1) 引介
引介(Introduction)是一种特殊的通知,可以为现有对象添加任何接口的实现,通过使用@DeclareParents注解定义一个引介:
141// 通过 JMX 公开统计信息2public class UsageTracking {4 // 引介:声明com.xzy.myapp.service包下的所有类实现UsageTracked接口,实现类为DefaultUsageTracked5 // @DeclareParents注解必须加在接口类型变量上6 (value="com.xzy.myapp.service.*+", defaultImpl=DefaultUsageTracked.class)7 public static UsageTracked mixin;8
9 // 通知:拦截businessService中的所有方法,并传递上下文中的 usageTracked 参数给通知10 ("com.xyz.myapp.SystemArchitecture.businessService() && this(usageTracked)")11 public void recordUsage(UsageTracked usageTracked) {12 usageTracked.incrementUseCount();13 }14}等效的XML配置如下:
141<aop:aspect id="usageTrackerAspect" ref="usageTracking">2
3    <!-- 定义一个引介4            types-matching:为这些指定的类实现接口5            implement-interface:实现该接口6            default-impl:接口的实现7    -->8    <aop:declare-parents types-matching="com.xzy.myapp.service.*+" implement-interface="com.xyz.myapp.service.tracking.UsageTracked"9        default-impl="com.xyz.myapp.service.tracking.DefaultUsageTracked"/>10
11    <!-- 定义一个通知recordUsage,拦截 businessService() 匹配的方法,并传递上下文 usageTracked 参数给通知 -->12    <aop:before method="recordUsage" pointcut="com.xyz.myapp.SystemArchitecture.businessService() and this(usageTracked)"/>13
14</aop:aspect>
此时,服务 Bean 可以直接用作 UsageTracked 接口的实现来使用。
11UsageTracked usageTracked = (UsageTracked) context.getBean("myService");注意:
也可以使用
IntroductionInterceptor和IntroductionAdvisor来定义引介,具体介绍请参考Spring官方文档。
2) 顾问
顾问(Advisors)是一种特殊的切面,只包含一条通知,通过<aop:advisor>标签配置,最常见的使用场景为Spring的声明式事务配置。
151<!-- 单独配置一个通知:事务通知 -->2<tx:advice id="tx-advice">3    <tx:attributes>4        <tx:method name="*" propagation="REQUIRED"/>5    </tx:attributes>6</tx:advice>7
8<!-- AOP配置 -->9<aop:config>10    <!-- 定义一个切入点 -->11    <aop:pointcut id="businessService" expression="execution(* com.xyz.myapp.service.*.*(..))"/>12    13    <!-- 配置一个顾问:引用名为tx-advice的通知和名为businessService的切入点 -->14    <aop:advisor advice-ref="tx-advice" pointcut-ref="businessService" />15</aop:config>
提示:
同一般切面类似,顾问同样支持使用
pointcut属性来定义内联切入点表达式,及使用order属性配置优先级。你也可以通过继承
org.springframework.aop.support.DefaultPointcutAdvisor类的方式定义Advisor。
Spring 提供了一个名为RegexpMethodPointcutAdvisor的顾问类封装了切入点和通知,简化了使用:
141<bean id="settersAndAbsquatulateAdvisor" class="org.springframework.aop.support.RegexpMethodPointcutAdvisor">2 <!--顾问关联的通知/拦截器-->3 <property name="advice">4 <ref bean="beanNameOfAopAllianceInterceptor"/>5 </property>6 7 <!--patterns属性:用于创建正则表达式切入点-->8 <property name="patterns">9 <list>10 <value>.*set.*</value>11 <value>.*absquatulate</value>12 </list>13 </property>14</bean>
第三节 扩展补充
1. 代理对象
1) 选择代理方式
在 Spring AOP 中,如果目标对象实现了接口,则会优先使用JDK动态代理,否则只能使用CGLIB动态代理。
JDK动态代理:基于Java反射机制实现的,针对接口的动态代理,性能较高。
CGLIB动态代理:基于字节码生成库实现的,继承目标类并覆盖其方法的代理方式。
可以通过proxyTargetClass或proxyMode属性来强制使用 CGLIB 代理:
121// 全局配置2(proxyTargetClass = true) // 强制使用CGLIB代理4public class AppConfig {5}6
7// Bean配置8(value = "singleton", proxyMode = ScopedProxyMode.TARGET_CLASS) // 强制使用CGLIB代理10public OrderService orderService() {11 return new OrderService();12}类似的XML配置如下:
31<aop:config proxy-target-class="true">2 <!-- 配置切面等 -->3</aop:config>注意:
使用CGLIB动态代理时,必须保证目标类及目标方法是非final的,且最好是 public 的。
2) 创建代理对象
ProxyCreatorSupport是 Spring AOP 中用于创建代理对象的基类,它提供了创建动态代理的通用逻辑和AOP配置管理功能。
以下是一个简单的示例代码,展示如何使用 ProxyCreatorSupport 创建一个带有日志功能的代理对象:
461import org.aopalliance.intercept.MethodInterceptor;2import org.aopalliance.intercept.MethodInvocation;3import org.springframework.aop.AdvisedSupport;4import org.springframework.aop.framework.ProxyCreatorSupport;5import org.springframework.aop.framework.ProxyFactory;6import java.lang.reflect.Method;7
8// 创建日志代理对象示例9public class LoggingProxyExample {10
11 // 目标类12 static class TargetObject {13 public void doSomething() {14 System.out.println("Doing something...");15 }16 }17 18 // 测试代码19 public static void main(String[] args) {20 21 // 1. 创建目标对象22 TargetObject target = new TargetObject();23
24 // 2. 创建代理工厂25 ProxyCreatorSupport proxyCreator = new ProxyCreatorSupport();26 proxyCreator.setTarget(target);27
28 // 3. 添加日志通知29 proxyCreator.addAdvice(new MethodInterceptor() {30 31 public Object invoke(MethodInvocation mi) throws Throwable {32 System.out.println("Before method: " + mi.getMethod().getName());33 Object result = mi.proceed();34 System.out.println("After method: " + mi.getMethod().getName());35 return result;36 }37 });38
39 // 4. 创建代理对象40 TargetObject proxy = (TargetObject) proxyCreator.getProxy();41
42 // 5.调用代理对象的方法43 proxy.doSomething();44 }45
46}在Spring AOP中,提供了许多创建代理对象的工具类,支持手动或自动扫描的方式创建代理对象:
ProxyFactoryBean:基于通知创建代理对象的工厂类,支持配置目标对象、通知(Advice)、顾问(Advisor)等。
AspectJProxyFactory:基于切面创建代理对象的工厂类,支持目标对象、切面(Aspect)等,使用更加简洁。
BeanNameAutoProxyCreator:基于Bean名称的代理创建器,可以非常方便地为一组Bean对象创建代理。
DefaultAdvisorAutoProxyCreator:自动检测容器中的所有Advisor(顾问)和Advice(通知),为相应目标对象创建代理对象。
AspectJAwareAdvisorAutoProxyCreator:自动检测容器中的切面,并解析通知和切入点,为相应目标对象创建代理对象。
AnnotationAwareAspectJAutoProxyCreator:自动检测容器中@Aspect注解的切面,为相应目标对象创建代理对象。
注意:
推荐使用
AnnotationAwareAspectJAutoProxyCreator,可通过@EnableAspectJAutoProxy注解来启用。
2. 目标源
1) 什么是目标源
TargetSource用于提供代理对象使用的目标对象,并且允许在运行时动态地切换目标对象。
2) 可热交换目标源
基于可热交换目标源HotSwappableTargetSource创建的AOP代理对象,允许对目标对象进行动态替换。
121<!--目标对象-->2<bean id="initialTarget" class="mycompany.OldTarget"/>3
4<!--目标对象的可热交换目标源-->5<bean id="swapper" class="org.springframework.aop.target.HotSwappableTargetSource">6    <constructor-arg ref="initialTarget"/>7</bean>8
9<!--使用可热交换目标源创建AOP代理-->10<bean id="swappable" class="org.springframework.aop.framework.ProxyFactoryBean">11    <property name="targetSource" ref="swapper"/>12</bean>
可以使用 HotSwappableTargetSource 上的swap()方法动态替换目标对象,该操作是线程安全的,并且会立即生效:
51// 获取可替换目标对象的代理对象2HotSwappableTargetSource swapper = (HotSwappableTargetSource) beanFactory.getBean("swapper");3
4// 替换目标对象为新目标对象5Object oldTarget = swapper.swap(newTarget);
3) 池目标源
池目标源维护了业务Bean的实例池,导入commons-pool.jar包后即可使用默认实现CommonsPool2TargetSource:
161<!--业务Bean(注意必须为原型Bean)-->2<bean id="businessObjectTarget" class="com.mycompany.MyBusinessObject" scope="prototype">3</bean>4
5<!--业务Bean的池目标源-->6<bean id="poolTargetSource" class="org.springframework.aop.target.CommonsPool2TargetSource">7    <property name="targetBeanName" value="businessObjectTarget"/>8    <!--maxSize:必须参数,池最大容量为25-->9    <property name="maxSize" value="25"/>10</bean>11
12<!--使用池目标源创建AOP代理-->13<bean id="businessObject" class="org.springframework.aop.framework.ProxyFactoryBean">14    <property name="targetSource" ref="poolTargetSource"/>15    <property name="interceptorNames" value="myInterceptor"/>16</bean>
4) 原型目标源
原型目标源PrototypeTargetSource与池目标源类似,但其每次方法调用都会创建目标的新实例:
41<bean id="prototypeTargetSource" class="org.springframework.aop.target.PrototypeTargetSource">2 <!--目标Bean(必须为原型Bean)-->3 <property name="targetBeanName" ref="businessObjectTarget"/>4</bean>
5) ThreadLocal目标源
如果需要为每个线程创建新的目标对象,则可以使用ThreadLocal目标源:
31<bean id="threadlocalTargetSource" class="org.springframework.aop.target.ThreadLocalTargetSource">2 <property name="targetBeanName" value="businessObjectTarget"/>3</bean>
3. AOP工具类
1) AOPUtils
AopUtils是 Spring 框架中用于处理 AOP 相关操作的工具类,常用方法如下:
201// 是否AOP代理对象2public static boolean isAopProxy(Object obj)3public static boolean isJdkDynamicProxy(Object obj)4public static boolean isCglibProxy(Object obj)5
6// 获取目标类7public static Class<?> getTargetClass(Object proxy)8
9// 是否指定方法10public static boolean isEqualsMethod(Method method)11public static boolean isToStringMethod(Method method)12public static boolean isHashCodeMethod(Method method)13
14// 是否Finalize方法15public static boolean isFinalizeMethod(Method method)16
17// 选择在目标类型上可调用的方法18// 如果目标类型中存在与传入方法签名匹配的方法,则返回该方法;否则返回null19public static Method selectInvocableMethod(Method method, Class<?> targetType)20
2) AopProxyUtils
AopProxyUtils 对 AopUtils 的补充,主要在创建代理对象和处理代理相关细节时使用,常用方法如下:
131// 获取目标类2public static Object getSingletonTarget(Object candidate) // 获取单例 bean 的目标对象3public static Class<?> getTargetClass(Object candidate)  // 获取代理对象的目标类4public static Class<?> ultimateTargetClass(Object candidate) // 获取代理对象的最终目标类(适用多层代理)5
6// 获取代理接口7ublic static Class<?>[] completeProxiedInterfaces(AdvisedSupport advised)8public static Class<?>[] proxiedUserInterfaces(Object proxy)9
10// 比较相关方法11public static boolean equalsInProxy(AdvisedSupport a, AdvisedSupport b)12public static boolean equalsProxiedInterfaces(AdvisedSupport a, AdvisedSupport b)13public static boolean equalsAdvisors(AdvisedSupport a, AdvisedSupport b)
3) AopContext
AopContext 是 Spring AOP 框架中的一个工具类,用于在方法内部访问当前 AOP 代理对象。
151// 解决方法内部调用事务失效问题2public class MyService {4
5 6 public void methodA() {7 // 通过代理对象调用事务方法8 ((MyService) AopContext.currentProxy()).methodB();9 }10
11 12 public void methodB() {13 // 事务逻辑14 }15}
4) 其它
AopConfigUtils:用于处理 AOP 配置相关的工具类,帮助解析和管理 AOP 配置信息,为 AOP 功能的实现提供配置支持。
AopNamespaceUtils:主要负责解析和处理 AOP 配置文件中的命名空间信息,以便正确加载和配置 AOP 相关的 Bean。
AutoProxyUtils:辅助自动代理创建的工具类,提供了一些方法来帮助 Spring 框架自动创建代理对象,简化了代理对象的生成过程。
AspectJAopUtils:提供了对 AspectJ 切点表达式、通知等进行处理的方法,用于支持 AspectJ 风格的 AOP 实现。
AspectJProxyUtils:主要用于处理与 AspectJ 代理创建和管理相关的一些操作,如创建 AspectJ 代理对象等。
4. AOP的一些问题
1) 无法代理非public方法
基于JDK的动态代理是针对接口的代理,只会有 public 方法,但基于 CGLIB 的代码,默认不会重写非 public 方法,需手动开启。
81public class MyService {3
4 // 事务注解不会生效,因为该方法不是 public 方法5 6 private void privateMethod() {7 }8}注意:
可通过
ProxyFactory的setOptimize(true)支持代理非 public 方法,但是需要注意访问安全问题。
2) 不支持方法的内部调用
代理方法在同一个类的内部被调用时,不会执行代理逻辑,因为是通过目标对象(而非代理对象)来调用的。
141public class MyService {3
4 // 外层方法5 public void myMethod() {6 // 此时anotherMethod的事务不会生效7 this.anotherMethod();8 }9
10 // 带事务注解的内层方法11 12 public void anotherMethod() {13 }14}注意:
该问题可通过注入代理对象,通过代理对象调用代理方法来解决,或者通过
AopContext.currentProxy()方式(不推荐)。原生 AspectJ 框架没有此自调用问题,因为它不是基于代理的 AOP 框架。
第四节 AOP代码示例
1. 基于AOP支持自动重试
对于一些可重复执行的操作,在执行失败时自动进行重试,该功能涉及多个类的逻辑修改,非常适合使用切面实施。
381public class ConcurrentOperationExecutor implements Ordered {3 private static final int DEFAULT_MAX_RETRIES = 2;4 private int maxRetries = DEFAULT_MAX_RETRIES;5 private int order = 1;6
7 public void setMaxRetries(int maxRetries) {8 this.maxRetries = maxRetries;9 }10
11 public int getOrder() {12 return this.order;13 }14
15 public void setOrder(int order) {16 this.order = order;17 }18
19 ("com.xyz.myapp.SystemArchitecture.businessService()")20 public Object doConcurrentOperation(ProceedingJoinPoint pjp) throws Throwable {21 int numAttempts = 0;22 PessimisticLockingFailureException lockFailureException;23 24 do {25 numAttempts++;26 try {27 return pjp.proceed();28 }29 catch(PessimisticLockingFailureException ex) {30 lockFailureException = ex;31 }32 } while(numAttempts <= this.maxRetries);33 34 throw lockFailureException;35 }36
37}38
相应的 Spring 配置如下:
71<aop:aspectj-autoproxy/>2
3<bean id="concurrentOperationExecutor" class="com.xyz.myapp.service.impl.ConcurrentOperationExecutor">4 <property name="maxRetries" value="3"/>5 <!-- 这里将切面的优先级设置为高于事务通知,这样就可以在每次重试的时候开启新事务了 -->6 <property name="order" value="100"/>7</bean>为了优化切面使用,仅对指定的方法进行重试,我们可以定义一个@Idempotent注解,对需要重试的方法进行标记。
41(RetentionPolicy.RUNTIME)2public @interface Idempotent {3 // marker annotation4}然后,修改切面的切入点表达式,仅对有@Idempotent注解的方法进行匹配:
41("com.xyz.myapp.SystemArchitecture.businessService() && @annotation(com.xyz.myapp.service.Idempotent)")2public Object doConcurrentOperation(ProceedingJoinPoint pjp) throws Throwable {3 ...4}如果你更喜欢通过XML进行AOP配置,可参考如下配置示例,配套的 Java 类去掉 AOP 相关注解即可。
161<aop:config>2    <aop:aspect id="concurrentOperationRetry" ref="concurrentOperationExecutor">3        <aop:pointcut id="idempotentOperation"4            expression="execution(* com.xyz.myapp.service.*.*(..)) 5            and @annotation(com.xyz.myapp.service.Idempotent)"/>6        <aop:around7            pointcut-ref="idempotentOperation"8            method="doConcurrentOperation"/>9    </aop:aspect>10</aop:config>11
12<bean id="concurrentOperationExecutor"13    class="com.xyz.myapp.service.impl.ConcurrentOperationExecutor">14        <property name="maxRetries" value="3"/>15        <property name="order" value="100"/>16</bean>
第03章_SpringMVC
第一节 SpringMVC简介
1. 什么是SpringMVC?
MVC是一种通用软件架构,M是指模型,V是指视图,C则是控制器,使用MVC的目的是将M和V的实现代码分离,从而使同一个程序可以使用不同的表现形式。MVC架构的工作流程如下:
用户发送请求到服务器的Controller(C)。
Controller调用相应的Model(M)处理请求。
根据处理结果渲染对应的View视图(V)进行响应。
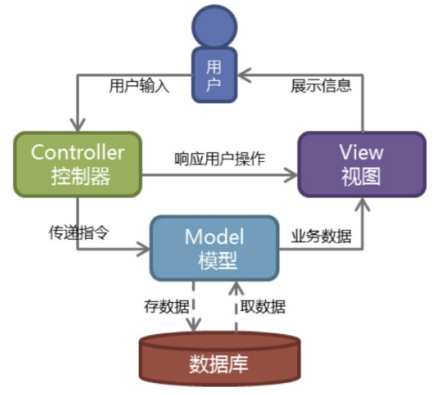
SpringMVC是MVC架构的一种具体实现,为表述层(web页面+Servlet)开发提供了一整套完备的解决方案。
SpringMVC的主要特点如下:
Spring系列产品,与Spring的IOC容器等基础设施无缝对接。
基于原生的Servlet,通过功能强大的前端控制器DispatcherServlet,对请求和响应进行统一处理。
表述层各细分领域需要解决的问题全方位覆盖,提供全面解决方案。
内部组件化程度高,可插拔式组件即插即用,想要什么功能配置相应组件即可。
性能卓著,尤其适合现代大型、超大型互联网项目要求。
2. SpringMVC入门案例
1) 创建Maven工程
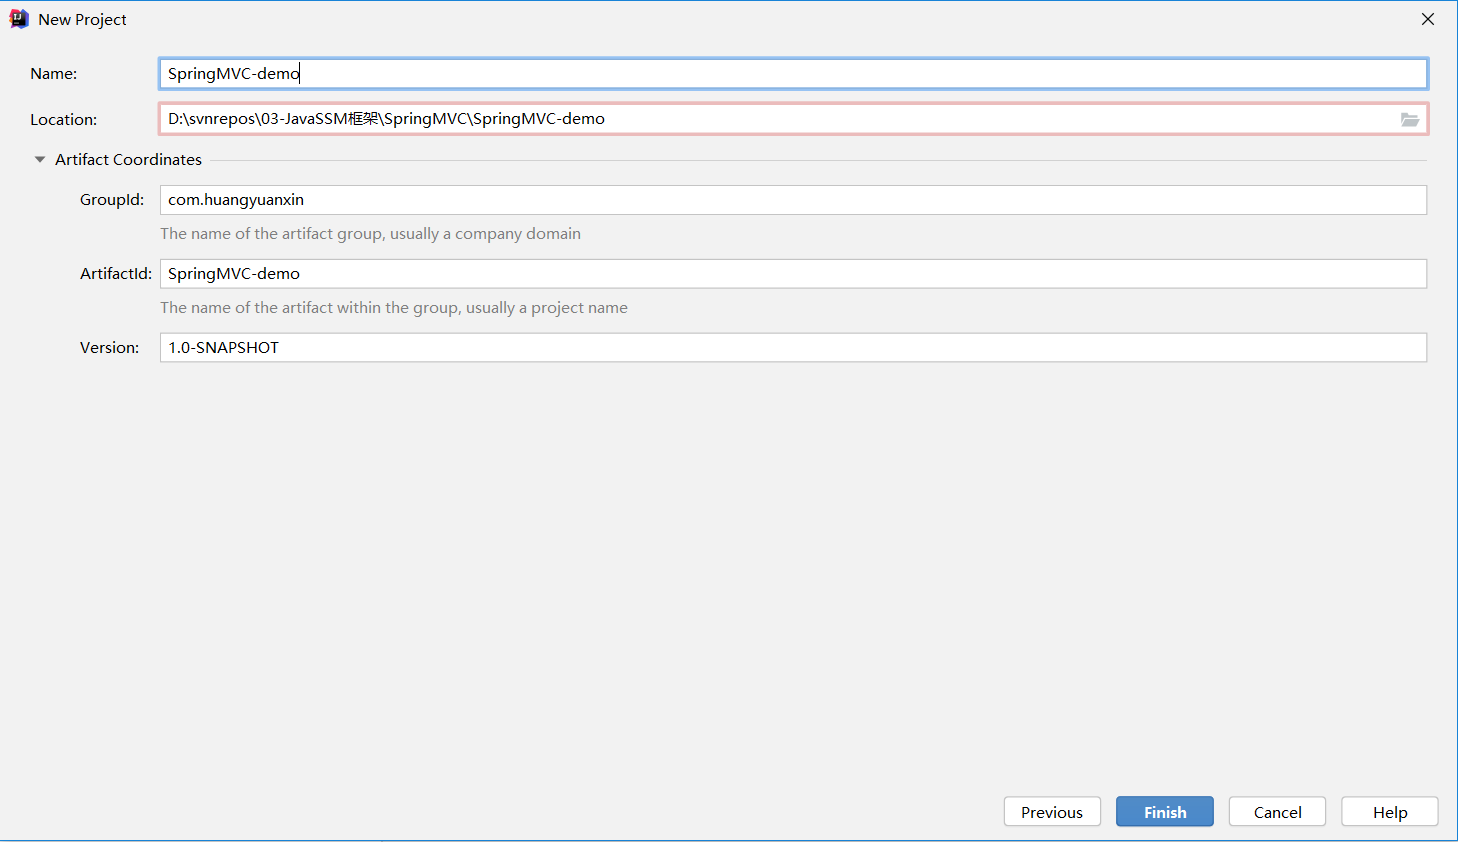
注意:
默认会标记
src\main\java为源代码根目录,src\main\resources为资源根目录,若没有则需手动标记。在单独使用 SpringMVC 时,需在
pom.xml中修改打包方式为war包:<packaging>war</packaging>。
2) 配置web.xml
新建src\main\webapp\WEB-INF\web.xml文件,配置DispatcherServlet统一处理前端请求。
361 2<web-app xmlns="http://xmlns.jcp.org/xml/ns/javaee"3 xmlns:xsi="http://www.w3.org/2001/XMLSchema-instance"4 xsi:schemaLocation="http://xmlns.jcp.org/xml/ns/javaee http://xmlns.jcp.org/xml/ns/javaee/web-app_4_0.xsd5 "6 version="4.0">7
8 <!-- 配置SpringMVC的前端控制器,对浏览器发送的请求统一进行处理 -->9 <servlet>10 <servlet-name>dispatcherServlet</servlet-name>11 <servlet-class>org.springframework.web.servlet.DispatcherServlet</servlet-class>12 <!-- 通过初始化参数指定SpringMVC配置文件的位置和名称 -->13 <init-param>14 <!-- contextConfigLocation为固定值 -->15 <param-name>contextConfigLocation</param-name>16 <!-- 使用classpath:表示从类路径查找配置文件,例如maven工程中的src/main/resources -->17 <param-value>classpath:spring-mvc-config.xml</param-value>18 </init-param>19 <!--20 作为框架的核心组件,在启动过程中有大量的初始化操作要做,而这些操作放在第一次请求时才执行会严重影响访问速度21 因此需要通过此标签将启动控制DispatcherServlet的初始化时间提前到服务器启动时22 -->23 <load-on-startup>1</load-on-startup>24 </servlet>25 <servlet-mapping>26 <servlet-name>dispatcherServlet</servlet-name>27 <!--28 设置springMVC的核心控制器所能处理的请求的请求路径,一般为"/"。29 "/"可以匹配/login或.html或.js或.css方式的请求路径, 但是/不能匹配.jsp请求路径的请求。30 "/*"则可以匹配所有请求,例如在使用过滤器时,若需要对所有请求进行过滤,就需要使用/*的写法。31 -->32 <url-pattern>/</url-pattern>33 </servlet-mapping>34 35</web-app>36
如需在Web工程启动时,加载Spring上下文配置,只需在web.xml中注册ContextLoaderListener监听器即可。
121<!-- 配置Spring提供的监听器,用于启动服务时加载容器。默认加载WEB-INF/applicationContext.xml文件 -->2<listener>3    <listener-class>4    org.springframework.web.context.ContextLoaderListener5    </listener-class>6</listener>7
8<!-- 手动指定Spring配置文件位置 -->9<context-param>10    <param-name>contextConfigLocation</param-name>11    <param-value>classpath:applicationContext.xml</param-value>12</context-param>
3) 配置spring-mvc-config.xml
在资源根目录下新建spring-mvc-config.xml文件(与web.xml中对应即可),配置表述层组件扫描和默认视图解析器。
211 2<beans xmlns="http://www.springframework.org/schema/beans"3 xmlns:xsi="http://www.w3.org/2001/XMLSchema-instance"4 xmlns:context="http://www.springframework.org/schema/context"5 xmlns:mvc="http://www.springframework.org/schema/mvc"6 xsi:schemaLocation="http://www.springframework.org/schema/beans http://www.springframework.org/schema/beans/spring-beans.xsd http://www.springframework.org/schema/context https://www.springframework.org/schema/context/spring-context.xsd http://www.springframework.org/schema/mvc https://www.springframework.org/schema/mvc/spring-mvc.xsd">7
8 <!-- 自动扫描包 -->9 <context:component-scan base-package="com.huangyuanxin.notes.springmvc.controller"/>10
11 <!-- 默认视图解析器,可用于处理jsp等视图 -->12 <bean id="viewResolver" class="org.springframework.web.servlet.view.InternalResourceViewResolver">13 <property name="order" value="3"/>14 <property name="prefix" value="/WEB-INF/pages/"/>15 <property name="suffix" value=".jsp"/>16 </bean>17
18 <!--开启注解驱动支持(虽然入门案例可以省略,但一般项目都会进行配置)-->19 <mvc:annotation-driven></mvc:annotation-driven>20
21</beans>
4) 编写请求控制器
151package com.huangyuanxin.notes.springmvc.controller;2
3import org.springframework.stereotype.Controller;4import org.springframework.web.bind.annotation.RequestMapping;5
6public class IndexController {8
9 ("/")10 public String index() {11 //设置视图名称12 return "index";13 }14
15}
5) 编写视图页面
新建src\main\webapp\WEB-INF\pages\index.jsp文件(与视图解析器配置的前缀后缀以及视图名称相对应),编写JSP页面如下。
101<html lang="en">3<head>4 <meta charset="UTF-8">5 <title>Index</title>6</head>7<body>8<h1>Hello, SpringMVC!(Jsp)</h1>9</body>10</html>
6) 进行测试
添加一个Tomcat服务器,部署当前应用,设置上下文路径后进行启动。
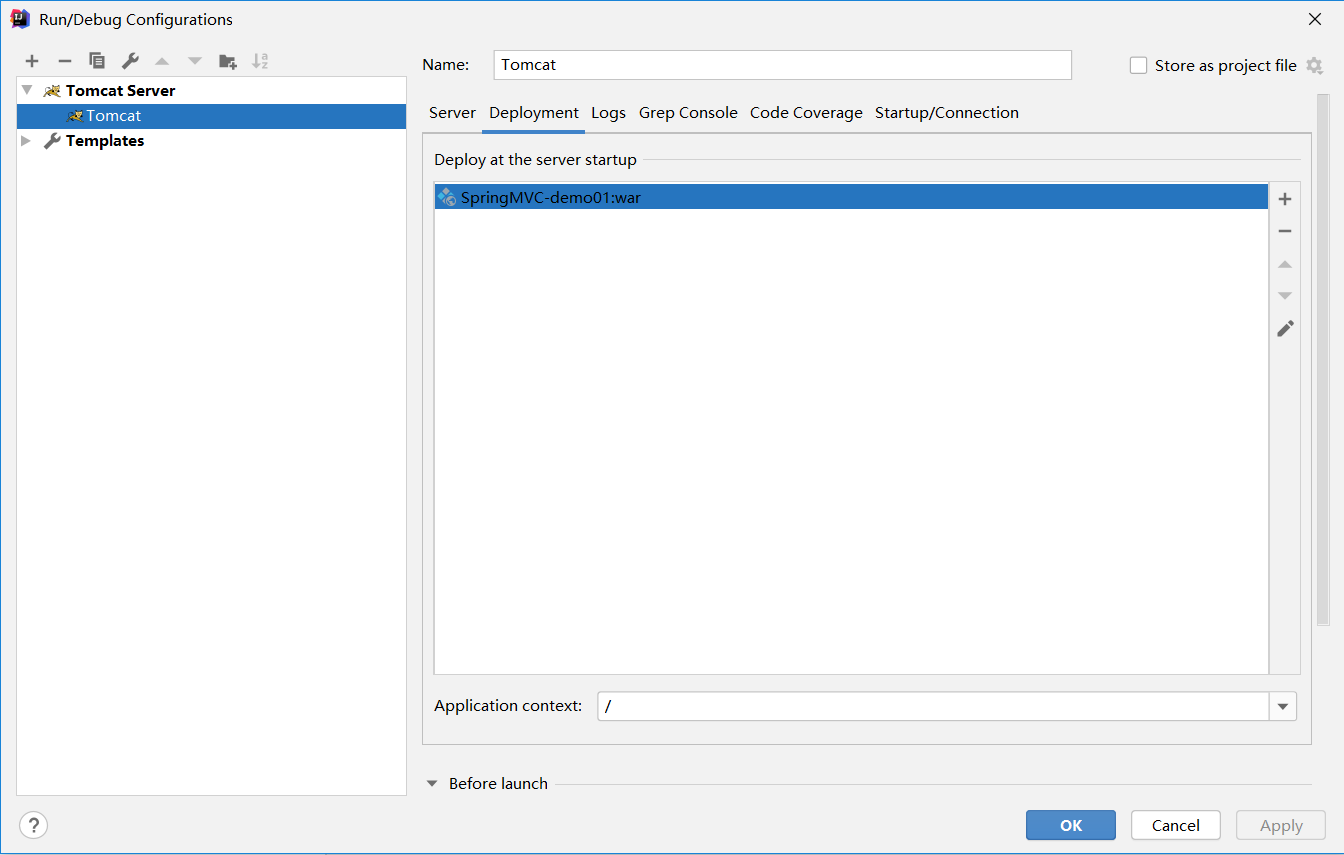
启动完成后访问http://localhost:8080/页面,显示如下即代表测试成功。
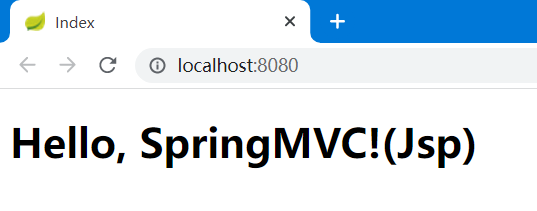
第二节 请求映射详解
请求映射指根据请求路径、请求方法、请求参数等信息,将请求映射到对应的控制器方法,一般使用@RequestMapping注解配置。
1. 请求路径路由
1) 声明请求路径
@RequestMapping注解的path(value)属性用来声明请求路径,类上为一级路径,方法上为二级路经,SpringMVC会自动进行拼接。
91// /mapping/path2("mapping") // 一级路径4public class RequestMappingController {5 ("path") // 二级路径6 public String testMapping() {7 return "success";8 }9}提示:
一个控制器方法可以配置多个请求路径,用于将不同的请求映射到同一段处理逻辑。
Spring MVC默认开启
.*后缀模式匹配,以便映射到/person的控制器也能映射到/person.*。建议设置useSuffixPatternMatching(false)和favorPathExtension(false)来关闭后缀匹配模式,并通过Accept请求头进行替代。
请求路径还可以嵌入
${…}占位符,这将在启动时从系统环境等其他属性源中解析替换。
2) 请求路径通配符
可以通过Ant风格的通配符来模糊匹配请求路径:
?:表示任意的单个字符。*:表示任意的0个或多个字符。/**/:表示任意的一层或多层目录。
221("mapping")3public class RequestMappingController {4 5 // /mapping/ant/a1b6 ("ant/a?b")7 public String testAntMapping01() {8 return "success";9 }10
11 // /mapping/ant/cd12 ("ant/c*d")13 public String testAntMapping02() {14 return "success";15 }16
17 // /mapping/ant/v1/v1.0/e18 ("ant/**/e")19 public String testAntMapping03() {20 return "success";21 }22}
2. 请求方式限定
1) 声明请求方式
@RequestMapping注解的method属性用来声明请求方式,如果方式不匹配则报"405:Request method 'POST' not supported"错误。
41(value = "method/post", method = RequestMethod.POST)2public String testPostMethodMapping() {3 return "success";4}
2) 请求方式组合注解
为了简化请求方法匹配,SpringMVC设计了一些组合注解,如@GetMapping、@PostMapping、@PutMapping和@DeleteMapping等。
41(value = "method/get")2public String testGetMethodMapping() {3 return "success";4}
3) 转换请求方式
浏览器默认只能发送GET和POST请求,如需发送其它类型请求,可用POST请求+_method参数进行伪造。
首先web.xml文件中配置过滤器如下:
91<!--配合前端伪造PUT等其它类型请求-->2<filter>3 <filter-name>HiddenHttpMethodFilter</filter-name>4 <filter-class>org.springframework.web.filter.HiddenHttpMethodFilter</filter-class>5</filter>6<filter-mapping>7 <filter-name>HiddenHttpMethodFilter</filter-name>8 <url-pattern>/*</url-pattern>9</filter-mapping>然后前端发送请求时改为POST请求,并附带_method参数指定要伪造的请求方法。
41<form action="mapping/method/put" method="post">2 <input type="hidden" name="_method" value="PUT">3 <input type="submit" value="提交">4</form>这时就可以正确匹配控制器中的PUT方法了。
51(value = "method/put", method = RequestMethod.PUT)2public String testPutMethodMapping() {4 return "success!";5}
3. 请求参数与请求头匹配
1) 声明请求参数和请求头(了解)
@RequestMapping注解的params属性和headers属性分别用来声明控制器方法所需的请求参数和请求头,支持的格式如下:
"param":要求请求映射所匹配的请求必须携带param请求参数。
"!param":要求请求映射所匹配的请求必须不携带param请求参数。
"param=value":要求请求映射所匹配的请求必须携带param请求参数且param=value。
"param!=value":要求请求映射所匹配的请求必须携带param请求参数但是param!=value。
111// 请求参数必须携带username、password和auth参数,不能携带limit参数,且password不能是123456,auth必须是ok。2(value = "params", params = {"username", "password!=123456", "auth=ok", "!limit"})3public String testParamsMapping() {4 return "success";5}6
7// 请求头必须携带Origin参数,且必须为www.huangyuanxin.com8(value = "headers", headers = {"Origin=www.huangyuanxin.com"})9public String testHeadersMapping() {10 return "success";11}
2) 几个特殊的请求头
特别的,对于Content-Type (请求消息格式)和Accept (可接收的消息格式)请求头,可分别通过consumes和produces属性来匹配。
111// 只处理请求消息格式为 application/json 的请求2(path = "/pets", consumes = "application/json") 3public void addPet( Pet pet) {4}5
6// 只处理可接收消息格式包括 application/json;charset=UTF-8 的请求7(path = "/pets/{petId}", produces = "application/json;charset=UTF-8") 8public Pet getPet( String petId) {10 // ...11}注意:
常用的 Content-Type 常量在
MediaType类中提供了定义,如:APPLICATION_JSON_VALUE和APPLICATION_XML_VALUE。
4. 自定义请求映射逻辑(了解)
SpringMVC可对请求映射进行精确控制,主要有两种方式:
通过重写
RequestMappingHandlerMapping的getCustomMethodCondition方法,返回自己的RequestCondition。通过Java方式注册处理器映射:
912public class MyConfig {34public void setHandlerMapping(RequestMappingHandlerMapping mapping, UserController controller) throws NoSuchMethodException {5RequestMappingInfo info = RequestMappingInfo.paths("/user/{id}").methods(RequestMethod.GET).build();6Method method = UserController.class.getMethod("getUser", Long.class);7mapping.registerMapping(info, controller, method);8}9}
5. 静态资源映射
默认情况下,前端不能访问服务器的静态资源(html/css/js/img等),需要对其进行映射配置。
131<!--静态资源映射(方式一)-->2<!-- location 表示路径,mapping 表示文件,**表示该目录下的文件以及子目录的文件 -->3<mvc:resources location="/html/" mapping="/html/**"/>4<mvc:resources location="/css/" mapping="/css/**"/>5<mvc:resources location="/js/" mapping="/js/**"/>6<mvc:resources location="/img/" mapping="/img/**"/>7<mvc:resources location="/public, classpath:/static/" mapping="/resources/**" cache-period="31556926" />8
9<!--静态资源映射(方式二)(注意开启MVC注解驱动)-->10<!--<mvc:default-servlet-handler/>-->11
12<!--开启注解驱动支持-->13<mvc:annotation-driven></mvc:annotation-driven>
注意:
如需生成“版本化”的URL,可考虑配置VersionResourceResolver。
第三节 参数绑定详解
1. 常用参数类型和注解
控制器方法常用的参数类型如下:
Servlet相关对象:
HttpServletRequest、MultipartHttpServletRequest、HttpSession、InputStream、Reader、OutputStream、Writer、PushBuilder。Spring内部对象:
RequestEntity<T>、WebRequest、NativeWebRequest、SessionStatus、HttpMethod、Errors、BindingResult、UriComponentsBuilder。域数据共享对象:Map、Model、ModelMap、RedirectAttributes。
其它对象支持:Locale、TimeZone+ZoneId、Principal。
任何其他参数:将会根据类型转换器进行属性映射。
参数绑定常用的注解如下:
用于获取参数:
@RequestParam、@RequestHeader、@CookieValue、@PathVariable、@MatrixVariable、@RequestBody(读取请求正文并通过HttpMessageConverter反序列化为Object)、@RequestPart。用于数据共享:@ModelAttribute、@SessionAttribute、@RequestAttribute。
2. 直接获取参数
将HttpServletRequest作为控制器方法的形参,框架在调用时会自动注入为当前请求对象,通过该对象即可获取参数和Cookie等。
81("servlet")2public String testServletApiParams(HttpServletRequest request) {3 // 获取请求参数、请求头和Cookie等4 System.out.println(request.getParameter("username"));5 System.out.println(request.getParameter("password"));6
7 return "success";8}
3. 绑定请求参数
1) 简单类型
在控制器方法的形参位置,设置和请求参数同名的形参,当浏览器发送请求,匹配到请求映射时,在DispatcherServlet中就会将请求参数赋值给相应的形参。
131("params")3public class RequestParamsController {4
5 ("simple")6 public String testParamsBySimple(String username, String password) {7 System.out.println(username);8 System.out.println(password);9
10 return "success";11 }12
13}注意:
若有多个同名的请求参数,可以设置形参为字符串数组或者字符串类型。
若使用字符串数组作为形参,则映射为多个数组元素。
若使用字符串作为形参,则映射为一个逗号拼接的字符串。
使用Map作为参数,它将接收所有未被其它方式映射的参数。
2) POJO类型
可以在控制器方法的形参位置设置一个POJO类型的形参,此时若浏览器传输的请求参数的参数名和实体类中的属性名一致,那么请求参数就会为此属性赋值。
271public class Account implements Serializable {2 private String name;3 private Float money;4}5
6public class Address implements Serializable {7 private String provinceName;8 private String cityName;9}10
11public class User implements Serializable {12 private String username;13 private String password;14 private Integer age;15 private Address address;16 private List<Account> accountList;17 private Map<String, Account> accountMap;18}19
20// 控制器方法,带有User形参21("pojo")22public String testParamsByPojo(User user) {23 System.out.println(user);24
25 return "success";26}27 相应的HTML页面如下:
301<html lang="en">3<head>4 <meta charset="UTF-8">5 <title>Index</title>6</head>7<body>8<h1>测试复杂POJO参数映射</h1>9<form action="/params/pojo" method="post">10 <!--简单属性映射-->11 用户名称: <input type="text" name="username"><br/>12 用户密码: <input type="password" name="password"><br/>13 用户年龄: <input type="text" name="age"><br/>14 <!--嵌套属性映射-->15 用户省份: <input type="text" name="address.provinceName"><br/>16 用户城市: <input type="text" name="address.cityName"><br/>17 <!--List属性映射-->18 账户1 名称: <input type="text" name="accountList[0].name"><br/>19 账户1 金额: <input type="text" name="accountList[0].money"><br/>20 账户2 名称: <input type="text" name="accountList[1].name"><br/>21 账户2 金额: <input type="text" name="accountList[1].money"><br/>22 <!--Map属性映射-->23 账户3 名称: <input type="text" name="accountMap['one'].name"><br/>24 账户3 金额: <input type="text" name="accountMap['one'].money"><br/>25 账户4 名称: <input type="text" name="accountMap['two'].name"><br/>26 账户4 金额: <input type="text" name="accountMap['two'].money"><br/>27 <input type="submit" value="提交">28</form>29</body>30</html>
3) @RequestParam注解
@RequestParam注解用来指定请求参数和控制器方法形参的映射关系。该注解一共有三个属性:
value:请求参数的参数名。
required:参数是否必传,默认值为true。如果未传且无默认值则报"400:Required String parameter 'xxx' is not present"错误。
defaultValue:不管required属性值为true或false,当value所指定的请求参数没有传输或传输的值为""时,则使用默认值为形参赋值。
101("requestParam")2public String testParamsByRequestParam(3 (value = "user_name", required = true) String username,4 (value = "pass_word", required = false, defaultValue = "123456") String password5) {6 System.out.println(username);7 System.out.println(password);8
9 return "success";10}注意:
如果使用
java.util.Optional作为方法参数,并且与@RequestParam和@RequestHeader等具有required属性的注解结合使用,该注解等效于required=false。
4. 绑定请求头和Cookie
@CookieValue注解用来指定Cookie数据和控制器方法形参的映射关系,@RequestHeader注解用来指定请求头信息与控制器方法形参的映射关系,其常用属性及使用方法和@RequestParam注解类似。
101("requestHeaderAndCookie")2public String testParamsByRequestHeader(3 (value = "Origin", required = true) String origin,4 (value = "time-out", required = false, defaultValue = "60s") String timeOut5) {6 System.out.println(origin);7 System.out.println(timeOut);8
9 return "success";10}
5. 绑定路径变量
路径变量指在请求路径中通过{xxx}占位符声明的变量,常用于RESTful风格的请求中,可通过@PathVariable注解进行绑定。
111// pathVariable?user_name=zhangsan&pass_word=123456 -> pathVariable/zhangsan/1234562("pathVariable/{user_name}/{pass_word}")3public String testParamsByPathVariable(4 (value = "user_name", required = true) String username,5 (value = "pass_word", required = false) String password6) {7 System.out.println(username);8 System.out.println(password);9
10 return "success";11}特别的,路径变量还可以使用正则表达式来进行路径匹配。
51// ==> /spring-web-3.0.5.jar2("/{name:[a-z-]+}-{version:\\d\\.\\d\\.\\d}{ext:\\.[a-z]+}")3public void handle( String version, String ext) {4 // ...5}
6. 绑定矩阵变量(了解)
矩阵变量(Matrix Variable)以;开头,多个值之间用逗号隔开,SpringMVC中可通过设置<mvc:annotation-driven enable-matrix-variables="true"/>或removeSemicolonContent=false来开启矩阵变量功能。
221// 矩阵变量以;开头,多个值之间用逗号隔开2/cars;color=red,green;year=20123/cars;color=red;color=green;color=blue4
5// 对比路径变量和矩阵变量 GET /pets/42;q=11;r=226("/pets/{petId}")7public void findPet( String petId, int q) {8 // petId:42,q:119}10
11// 多个矩阵变量 GET /owners/42;q=11/pets/21;q=2212("/owners/{ownerId}/pets/{petId}")13public void findPet((name="q", pathVar="ownerId") int q1,(name="q", pathVar="petId") int q2) {14 // q1:11,q:2215}16
17// 通过MultiValueMap获取所有的矩阵变量 GET /owners/42;q=11;r=12/pets/21;q=22;s=2318("/owners/{ownerId}/pets/{petId}")19public void findPet( MultiValueMap<String, String> matrixVars,(pathVar="petId") MultiValueMap<String, String> petMatrixVars) {20 // matrixVars: ["q" : [11,22], "r" : 12, "s" : 23]21 // petMatrixVars: ["q" : 22, "s" : 23]22}
7. 绑定请求体(重要)
1) @RequestBody注解
@RequestBody注解用来将请求体内容绑定到控制器方法的形参。请求体的格式默认为&拼接的字符串,无需消息转换器,可直接使用String类型形参接收。
101("message")3public class MessageContoller {4
5 ("req")6 public String reqConvert( String body) {7 System.out.println(body);8 return "success";9 }10}如下页面,发送POST请求时,打印请求体的值:name=zhangsan&money=123。
181<html lang="en">3<head>4 <meta charset="UTF-8">5 <title>测试HTTP消息转换</title>6</head>7<body>8<a href="/message/req?name=zhangsan&money=123">请求消息转换(Get)</a>9<hr/>10
11<form action="/message/req" method="post">12 账户名称: <input type="text" name="name"><br/>13 账户金额: <input type="number" name="money"><br/>14 <input type="submit" value="请求消息转换(Post)">15</form>16
17</body>18</html>注意:
如果请求体不存在(如GET请求方式)或形参类型不匹配(非String类型),则响应400错误。
2) 请求消息转换
如果请求体为JSON/XML等特殊字符串格式,除了使用String类型形参接收外,还可以通过HttpMessageConverter绑定到相应的实体类。
首先引入Jackson的依赖如下:
61<dependency>2 <groupId>com.fasterxml.jackson.core</groupId>3 <artifactId>jackson-databind</artifactId>4 <version>2.12.1</version>5</dependency>6
然后通过开启MVC注解驱动来自动配置MappingJackson2HttpMessageConverter。
11<mvc:annotation-driven />则可以编写控制器方法如下:
51("req2")2public String reqConvert2( Account account) {3 System.out.println(account);4 return "success";5}使用Postman发送一个POST请求如下,请求体格式为JSON字符串,形参为Account类型,实现自动绑定。

注意:
如果请求体格式为
&拼接的字符串,则消息转换器不能将其绑定到POJO类,需要使用前面所述的请求参数绑定方式。
扩展:使用Jquery来发送POST请求示例如下:
171<script type="text/javascript" src="${pageContext.request.contextPath}/js/jquery.min.js"></script>2<script type="text/javascript">3$(function () {4$("#testJson").click(function () {5$.ajax({6type: "post",7url: "${pageContext.request.contextPath}/testResponseJson",8contentType: "application/json;charset=utf-8",9data: '{"id":1,"name":"test","money":999.0}',10dataType: "json",11success: function (data) {12alert(data);13}14});15});16})17</script>
3) RequestEntity
RequestEntity<T>类可作为控制器方法的形参,封装请求头和转换后的请求体,方便后续使用。
181("req2")2public String reqConvert2(RequestEntity<String> req) {3 System.out.println(req);4 System.out.println(req.getMethod());5 System.out.println(req.getUrl());6 System.out.println(req.getHeaders());7 System.out.println(req.getBody());8 return "success";9}10
11("req4")12public String reqConvert4(RequestEntity<Account> req) {13 System.out.println(req.getMethod());14 System.out.println(req.getUrl());15 System.out.println(req.getHeaders());16 System.out.println(req.getBody());17 return "success";18}前端通过POST方式请求http://localhost:8080/message/req2,打印信息如下:
41POST2http://localhost:8080/message/req23[host:"localhost:8080", connection:"keep-alive", content-length:"18", cache-control:"max-age=0", sec-ch-ua:""Chromium";v="104", " Not A;Brand";v="99", "Microsoft Edge";v="104"", sec-ch-ua-mobile:"?0", sec-ch-ua-platform:""Windows"", upgrade-insecure-requests:"1", origin:"http://localhost:8080", user-agent:"Mozilla/5.0 (Windows NT 10.0; Win64; x64) AppleWebKit/537.36 (KHTML, like Gecko) Chrome/104.0.5112.81 Safari/537.36 Edg/104.0.1293.54", accept:"text/html,application/xhtml+xml,application/xml;q=0.9,image/webp,image/apng,*/*;q=0.8,application/signed-exchange;v=b3;q=0.9", sec-fetch-site:"same-origin", sec-fetch-mode:"navigate", sec-fetch-user:"?1", sec-fetch-dest:"document", referer:"http://localhost:8080/message_test", accept-encoding:"gzip, deflate, br", accept-language:"zh-CN,zh;q=0.9,en;q=0.8,en-GB;q=0.7,en-US;q=0.6", Content-Type:"application/x-www-form-urlencoded;charset=UTF-8"]4name=zhangsan&money=123
注意:
使用 RequestEntity 作为形参时,也可以没有请求体,封装后的请求体数据为null。
8. 请求参数乱码问题
1) POST请求参数乱码
如果POST请求参数出现乱码,可在web.xml中配置SpringMVC提供的编码过滤器CharacterEncodingFilter。
171<!--配置springMVC的编码过滤器,指定编码为UTF-8-->2<filter>3 <filter-name>CharacterEncodingFilter</filter-name>4 <filter-class>org.springframework.web.filter.CharacterEncodingFilter</filter-class>5 <init-param>6 <param-name>encoding</param-name>7 <param-value>UTF-8</param-value>8 </init-param>9 <init-param>10 <param-name>forceResponseEncoding</param-name>11 <param-value>true</param-value>12 </init-param>13</filter>14<filter-mapping>15 <filter-name>CharacterEncodingFilter</filter-name>16 <url-pattern>/*</url-pattern>17</filter-mapping>注意:
CharacterEncodingFilter一定要配置到其他过滤器之前,否则可能无效!
2) Get请求乱码
Tomcat8.0之前GET请求也可能会出现乱码问题,需修改Tomcat的server.xml配置文件useBodyEncodingForURI属性为true。
11<Connector connectionTimeout="20000" port="8080" protocol="HTTP/1.1" redirectPort="8443" useBodyEncodingForURI="true" />如果遇到Ajax请求仍然乱码,则把useBodyEncodingForURI="true"改为URIEncoding="UTF-8"。
9. 参数验证
若类路径存在Hibernate Validator或类似实现,则在全局注册LocalValidatorFactoryBean,以支持@Vaild注解和Validated接口。
你可以通过如下方式来配置全局Validator实例:
91public class WebConfig implements WebMvcConfigurer {4
5 6 public Validator getValidator(); {7 // ...8 }9}也可注册控制器私有的Validator实例:
91public class MyController {3
4 5 protected void initBinder(WebDataBinder binder) {6 binder.addValidators(new FooValidator());7 }8
9}类似的XML配置如下:
11<mvc:annotation-driven validator="globalValidator"/>
第四节 域数据共享
1. Request域数据共享
1) 通过HttpServletRequest共享
将HttpServletRequest作为控制器方法的形参,框架在调用时会自动注入为当前请求对象,通过该对象即可在Request域共享数据。
91("share")3public class DataShareController {4 ("api")5 public String testDataShareByServletAPI(HttpServletRequest request) {6 request.setAttribute("username", "request_zhangsan");7 return "success";8 }9}
2) 通过Model形参共享
51("model")2public String testDataShareByModel(Model model) {3 model.addAttribute("username", "request_zhangsan");4 return "success";5}
3) 通过Map/ModelMap形参共享
111("map")2public String testMap(Map<String, Object> map) {3 map.put("username", "request_zhangsan");4 return "success";5}6
7("modelMap")8public String testMap(ModelMap modelMap) {9 modelMap.put("username", "request_zhangsan");10 return "success";11}
4) 通过响应ModelAndView共享
ModelAndView有Model和View的功能,Model主要用于向请求域共享数据,View主要用于设置视图,实现页面跳转。
91("mv")2public ModelAndView testDataShareByMv() {3 ModelAndView mv = new ModelAndView();4 // 共享数据5 mv.addObject("username", "request_zhangsan");6 // 页面跳转(默认转发)7 mv.setViewName("success");8 return mv;9}
5) 通过@ModelAttribute共享(了解)
@ModelAttribute注解用来进行Request域数据共享,可以作用于普通方法或控制器方法参数之上。
当作用于普通方法时,则该方法会在此Controller的每个方法执行前被执行,如果有返回值,则自动将该返回值加入到ModelMap中。
151public class Hello2ModelController {3 4 5 public User populateModel() { 6 User user=new User();7 user.setAccount("ray");8 return user;9 } 10 11 (value = "/helloWorld2") 12 public String helloWorld() { 13 return "helloWorld.jsp"; 14 } 15}当作用于控制器方法参数时,自动将该参数值添加到ModelMap中。
61("/testModelAttribute")2public String testModelAttribute(("newUser")User user,Model model){3 System.out.println("testModelAttribute User:" + user);4 System.out.println("testModelAttribute model:" + model.toString());5 return "success";6}
6) @RequestAttribute(了解)
@RequestAttribute属性可以从Request域获取数据并映射到控制器方法参数。
41("/")2public String handle( Client client) { 3 // ...4}
2. Session域数据共享
1) 通过HttpSession共享
将HttpSession作为控制器方法的形参,框架在调用时会自动注入为当前会话对象,通过该对象即可在Session域共享数据等。
51("api2")2public String testDataShareByServletAPI(HttpSession session) {3 session.setAttribute("username", "session_zhangsan");4 return "success";5}
2) 通过@SessionAttributes共享(了解)
@SessionAttributes注解可作用于控制器所在类上,其从Request域查找配置的属性,并共享到Session域。
101("sc")3("name")4public class SessionController {5 ("session")6 public String sessions(Model model, HttpSession session){7 model.addAttribute("name", "winclpt");8 session.setAttribute("myName", "chke");9 return "session";10}@SessionAttribute注解可从Session域获取数据并映射到控制器方法参数。
41("/")2public String handle( User user) { 3 // ...4}
3. Application域数据共享
获取会话对象(或请求对象)后,通过该对象可获取ServletContext对象,即可在Application域共享数据等。
51("api3")2public String testDataShareByServletAPI3(HttpSession session) {3 session.getServletContext().setAttribute("username", "servletContext_zhangsan");4 return "success";5}
第五节 结果响应
1. 常用返回类型和注解
控制器方法常用的返回值类型如下:
响应视图和模型:
ResponseEntity<T>、HttpHeaders、String、View、Map、Model、ModelAndView、void。异步响应类型:DeferredResult<V>、Callable<V>、ListenableFuture<V>、ResponseBodyEmitter、SseEmitter、StreamingResponseBody
任何其他返回值:如果是String,将会被当作逻辑视图名称解析,其它类型将会被反序列化后进行响应。
返回值相关的注解如下:
@ResponseBody:将返回值通过HttpMessageConverter序列化到响应主体。
@ModelAttribute:将返回值共享到请求域。
2. 直接响应结果
将HttpServletRequest或HttpServletResponse作为控制器方法的形参,框架在调用时会自动注入为当前请求对象或响应对象,此时可以进行请求转发、重定向或直接发送响应数据等。
191// 请求转发 -> /WEB-INF/pages/success.jsp2("api2")3public void testServletApi2(HttpServletRequest request, HttpServletResponse response) throws IOException, ServletException {4 request.getRequestDispatcher("/WEB-INF/pages/success.jsp").forward(request, response);5}6
7// 重定向 -> http://baidu.com8("api3")9public void testServletApi3(HttpServletRequest request, HttpServletResponse response) throws IOException, ServletException {10 response.sendRedirect("http://baidu.com");11}12
13// 直接发送响应数据 -> "这是一个响应数据!"14("api")15public void testServletApi(HttpServletResponse response) throws IOException {16 response.setCharacterEncoding("utf-8");17 response.setContentType("application/json;charset=utf-8");18 response.getWriter().write("这是一个响应数据!");19}
3. 请求转发或重定向
1) 通过forward进行请求转发
当控制器方法设置的视图名称以forward:为前缀时,创建InternalResourceView视图,然后直接通过:后面的路径进行转发,而不经过视图解析器拼接视图前后缀等过程。
51// 请求转发 -> /WEB-INF/pages/success.jsp2("/forward")3public String forward() {4 return "forward:/WEB-INF/pages/success.jsp";5}注意:
使用Forward进行转发时,写转发路径而非视图名称,相当于 request.getRequestDispatcher("url").forward(request,response)。
转发路径以
/开头时,则是基于Servlet上下文的绝对路径,否则是相对于当前请求的相对路径。可以转发到其它的控制器方法或JSP视图页面,但不能够转发到其它服务器。
当工程引入了JSTL模板库的依赖时,转发视图会自动转换为
JstlView。
2) 通过redirect进行重定向
当控制器方法设置的视图名称以redirect:为前缀时,创建RedirectView视图,然后直接通过:后面的路径进行重定向,也不经过视图解析器拼接视图前后缀等过程。
51// 重定向 -> http://baidu.com2("/redirect")3public String redirect() {4 return "redirect:http://baidu.com";5}注意:
使用Redirect进行重定向时,写新路径而非视图名称,相当于response.sendRedirect(url)。
同样的,路径以
/开头时,则是基于Servlet上下文的绝对路径,否则是相对于当前请求的相对路径。可以重定向到任何可访问URL资源,但WEB-INF目录下的资源除外。
3) 重定向数据共享(了解)
重定向时默认传递所有的Model属性,可以通过RequestMappingHandlerAdapter的ignoreDefaultModelOnRedirect标志来控制。
如果属性为String类型,则直接拼接在URL之后。如果非String类型,则通过RedirectAttributes的实现类RedirectAttributesModelMap进行传递。RedirectAttributesModelMap有一个flashAttributes属性,在重定向之前(通常在会话中)被临时保存,在重定向之后可供请求使用。
在每个请求上,都有一个具有从上一个请求(如果有)传递的属性的输入FlashMap,和一个具有为后续请求保存的属性的输出FlashMap,通过RequestContextUtils中的getInputFlashMap/getOutputFlashMap方法,可以从Spring MVC中的任何位置访问这两个FlashMap实例。
4. 响应视图页面
当控制器方法设置的视图名称没有任何前缀时,则由配置的视图解析器按优先级(order属性配置)进行解析,它会将视图名称拼接前后缀,然后以转发的方式实现跳转。
1) 设置视图名称
在控制器方法结束时,可通过返回String或ModelAndView的形式设置视图名称。
131// String2("/view")3public String view() {4 return "success";5}6
7// ModelAndView8("/mv")9public ModelAndView mv() {10 ModelAndView mv = new ModelAndView();11 mv.setViewName("success");12 return mv;13}这里也可以直接返回视图的绝对路径,如/WEB-INF/pages/success.jsp,但一般会结合视图解析器使用,只需返回视图名称即可。
2) 默认视图解析器(JSP)
SpringMVC提供了一个默认视图解析器InternalResourceViewResolver可用于解析JSP视图。
111<!-- 默认视图解析器,可用于处理jsp等视图 -->2<bean id="viewResolver" class="org.springframework.web.servlet.view.InternalResourceViewResolver">3    <property name="order" value="1"/>4    <property name="prefix" value="/WEB-INF/pages/"/>5    <property name="suffix" value=".jsp"/>6</bean>7
8<!-- 简化方式配置(了解) -->9<mvc:view-resolvers>10 <mvc:jsp/>11</mvc:view-resolvers>JSP视图的简单示例如下,文件路径为src\main\webapp\WEB-INF\pages\success.jsp。
161<% page contentType="text/html;charset=UTF-8" language="java" %>2<html lang="en">4<head>5 <meta charset="UTF-8">6 <title>Success</title>7</head>8<body>9<h1>Success!</h1>10
11request.username: <%=request.getAttribute("username")%>12session.username: <%=session.getAttribute("username")%>13application.username: <%=application.getAttribute("username")%>14
15</body>16</html>
3) 响应Thymeleaf视图
首先需要引入Thymeleaf视图的相关依赖。
61<!-- Spring5和Thymeleaf整合包 -->2<dependency>3 <groupId>org.thymeleaf</groupId>4 <artifactId>thymeleaf-spring5</artifactId>5 <version>3.0.12.RELEASE</version>6</dependency>然后在spring-mvc-config.xml文件中配置Thymeleaf视图解析器,并设置视图前缀、视图后缀和优先级等关键属性。
201<!-- 配置Thymeleaf视图解析器 -->2<bean id="thymeleafViewResolver" class="org.thymeleaf.spring5.view.ThymeleafViewResolver">3 <!-- 解析优先级 -->4 <property name="order" value="0"/>5 <property name="characterEncoding" value="UTF-8"/>6 <property name="templateEngine">7 <bean class="org.thymeleaf.spring5.SpringTemplateEngine">8 <property name="templateResolver">9 <bean class="org.thymeleaf.spring5.templateresolver.SpringResourceTemplateResolver">10 <!-- 视图前缀 -->11 <property name="prefix" value="/WEB-INF/templates/"/>12 <!-- 视图后缀 -->13 <property name="suffix" value=".html"/>14 <property name="templateMode" value="HTML5"/>15 <property name="characterEncoding" value="UTF-8"/>16 </bean>17 </property>18 </bean>19 </property>20</bean>Thymeleaf视图的简单示例如下,文件路径为src\main\webapp\WEB-INF\templates\success.html。
181<html lang="en" xmlns:th="http://www.thymeleaf.org">3<head>4 <meta charset="UTF-8">5 <title>Success</title>6</head>7<body>8
9<a th:href="@{/}"><h1>首页</h1></a>10
11request.username: <span th:text="${#httpServletRequest.getAttribute('username')}"></span>12<br>13session.username: <span th:text="${session.username}"></span>14<br>15application.username: <span th:text="${application.username}"></span>16
17</body>18</html>
4) 响应FreeMarker视图页面
首先也是引入FreeMarker视图的相关依赖。
111<!-- Spring5和freemarker整合包 -->2<dependency>3 <groupId>org.freemarker</groupId>4 <artifactId>freemarker</artifactId>5 <version>2.3.31</version>6</dependency>7<dependency>8 <groupId>org.springframework</groupId>9 <artifactId>spring-context-support</artifactId>10 <version>5.3.15</version>11</dependency>然后在spring-mvc-config.xml文件中配置FreeMarker视图解析器和相关配置类,并设置视图前缀、视图后缀和优先级等关键属性。
521<!-- 注册freemarker视图解析器 -->2<bean id="freeMarkerViewResolver" class="org.springframework.web.servlet.view.freemarker.FreeMarkerViewResolver">3    <!-- 视图解析顺序,排在其他视图解析器之后 数字越大优先级越低 -->4    <property name="order" value="2"/>5    <!-- 开启模版缓存 -->6    <property name="cache" value="true"/>7    <!-- freeMarkerConfigurer已经配了,这里就不用配啦 -->8    <property name="prefix" value=""/>9    <!-- 配置文件后缀 -->10    <property name="suffix" value=".ftl"/>11    <property name="contentType" value="text/html;charset=UTF-8"/>12    <!-- 是否允许session属性覆盖模型数据,默认false -->13    <property name="allowSessionOverride" value="false"/>14    <!-- 是否允许request属性覆盖模型数据,默认false -->15    <property name="allowRequestOverride" value="false"/>16    <!-- 开启spring提供的宏帮助(macro) -->17    <property name="exposeSpringMacroHelpers" value="true"/>18    <!-- 添加request attributes属性到ModelAndView中 -->19    <property name="exposeRequestAttributes" value="true"/>20    <!-- 添加session attributes属性到ModelAndView中 -->21    <property name="exposeSessionAttributes" value="true"/>22</bean>23
24<!-- 注册freemarker配置类 -->25<bean id="freeMarkerConfigurer" class="org.springframework.web.servlet.view.freemarker.FreeMarkerConfigurer">26    <!-- ftl模版文件路径  -->27    <property name="templateLoaderPath" value="/WEB-INF/templates/"/>28    <!-- 页面编码 -->29    <property name="defaultEncoding" value="utf-8"/>30    <property name="freemarkerSettings">31        <props>32            <!-- 模版缓存刷新时间,不写单位默认为秒 -->33            <prop key="template_update_delay">0</prop>34            <!-- 时区 和 时间格式化 -->35            <prop key="locale">zh_CN</prop>36            <prop key="datetime_format">yyyy-MM-dd</prop>37            <prop key="date_format">yyyy-MM-dd</prop>38            <!-- 数字使用.来分隔 -->39            <prop key="number_format">#.##</prop>40        </props>41    </property>42</bean>43    44
45<!-- 简化配置方式(了解) -->46<mvc:view-resolvers>47    <mvc:freemarker cache="false"/>48</mvc:view-resolvers>49<mvc:freemarker-configurer>50    <mvc:template-loader-path location="/WEB-INF/freemarker"/>51</mvc:freemarker-configurer>52
FreeMarker视图的简单示例如下,文件路径为src\main\webapp\WEB-INF\templates\success.ftl。
151<html lang="en">3<head>4 <meta charset="UTF-8">5 <title>Success</title>6</head>7<body>8
9<a href="/"><h1>首页</h1></a>10
11<!--注意:如果域中不存在username属性会报错!-->12username: ${username}13
14</body>15</html>
5) view-controller
当控制器方法中,仅仅用来实现页面跳转,即只需要设置视图名称时,可以将处理器方法使用view-controller标签进行表示。
61<!--2 path:设置处理的请求地址3 view-name:设置请求地址所对应的视图名称4-->5<mvc:view-controller path="/testView1" view-name="myView1"></mvc:view-controller>6<mvc:view-controller path="/testView2" view-name="myView2"></mvc:view-controller>注意:
当存在view-controller时,控制器方法中的请求映射将全部失效,此时需开启MVC注解驱动:
<mvc:annotation-driven/>。
5. 响应实体类(重要)
1) @ResponseBody注解
@ResponseBody注解用来将返回值作为为响应体返回,但由于响应体一般为字符串类型,因此默认只能转换String类型的返回值。
51("res")2public String resConvert() {4 return "this is string.";5}提示:
@ResponseBody注解也可以配置在类上,等效于类中的所有控制器方法都加上该注解。
SpringMVC提供了一个@ResponseBody和@Controller的组合注解
@RestController,简化注解使用。
2) 响应消息转换
为了能够转换其它类型的返回值作为响应体,需要引入JSON/XML依赖,并配置相关的HttpMessageConverter。
引入Jackson的依赖如下:
51<dependency>2 <groupId>com.fasterxml.jackson.core</groupId>3 <artifactId>jackson-databind</artifactId>4 <version>2.12.1</version>5</dependency>并通过开启MVC注解驱动来自动配置MappingJackson2HttpMessageConverter。
11<mvc:annotation-driven />然后就可以响应不同类型的实体数据了。
181// ==> http://localhost:8080/message/res22// <== 6663("res2")4public Integer resConvert2() {6 return 666;7}8
9// ==> http://localhost:8080/message/res310// <== {"name":"zhangsan","money":123.4}11("res3")12public Account resConvert3() {14 Account account = new Account();15 account.setName("zhangsan");16 account.setMoney(123.4F);17 return account;18}
3) ResponseEntity
ResponseEntity可作为控制器方法的返回值类型,它可以设置响应头和响应体信息,并经消息转换器转换后响应给浏览器。
251// 成功响应2("/success")3public ResponseEntity<String> success() {4 return ResponseEntity.ok("Success");5}6
7// 自定义状态码和响应头8("/create")9public ResponseEntity<String> create() {10 return ResponseEntity.status(HttpStatus.CREATED)11 .header("Location", "/newResource")12 .body("Resource created");13}14
15// 无内容响应16("/no-content")17public ResponseEntity<Void> noContent() {18 return ResponseEntity.noContent().build();19}20
21// 错误响应22("/error")23public ResponseEntity<String> error() {24 return ResponseEntity.badRequest().body("Invalid request");25}
第六节 文件上传和下载
1. 文件上传
1) 前端表单
文件上传要求FROM表单的请求方式必须为POST,并且添加属性enctype="multipart/form-data"。
151<html lang="en">3<head>4 <meta charset="UTF-8">5 <title>文件上传测试</title>6</head>7<body>8
9<form action="/file/up" method="post" enctype="multipart/form-data">10 <input type="file" name="multipartFile"/>11 <input type="submit" value="上传">12</form>13
14</body>15</html>注意:
文件输入框的 name 属性值要求和控制器方法中MultipartFile形参名一致。
2) 后台服务
首先添加commons-fileupload依赖如下:
51<dependency>2 <groupId>commons-fileupload</groupId>3 <artifactId>commons-fileupload</artifactId>4 <version>1.3.1</version>5</dependency>然后在SpringMVC的配置文件中添加multipartResolver配置。
71<!-- 配置文件解析器:用于解析文件为MultipartFile对象(注意:BeanId不能修改) -->2<bean id="multipartResolver" class="org.springframework.web.multipart.commons.CommonsMultipartResolver">3 <!-- 设置上传文件的最大尺寸为5MB -->4 <property name="maxUploadSize">5 <value>5242880</value>6 </property>7</bean>编写控制器代码如下,SpringMVC中将上传的文件封装到MultipartFile对象中,通过此对象可以获取文件相关信息。
351("file")3public class FileController {4
5 ("up")6 public String up(MultipartFile multipartFile, HttpSession session) throws IOException {7 // 获取上传的文件名8 String fileName = multipartFile.getOriginalFilename();9 if (fileName == null) {10 return "error";11 }12
13 // 生成UUID作为文件名14 int suffixIndex = fileName.lastIndexOf(".");15 String uuidFileName = UUID.randomUUID().toString() + (suffixIndex != -1 ? fileName.substring(suffixIndex) : "");16
17 // 获取服务器中upload目录的路径18 ServletContext servletContext = session.getServletContext();19 String path = servletContext.getRealPath("upload");20 File file = new File(path);21 if (!file.exists()) {22 file.mkdirs();23 }24
25 // 组成最终的文件名26 String finalFilename = path + File.separator + uuidFileName;27 System.out.println("file-up: " + finalFilename);28
29 //上传30 multipartFile.transferTo(new File(finalFilename));31
32 return "success";33 }34
35}注意:
可以使用
List<MultipartFile>接收多个同名文件,或使用Map<String, MultipartFile>或MultiValueMap<String, MultipartFile>映射多个文件。MultipartFile可以不直接作为方法的参数,放在POJO类参数的某个属性。
2. 文件下载
文件下载关键是设置一个Content-Disposition请求头,以附件的形式进行下载。
261("/down")2public ResponseEntity<byte[]> down( String fileName, HttpSession session) throws IOException {3 ResponseEntity<byte[]> responseEntity;4
5 //获取真实路径6 // ServletContext servletContext = session.getServletContext();7 // String realPath = servletContext.getRealPath("down" + File.separator + fileName);8 String realPath = "D:/Download" + File.separator + fileName;9
10 // 读文件11 byte[] bytes;12 try (InputStream is = new FileInputStream(realPath)) {13 bytes = new byte[is.available()];14 is.read(bytes);15 }16
17 // 设置响应头18 MultiValueMap<String, String> headers = new HttpHeaders();19 headers.add("Content-Disposition", "attachment;filename=" + fileName); // 以附件形式下载20 HttpStatus statusCode = HttpStatus.OK;21
22 // 封装ResponseEntity23 responseEntity = new ResponseEntity<>(bytes, headers, statusCode);24
25 return responseEntity;26}
3. 文件异地存储
第七节 常用MVC组件
1. MVC组件简介
SpringMVC通过组件化配置来支持不同的功能,主要的一些组件如下:
DispatcherServlet:前端控制器,统一接收客户端(浏览器)的请求,并根据请求URL转发给 Controller 中的方法。
Handler:控制器处理器,即标注了 @RequestMapping 注解的方法,负责处理客户端发送的请求,并响应视图/JSON 数据。
HandlerMapping:处理器映射器,匹配查找能处理请求的Handler,并组合拦截器,返回一个HandlerExecutionchain对象。
RequestMappingHandlerMapping:根据@RequestMapping注解的配置信息进行映射。
SimpleUrlHandlerMapping:根据URI进行简单映射,不常用。
HandlerAdapter:处理器适配器,它的作用是执行上面封装好的 HandlerExecutionchain。
HandlerExceptionResolver:解决异常的策略,可以将异常映射到到控制器方法、错误视图或其他目标。
ViewResolver:视图解析器,根据 ModelAndview 中存放的视图名称进行实际的视图渲染。
LocaleResolver和LocaleContextResolver:解析Client端正在使用的Locale以及可能的时区,以便能够提供国际化的视图。
ThemeResolve:解决Web应用程序可以使用的主题,例如提供个性化的布局。
MultipartResolver:借助其它解析库来解析Multipart请求,如实现文件上传。
FlashMapManager:存储和检索输入和输出FlashMap,实现将属性从一个请求传递到另一个请求,通常跨重定向。
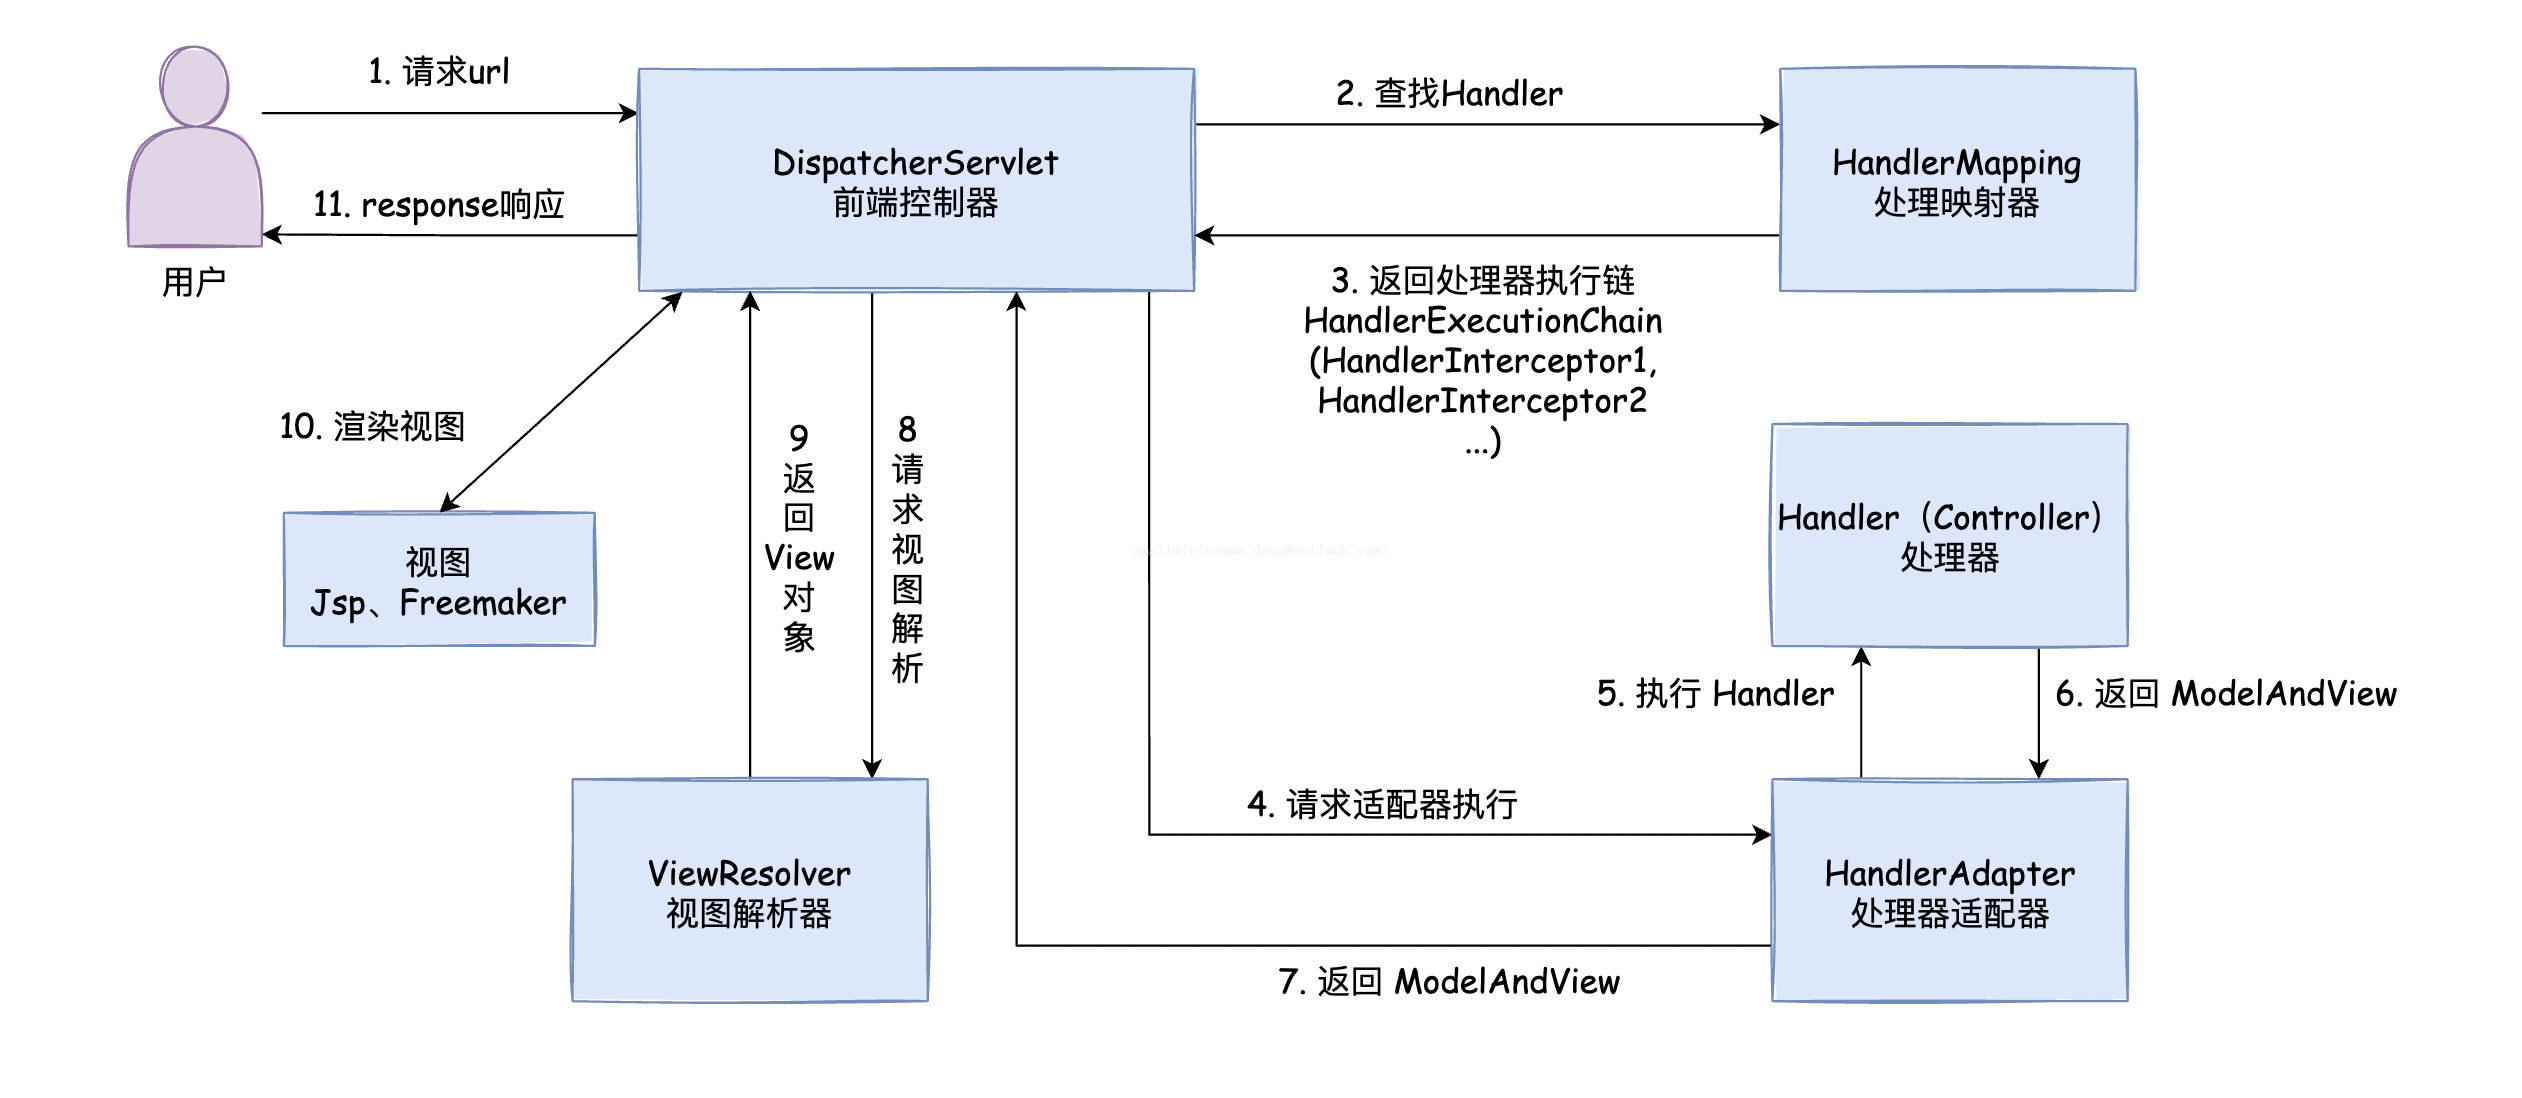
下面是MVC组件的一些内置实现,详情可以参考DispatcherServlet.properties:
261# Default implementation classes for DispatcherServlet's strategy interfaces.2# Used as fallback when no matching beans are found in the DispatcherServlet context.3# Not meant to be customized by application developers.4
5org.springframework.web.servlet.LocaleResolver=org.springframework.web.servlet.i18n.AcceptHeaderLocaleResolver6
7org.springframework.web.servlet.ThemeResolver=org.springframework.web.servlet.theme.FixedThemeResolver8
9org.springframework.web.servlet.HandlerMapping=org.springframework.web.servlet.handler.BeanNameUrlHandlerMapping,\10    org.springframework.web.servlet.mvc.method.annotation.RequestMappingHandlerMapping,\11    org.springframework.web.servlet.function.support.RouterFunctionMapping12
13org.springframework.web.servlet.HandlerAdapter=org.springframework.web.servlet.mvc.HttpRequestHandlerAdapter,\14    org.springframework.web.servlet.mvc.SimpleControllerHandlerAdapter,\15    org.springframework.web.servlet.mvc.method.annotation.RequestMappingHandlerAdapter,\16    org.springframework.web.servlet.function.support.HandlerFunctionAdapter17
18org.springframework.web.servlet.HandlerExceptionResolver=org.springframework.web.servlet.mvc.method.annotation.ExceptionHandlerExceptionResolver,\19    org.springframework.web.servlet.mvc.annotation.ResponseStatusExceptionResolver,\20    org.springframework.web.servlet.mvc.support.DefaultHandlerExceptionResolver21
22org.springframework.web.servlet.RequestToViewNameTranslator=org.springframework.web.servlet.view.DefaultRequestToViewNameTranslator23
24org.springframework.web.servlet.ViewResolver=org.springframework.web.servlet.view.InternalResourceViewResolver25
26org.springframework.web.servlet.FlashMapManager=org.springframework.web.servlet.support.SessionFlashMapManager
2. 视图解析器
SpringMVC定义了View和ViewResolver接口,用于解绑控制器与特定的视图技术。
View:解决了在移交给特定视图技术之前的数据准备问题。
ViewResolver:提供了视图名称和实际视图之间的映射。
1) 内置视图解析器
SpringMVC对一些场景内置了ViewResolver,如下:
ContentNegotiatingViewResolver:本身不会解析视图,只根据Accept请求头或"format=pdf"请求参数等信息委派给其他视图解析器。
InternalResourceView:用于解析JSP页面,将视图名称解析为Web应用内的资源路径,如
/WEB-INF/views/目录下的JSP文件。RedirectView:用于执行重定向操作,当控制器方法返回的视图名称以"redirect:"为前缀时,SpringMVC会使用RedirectView来处理。
2) 配置ContentNegotiatingViewResolver
91public class WebConfig implements WebMvcConfigurer {4
5 6 public void configureViewResolvers(ViewResolverRegistry registry) {7 registry.enableContentNegotiation(new MappingJackson2JsonView());8 }9}类似的XML配置如下:
71<mvc:view-resolvers>2 <mvc:content-negotiation>3 <mvc:default-views>4 <bean class="org.springframework.web.servlet.view.json.MappingJackson2JsonView"/>5 </mvc:default-views>6 </mvc:content-negotiation>7</mvc:view-resolvers>
3) 配置其它视图解析器
请参考“响应视图页面”章节!
3. 控制器拦截器
1) 实现一个拦截器
拦截器用于拦截Controller方法的执行,需要实现HandlerInterceptor接口,并根据情况来实现其抽象方法。
271(0)2public class LogInterceptor implements HandlerInterceptor {3 /**4 * 在控制器方法执行之前执行,返回值表示是否放行。5 */6 7 public boolean preHandle(HttpServletRequest request, HttpServletResponse response, Object handler) throws Exception {8 System.out.println("LogInterceptor->preHandle(): " + request.getServletPath());9 return true;10 }11
12 /**13 * 控制器方法执行之后执行。14 */15 16 public void postHandle(HttpServletRequest request, HttpServletResponse response, Object handler, ModelAndView modelAndView) throws Exception {17 System.out.println("LogInterceptor->postHandle(): " + request.getServletPath());18 }19
20 /**21 * 处理完视图和模型数据,渲染视图完毕之后执行。22 */23 24 public void afterCompletion(HttpServletRequest request, HttpServletResponse response, Object handler, Exception ex) throws Exception {25 System.out.println("LogInterceptor->afterCompletion(): " + request.getServletPath());26 }27}注意:
拦截器只能拦截控制器方法,不能拦截其它请求,如静态资源请求。
特别的,如果使用@ResponseBody和ResponseEntity,则在控制器方法返回前已将响应写入和提交,因此不能再通过postHandle来处理响应,如"添加额外的响应头"等操作。(不过,你可以通过ResponseBodyAdvice或RequestMappingHandlerAdapter解决!)
2) 配置拦截器
151<mvc:interceptors>2    <!--配置拦截器(/**所有控制器请求 /*表示只有一层路径的控制器请求)-->3    <mvc:interceptor>4        <mvc:mapping path="/**"/>5        <mvc:exclude-mapping path="/"/>6        <bean class="com.huangyuanxin.notes.springmvc.interceptor.LogInterceptor"></bean>7    </mvc:interceptor>8
9    <!--简写方式一:直接创建Bean,默认拦截所有控制器请求-->10    <!--<bean id="logInterceptor" class="com.huangyuanxin.notes.springmvc.interceptor.LogInterceptor"></bean>-->11
12    <!--简写方式二:直接引用外部Bean,也是默认拦截所有控制器请求-->13    <!--<ref bean="logInterceptor"></ref>-->14</mvc:interceptors>15
3) 拦截器执行顺序
如果配置了多个拦截器,则按如下原则来执行拦截器方法:
按配置顺序执行preHandle(),反顺序执行postHandle()和afterComplation(),配置顺序可通过
@Order注解或Order接口调整。如果中途某个拦截器的preHandle()返回了false,则直接跳转到上一个拦截器的afterComplation(),其它未执行的拦截器,包括控制器方法都将会被跳过。
4. 异常处理器
如果在请求映射或处理期间引发了异常,则交给HandlerExceptionResolver链来处理,通常是返回一个友好的错误响应。
1) 内置异常处理器
SpringMVC对一些场景内置了HandlerExceptionResolver,如下:
SimpleMappingExceptionResolver:用于声明异常类名称与错误页面之间的映射。
111<bean class="org.springframework.web.servlet.handler.SimpleMappingExceptionResolver">2<property name="exceptionMappings">3<props>4<!-- properties的键表示处理器方法执行过程中出现的异常5properties的值表示若出现指定异常时,设置一个新的视图名称,跳转到指定页面 -->6<prop key="java.lang.ArithmeticException">error</prop>7</props>8</property>9<!-- exceptionAttribute属性设置一个属性名,将出现的异常信息在请求域中进行共享 -->10<property name="exceptionAttribute" value="ex"></property>11</bean>DefaultHandlerExceptionResolver:用于处理SpringMVC引发的异常,并将异常映射到HTTP状态码。
ResponseStatusExceptionResolver:在使用@ResponseStatus注解处理异常的场景,根据注解中的值将其映射到 HTTP 状态码。
ExceptionHandlerExceptionResolver: 通过调用@Controller或@ControllerAdvice类中的
@ExceptionHandler方法来解决异常。
如果当前HandlerExceptionResolver无法处理引发的异常,请返回null值,交给下一个HandlerExceptionResolver进行处理。
如果所有的HandlerExceptionResolver都无法处理异常,则映射到Servlet容器的默认错误页面。错误页面可通过下面方式配置。
31<error-page>2 <location>/error</location>3</error-page>
2) 实现一个异常处理器
自定义CustomRuntimeException异常和CustomExceptionResolver如下。
301public class CustomRuntimeException extends RuntimeException {2 public CustomRuntimeException(String s) {3 super(s);4 }5}6
7public class CustomExceptionResolver implements HandlerExceptionResolver {8
9 10 public ModelAndView resolveException(HttpServletRequest request, HttpServletResponse response, Object handler, Exception ex) {11 // 打印异常信息12 ex.printStackTrace();13
14 // 转换为自定义异常15 CustomRuntimeException exception = null;16 if (ex instanceof CustomRuntimeException) {17 exception = (CustomRuntimeException) ex;18 } else {19 exception = new CustomRuntimeException(ex.getMessage());20 }21
22 // 构建ModelAndView23 ModelAndView modelAndView = new ModelAndView();24 modelAndView.addObject("ex", exception);25 modelAndView.setViewName("error");26
27 return modelAndView;28 }29}30
3) 配置异常处理器
21<!-- 配置自定义异常处理器 -->2<bean id="handlerExceptionResolver" class="com.huangyuanxin.notes.springmvc.resolver.CustomExceptionResolver"/>
5. 类型转换器
如果控制器方法的参数既不是HttpServletRquest等特殊对象,也不是String类型,则在映射请求参数时,一般需要进行相应的类型转换。
如将前端传过来的String类型值映射到Date类型的形参。
51("date")2public String deleteAccount(Date date) {3 System.out.println(date);4 return "success";5}
1) Formatter
org.springframework.format.Formatter用于处理String类型到任意类型的转换。首先定义一个Formatter如下:
141public class MyFormatter implements Formatter<Date> {2 3 public Date parse(String text, Locale locale) throws ParseException {4 SimpleDateFormat simpleDateFormat = new SimpleDateFormat("yyyyMMdd");5 Date date = simpleDateFormat.parse(text);6 System.out.println("转换了:"+date);7 return date;8 }9
10 11 public String print(Date object, Locale locale) {12 return null;13 }14}然后在spring-mvc-config.xml文件中进行配置。
251<!-- 配置类型转换服务 -->2<bean id="conversionService" class="org.springframework.format.support.FormattingConversionServiceFactoryBean">3    <!-- 配置Formatter -->4    <property name="formatters">5        <set>6            <bean class="org.example.MyFormatter"/>7            <bean class="org.example.MyAnnotationFormatterFactory"/>8        </set>9    </property>10    <!-- 配置FormatterRegistrar -->11    <property name="formatterRegistrars">12        <set>13            <bean class="org.example.MyFormatterRegistrar"/>14        </set>15    </property>16    <!-- 配置Converter -->17    <property name="converters">18        <set>19            <bean class="org.example.MyConverter"/>20        </set>21    </property>22</bean>23
24<!--开启注解驱动支持-->25<mvc:annotation-driven conversion-service="conversionService"/>
2) Converter
org.springframework.core.convert.converter.Converter用来处理任意类型之间的映射。首先定义一个Converter如下:
181public class StringToDateConverter implements Converter<String, Date> {2
3 private DateFormat format = new SimpleDateFormat("yyyy-MM-dd");4
5 6 public Date convert(String source) {7 if (source != null && source.trim().length() > 0) {8 try {9 return format.parse(source);10 } catch (Exception e) {11 throw new RuntimeException("日期转换错误");12 }13 }14
15 return null;16 }17}18
然后在spring-mvc-config.xml文件中进行配置:
131<!-- 配置类型转换服务 -->2<bean id="converterService" class="org.springframework.context.support.ConversionServiceFactoryBean">3    <!-- 给工厂注入一个新的类型转换器 -->4    <property name="converters">5        <array>6            <!-- 配置自定义类型转换器 -->7            <bean class="com.huangyuanxin.notes.springmvc.converter.StringToDateConverter"></bean>8        </array>9    </property>10</bean>11
12<!--开启注解驱动支持-->13<mvc:annotation-driven conversion-service="converterService"></mvc:annotation-driven>
3) PropertyEditor
java.beans.PropertyEditor也可以用来进行属性转换,使用方式请参考“Spring IOC”相关章节。
6. Multipart解析器
MultipartResolver是一种用于解析Multipart请求(如文件上传)的策略,当收到Content Type为multipart/form-data的POST请求时,将会把HttpServletRequest包装为MultipartHttpServletRequest。
SpringMVC提供了两种实现方式,一种是基于Commons FileUpload的实现,另一种基于Servlet 3.0 Multipart请求解析。
1) Commons FileUpload
首先导入commons-fileupload依赖,然后配置CommonsMultipartResolver类,Bean名称固定为multipartResolver。
如何使用Multipart解析器,请参考“文件上传”章节。
2) Servlet 3.0 Multipart
默认情况下,Servlet 3.0 Multipart功能为关闭状态,可通过web.xml的<multipart-config>标签或如下Java配置进行开启。
101public class AppInitializer extends AbstractAnnotationConfigDispatcherServletInitializer {2
3 4 protected void customizeRegistration(ServletRegistration.Dynamic registration) {5
6 // Optionally also set maxFileSize, maxRequestSize, fileSizeThreshold7 registration.setMultipartConfig(new MultipartConfigElement("/tmp"));8 }9
10}同样的,需要配置Bean名称为multipartResolver的StandardServletMultipartResolver。
第八节 常用MVC注解
1. 通过注解配置MVC
1) Servlet容器初始化(web.xml)
在Servlet3.0环境中,容器会查找javax.servlet.ServletContainerInitializer接口的实现类,并用它来初始化Servlet容器。而Spring的SpringServletContainerInitializer类实现了该接口,将初始化逻辑委托给WebApplicationInitializer的实现类。
171public class MyWebApplicationInitializer implements WebApplicationInitializer {2
3 4 public void onStartup(ServletContext servletCxt) {5
6 // Load Spring web application configuration7 AnnotationConfigWebApplicationContext ac = new AnnotationConfigWebApplicationContext();8 ac.register(AppConfig.class);9 ac.refresh();10
11 // Create and register the DispatcherServlet12 DispatcherServlet servlet = new DispatcherServlet(ac);13 ServletRegistration.Dynamic registration = servletCxt.addServlet("app", servlet);14 registration.setLoadOnStartup(1);15 registration.addMapping("/app/*");16 }17}
为了继续简化Servlet容器的初始化过程,Spring又定义了AbstractAnnotationConfigDispatcherServletInitializer抽象类。
461public class WebInit extends AbstractAnnotationConfigDispatcherServletInitializer {2 /**3 * 指定SpringMVC的配置类4 *5 * @return6 */7 8 protected Class<?>[] getServletConfigClasses() {9 return new Class[]{WebConfig.class};10 }11 12 /**13 * 指定Spring的配置类14 *15 * @return16 */17 18 protected Class<?>[] getRootConfigClasses() {19 return new Class[]{SpringConfig.class};20 }21
22 /**23 * 指定DispatcherServlet的映射规则,即url-pattern24 *25 * @return26 */27 28 protected String[] getServletMappings() {29 return new String[]{"/"};30 }31
32 /**33 * 添加过滤器34 *35 * @return36 */37 38 protected Filter[] getServletFilters() {39 CharacterEncodingFilter encodingFilter = new CharacterEncodingFilter();40 encodingFilter.setEncoding("UTF-8");41 encodingFilter.setForceRequestEncoding(true);42 HiddenHttpMethodFilter hiddenHttpMethodFilter = new HiddenHttpMethodFilter();43 return new Filter[]{encodingFilter, hiddenHttpMethodFilter};44 }45}46
注意:
如果您需要进一步自定义DispatcherServlet本身,则可以覆盖createDispatcherServlet方法。
2) SpringMVC配置(spring-mvc-config.xml)
1101("com.huangyuanxin.notes.springmvc") //扫描组件3 //开启MVC配置(等效于 <mvc:annotation-driven/> )4public class WebConfig implements WebMvcConfigurer {5
6 // 开启DefaultServletHandler支持(可用于处理静态资源等)7 8 public void configureDefaultServletHandling(DefaultServletHandlerConfigurer configurer) {9 // 开启DefaultServletHandler支持(参数可自定义默认Servlet名称)10 configurer.enable();11 }12 13 /* 配置静态资源映射14 @Override15 public void addResourceHandlers(ResourceHandlerRegistry registry) {16 registry.addResourceHandler("/resources/**")17 .addResourceLocations("/public", "classpath:/static/")18 .setCachePeriod(31556926);19 }20 */21
22 //配置文件上传解析器23 24 public CommonsMultipartResolver multipartResolver() {25 return new CommonsMultipartResolver();26 }27
28 //配置属性转换器29 30 public void addFormatters(FormatterRegistry registry) {31 registry.addFormatter(new DateFormatter("yyyy-MM-dd"));32 }33 34 //配置拦截器35 36 public void addInterceptors(InterceptorRegistry registry) {37 LogInterceptor logInterceptor = new LogInterceptor();38 registry.addInterceptor(logInterceptor).addPathPatterns("/**");39 }40
41 // 配置视图控制42 43 public void addViewControllers(ViewControllerRegistry registry) {44 registry.addViewController("/").setViewName("index");45 }46
47 // 配置异常映射48 49 public void configureHandlerExceptionResolvers(List<HandlerExceptionResolver> resolvers) {50 SimpleMappingExceptionResolver exceptionResolver = new SimpleMappingExceptionResolver();51 Properties prop = new Properties();52 prop.setProperty("java.lang.ArithmeticException", "error");53 //设置异常映射54 exceptionResolver.setExceptionMappings(prop);55 //设置共享异常信息的键56 exceptionResolver.setExceptionAttribute("ex");57 resolvers.add(exceptionResolver);58 }59
60 // 配置Thymeleaf模板解析器61 62 public ITemplateResolver templateResolver() {63 WebApplicationContext webApplicationContext = ContextLoader.getCurrentWebApplicationContext();64 // ServletContextTemplateResolver需要一个ServletContext作为构造参数,可通过WebApplicationContext 的方法获得65 ServletContextTemplateResolver templateResolver = new ServletContextTemplateResolver(66 webApplicationContext.getServletContext());67 templateResolver.setPrefix("/WEB-INF/templates/");68 templateResolver.setSuffix(".html");69 templateResolver.setCharacterEncoding("UTF-8");70 templateResolver.setTemplateMode(TemplateMode.HTML);71 templateResolver.setOrder(0);72 return templateResolver;73 }74
75 // 配置Thymeleaf模板引擎76 77 public SpringTemplateEngine templateEngine(ITemplateResolver templateResolver) {78 SpringTemplateEngine templateEngine = new SpringTemplateEngine();79 templateEngine.setTemplateResolver(templateResolver);80 return templateEngine;81 }82
83 // 配置Thymeleaf视图解析器84 85 public ViewResolver viewResolver(SpringTemplateEngine templateEngine) {86 ThymeleafViewResolver viewResolver = new ThymeleafViewResolver();87 viewResolver.setCharacterEncoding("UTF-8");88 viewResolver.setTemplateEngine(templateEngine);89 return viewResolver;90 }91
92 // 配置其它视图解析器93 94 public void configureViewResolvers(ViewResolverRegistry registry) {95 // 配置FreeMarker视图解析器96 registry.freeMarker().cache(false);97 // 配置JSP视图解析器98 registry.jsp();99 }100 101 // FreeMarker视图解析器属性配置102 103 public FreeMarkerConfigurer freeMarkerConfigurer() {104 FreeMarkerConfigurer configurer = new FreeMarkerConfigurer();105 configurer.setTemplateLoaderPath("/WEB-INF/freemarker");106 return configurer;107 }108 109}110
3) Spring配置(spring-config.xml)
51public class SpringConfig {3 //ssm整合之后,spring的配置信息写在此类中4}5
4) 编写控制器
一切配置就绪后,就可以使用之前的方式来编写控制器了。
171public class TestController {3
4 ("test")5 public ModelAndView test(HttpSession session) {6 ModelAndView mav = new ModelAndView();7
8 mav.addObject("username", "zhangsan(request)");9 session.setAttribute("username", "zhangsan(session)");10 session.getServletContext().setAttribute("username", "zhangsan(application)");11
12 mav.setViewName("success");13
14 return mav;15 }16}17
2. @ControllerAdvice
@ControllerAdvice(@RestControllerAdvice)是针对多个控制器的切面,一般用于配置类型转换器和异常处理器等。
1) @InitBinder
@InitBinder标注的方法用来初始化WebDataBinder实例,该类实例用于多种场景下的属性转换。
181public class FormController{3
4 // 注册PropertyEditor5 6 public void initBinder01(WebDataBinder binder) {7 SimpleDateFormat dateFormat = new SimpleDateFormat("yyyy-MM-dd");8 dateFormat.setLenient(false);9 binder.registerCustomEditor(Date.class, new CustomDateEditor(dateFormat, false));10 }11
12 // 添加Formatter13 14 protected void initBinder02(WebDataBinder binder) {15 binder.addCustomFormatter(new DateFormatter("yyyy-MM-dd"));16 }17}18
注意:
如果@InitBinder方法在@ControllerAdvice中定义,默认对所有控制器生效,若在@Controller中定义,则只对当前控制器生效。
@Controller中定义的@InitBinder和@ModelAttribute方法将会在@ControllerAdvice中定义的相应方法之后被调用。
@Controller中定义的@ExceptionHandler方法将会在@ControllerAdvice中定义的相应方法之前被调用。
2) @ExceptionHandler
@ControllerAdvice是控制器方法的切面,配合@ExceptionHandler注解可以定义异常处理通知。
141public class ExceptionController {3 /**4 * 异常拦截通知5 *6 * @ExceptionHandler 用于设置所拦截的异常7 * ex 表示当前请求的异常对象8 */9 (ArithmeticException.class)10 public String handleArithmeticException(Exception ex, Model model) {11 model.addAttribute("ex", ex);12 return "error";13 }14}提示:
尽量通过注解的value属性或方法参数指定更精确的异常类型。
异常处理方法参数支持HandlerMethod、ServletRequest、ServletResponse、HttpSession等大多数在控制器所支持的参数。
返回值也可以是@ResponseBody、ResponseEntity<B>、String、void、ModelAndView等大多数在控制器所支持的返回值。
3) @ModelAttribute
该注解不常用,使用方式请参考“域数据共享”章节。
第九节 扩展补充
1. 其它MVC配置
1) 配置HttpMessageConverter
HttpMessageConverter用于处理@RequestBody和@ResponseBody注解,对HTTP消息进行序列化和反序列化。
你可以通过覆盖configureMessageConverters()或extendMessageConverters()来自定义HttpMessageConverter。
141public class WebConfiguration implements WebMvcConfigurer {4
5 6 public void configureMessageConverters(List<HttpMessageConverter<?>> converters) {7 Jackson2ObjectMapperBuilder builder = new Jackson2ObjectMapperBuilder()8 .indentOutput(true)9 .dateFormat(new SimpleDateFormat("yyyy-MM-dd"))10 .modulesToInstall(new ParameterNamesModule());11 converters.add(new MappingJackson2HttpMessageConverter(builder.build()));12 converters.add(new MappingJackson2XmlHttpMessageConverter(builder.createXmlMapper(true).build()));13 }14}类似的XML配置如下:
181<mvc:annotation-driven>2    <mvc:message-converters>3        <bean class="org.springframework.http.converter.json.MappingJackson2HttpMessageConverter">4            <property name="objectMapper" ref="objectMapper"/>5        </bean>6        <bean class="org.springframework.http.converter.xml.MappingJackson2XmlHttpMessageConverter">7            <property name="objectMapper" ref="xmlMapper"/>8        </bean>9    </mvc:message-converters>10</mvc:annotation-driven>11
12<bean id="objectMapper" class="org.springframework.http.converter.json.Jackson2ObjectMapperFactoryBean"13      p:indentOutput="true"14      p:simpleDateFormat="yyyy-MM-dd"15      p:modulesToInstall="com.fasterxml.jackson.module.paramnames.ParameterNamesModule"/>16
17<bean id="xmlMapper" parent="objectMapper" p:createXmlMapper="true"/>18
2) 配置内容协商
SpringMVC根据如下流程来确定请求的Midea类型:
首先检查请求路径的扩展名,如.json、.xml、.do等,根据扩展名去配置中查找Content Type。
查询参数format?
如果未找到,则读取Accept请求头中的Content Type(推荐)。
扩展名和Content Type的对应关系可通过configureContentNegotiation来配置:
101public class WebConfig implements WebMvcConfigurer {4
5 6 public void configureContentNegotiation(ContentNegotiationConfigurer configurer) {7 configurer.mediaType("json", MediaType.APPLICATION_JSON);8 configurer.mediaType("xml", MediaType.APPLICATION_XML);9 }10}类似的XML配置如下:
101<mvc:annotation-driven content-negotiation-manager="contentNegotiationManager"/>2
3<bean id="contentNegotiationManager" class="org.springframework.web.accept.ContentNegotiationManagerFactoryBean">4    <property name="mediaTypes">5        <value>6            json=application/json7            xml=application/xml8        </value>9    </property>10</bean>
3) 配置路径匹配规则
您可以自定义路径匹配和URL处理有关的选项。
281public class WebConfig implements WebMvcConfigurer {4
5 6 public void configurePathMatch(PathMatchConfigurer configurer) {7 configurer8 .setUseSuffixPatternMatch(true)9 .setUseTrailingSlashMatch(false)10 .setUseRegisteredSuffixPatternMatch(true)11 .setPathMatcher(antPathMatcher())12 .setUrlPathHelper(urlPathHelper())13 .addPathPrefix("/api",14 HandlerTypePredicate.forAnnotation(RestController.class));15 }16
17 18 public UrlPathHelper urlPathHelper() {19 //...20 }21
22 23 public PathMatcher antPathMatcher() {24 //...25 }26
27}28
类似的XML配置如下:
111<mvc:annotation-driven>2    <mvc:path-matching3                       suffix-pattern="true"4                       trailing-slash="false"5                       registered-suffixes-only="true"6                       path-helper="pathHelper"7                       path-matcher="pathMatcher"/>8</mvc:annotation-driven>9
10<bean id="pathHelper" class="org.example.app.MyPathHelper"/>11<bean id="pathMatcher" class="org.example.app.MyPathMatcher"/>
4) DelegatingWebMvcConfiguration
DelegatingWebMvcConfiguration为SpringMVC提供了一些默认配置,你可以删除@EnableWebMvc并直接从DelegatingWebMvcConfiguration扩展,而不是实现WebMvcConfigurer。
41public class WebConfig extends DelegatingWebMvcConfiguration {3 // ...4}
2. 配置CROS
跨域资源共享(CORS)可以解决Ajax只能同源(协议+域名+端口)使用的限制,使用 SpringMVC 可以非常方便的进行配置。
1) 单独配置
@CrossOrigin注解用于开启单个控制器的跨域请求支持,如以下示例所示:
181(maxAge = 3600)2("/account")4public class AccountController {5
6 ("http://domain2.com")7 ("/{id}")8 public Account retrieve( Long id) {9 // ...10 }11
12 ("/{id}")13 public void remove( Long id) {14 // ...15 }16}17
18
默认情况下,@CrossOrigin允许所有的来源、所有的请求头和所有HTTP请求方式,不启用allowedCredentials,并设置maxAge为30分钟。
2) 全局配置(CorsRegistry)
默认情况下,全局配置允许所有的来源、所有的请求头和GET、HEAD、POST请求方式,不启用allowedCredentials,maxAge为30分钟。
181public class WebConfig implements WebMvcConfigurer {4
5 6 public void addCorsMappings(CorsRegistry registry) {7
8 registry.addMapping("/api/**")9 .allowedOrigins("http://domain2.com")10 .allowedMethods("PUT", "DELETE")11 .allowedHeaders("header1", "header2", "header3")12 .exposedHeaders("header1", "header2")13 .allowCredentials(true).maxAge(3600);14
15 // Add more mappings...16 }17}18
类似的XML配置如下:
141<mvc:cors>2
3    <mvc:mapping path="/api/**"4        allowed-origins="http://domain1.com, http://domain2.com"5        allowed-methods="GET, PUT"6        allowed-headers="header1, header2, header3"7        exposed-headers="header1, header2" allow-credentials="true"8        max-age="123" />9
10    <mvc:mapping path="/resources/**"11        allowed-origins="http://domain1.com" />12
13</mvc:cors>14
3) 全局配置(CorsFilter)
151CorsConfiguration config = new CorsConfiguration();2
3// Possibly...4// config.applyPermitDefaultValues()5
6config.setAllowCredentials(true);7config.addAllowedOrigin("http://domain1.com");8config.addAllowedHeader("*");9config.addAllowedMethod("*");10
11UrlBasedCorsConfigurationSource source = new UrlBasedCorsConfigurationSource();12source.registerCorsConfiguration("/**", config);13
14CorsFilter filter = new CorsFilter(source);15
3. 构建URL(了解)
1) UriBuilderFactory
UriBuilderFactory和UriBuilder一起提供了一种可插入的机制,基于共享配置(基本URL、编码首选项和其他详细信息)从URI 模板构建URI。
61String baseUrl = "http://example.com";2DefaultUriBuilderFactory uriBuilderFactory = new DefaultUriBuilderFactory(baseUrl);3
4URI uri = uriBuilderFactory.uriString("/hotels/{hotel}")5        .queryParam("q", "{q}")6        .build("Westin", "123");
2) UriComponentsBuilder
UriComponentsBuilder是UriBuilder的实现类,用于构建复杂的URL请求路径。
61URI uri = UriComponentsBuilder2 .fromUriString("http://example.com/hotels/{hotel}")3 .queryParam("q", "{q}")4 .encode()5 .buildAndExpand("Westin", "123")6 .toUri();
3) ServletUriComponentsBuilder
ServletUriComponentsBuilder也是UriBuilder的实现类,用于构建相对于当前请求的URI。
151HttpServletRequest request = ...2
3// Re-uses host, scheme, port, path and query string...4ServletUriComponentsBuilder ucb = ServletUriComponentsBuilder.fromRequest(request)5        .replaceQueryParam("accountId", "{id}").build()6        .expand("123")7        .encode();8
9// Re-uses host, port and context path...10ServletUriComponentsBuilder ucb = ServletUriComponentsBuilder.fromContextPath(request)11        .path("/accounts").build()12
13// Re-uses host, port, context path, and Servlet prefix...14ServletUriComponentsBuilder ucb = ServletUriComponentsBuilder.fromServletMapping(request)15        .path("/accounts").build()
4) MvcUriComponentsBuilder
MvcUriComponentsBuilder可以按控制器方法名称来构建URI连接。
41UriComponents uriComponents = MvcUriComponentsBuilder2    .fromMethodName(BookingController.class, "getBooking", 21).buildAndExpand(42);3
4URI uri = uriComponents.encode().toUri();
4. 其它说明
1) 内置过滤器
SpringMVC内置了一些过滤器,用来处理一些特殊场景:
FormContentFilter:拦截Content Type为application/x-www-form-urlencoded的PUT、PATCH、DELETE 请求,从请求的正文中读取表单数据,并包装ServletRequest以通过ServletRequest.getParameter()系列方法使表单数据可用。
ForwardedHeaderFilter:当请求通过代理(例如负载平衡器)进行处理时,主机,端口和方案可能会更改,该过滤器根据Forwarded请求头修改请求的主机,端口和方案,然后删除这些请求头。出于安全考虑,你可以通过removeOnly=true仅删除请求头而不使用它。
ShallowEtagHeaderFilter:用于支持ETag(如果响应内容的哈希值与请求发过来的哈希值一致,则响应304,可节省带宽)。
CorsFilter:用于支持CROS,并适用于Spring Security。
2) 控制器动态代理
对控制器进行动态代理时推荐使用基于子类的动态代理。
主要注意的是,如果继承了非Spring上下文感知接口(例如InitializingBean,*Aware等)的其它接口,则需要手动指定代理方式。
21<!--配置事务通知通过基于子类的代理方式-->2<tx:annotation-driven proxy-target-class="true"/>
3) MVC日志
DEBUG和TRACE日志记录可能会记录敏感信息,因此默认情况下屏蔽请求参数和请求头,开启方式如下:
81public class MyInitializer extends AbstractAnnotationConfigDispatcherServletInitializer {2
3 4 protected void customizeRegistration(Dynamic registration) {5 registration.setInitParameter("enableLoggingRequestDetails", "true");6 }7
8}
4) 异步请求
SpringMVC与Servlet 3.0异步请求处理进行了广泛的集成:
控制器方法中的DeferredResult和Callable返回值,并为单个异步返回值提供基本支持。
控制器可以stream多个值,包括SSE和raw data。
控制器可以使用反应式Client 端,并返回reactive类型进行响应处理。
更多信息请参考官方文档!
5) HTTP缓存
HTTP缓存可显著提高Web应用程序的性能。 HTTP缓存围绕Cache-Control响应头以及随后的条件请求头(例如Last-Modified和ETag)展开。
Cache-Control为私有(例如浏览器)和公共(例如代理)缓存提供有关如何缓存和重用响应的建议。
ETag请求头用于发出条件请求,如果内容未更改,则可能导致没有主体的304(NOT_MODIFIED)。 ETag可以看作是Last-ModifiedHeaders 的更复杂的后继者。
第04章_SpringSecurity
第一节 Spring Security 简介
1. 什么是 Spring Security ?
Spring Security 是一个专注于为 Java 应用程序提供身份认证(Authentication)和授权(Authorization)的框架。
身份认证:指判断谁在访问系统,常见方式是根据用户名判断并依据密码验证真实性。
用户授权:指该用户能够访问哪些系统资源,没有权限的资源无法访问。
2. 入门案例
1) 新建 Maven 工程
641<!-- SpringBoot父工程 -->2<parent>3    <groupId>org.springframework.boot</groupId>4    <artifactId>spring-boot-starter-parent</artifactId>5    <version>3.2.0</version>6</parent>7
8<!-- GAV坐标 -->9<groupId>com.example</groupId>10<artifactId>SpringSecurity-demo</artifactId>11<version>0.0.1-SNAPSHOT</version>12
13<!-- 工程属性 -->14<properties>15    <java.version>17</java.version>16</properties>17
18<!-- 工程依赖 -->19<dependencies>20    <!-- spring-web -->21    <dependency>22        <groupId>org.springframework.boot</groupId>23        <artifactId>spring-boot-starter-web</artifactId>24    </dependency>25
26    <!-- spring-security -->27    <dependency>28        <groupId>org.springframework.boot</groupId>29        <artifactId>spring-boot-starter-security</artifactId>30    </dependency>31
32    <!-- thymeleaf -->33    <dependency>34        <groupId>org.springframework.boot</groupId>35        <artifactId>spring-boot-starter-thymeleaf</artifactId>36    </dependency>37    <dependency>38        <groupId>org.thymeleaf.extras</groupId>39        <artifactId>thymeleaf-extras-springsecurity6</artifactId>40    </dependency>41
42    <!-- test -->43    <dependency>44        <groupId>org.springframework.boot</groupId>45        <artifactId>spring-boot-starter-test</artifactId>46        <scope>test</scope>47    </dependency>48    <dependency>49        <groupId>org.springframework.security</groupId>50        <artifactId>spring-security-test</artifactId>51        <scope>test</scope>52    </dependency>53
54</dependencies>55
56<!-- Maven插件 -->57<build>58    <plugins>59        <plugin>60            <groupId>org.springframework.boot</groupId>61            <artifactId>spring-boot-maven-plugin</artifactId>62        </plugin>63    </plugins>64</build>
2) 主页视图
在路径 resources/templates 中创建index.html:
111<html xmlns:th="https://www.thymeleaf.org">2<head>3    <title>Hello Security!</title>4</head>5<body>6<h1>Hello Security</h1>7
8<!-- 当点击“登出”时,访问 SpringSecurity 提供的默认登出接口:/logout,进行登出操作 -->9<a th:href="@{/logout}">登出</a>10</body>11</html>
注意:
资源地址使用
@{/资源地址}引用,以适应不同的 Servlet 上下文路径
3) 主页接口
91public class IndexController {3
4 // 访问 / 时,跳转 index 视图5 ("/")6 public String index() {7 return "index";8 }9}
4) 启动应用测试
启动 SpringBoot 应用,在浏览器中访问:http://localhost:8080/,当未登录时,会自动跳转到登录页面:http://localhost:8080/login。
61public class Application {3 public static void main(String[] args) {4 SpringApplication.run(Application.class, args);5 }6}默认登录用户为 user,登陆密码可在控制台的启动日志中查看,或者通过 SpringBoot 属性进行修改:
31# application.yml -> SecurityProperties2spring.security.user.name=user3spring.security.user.password=123注意:
由于默认登录页面在线引用了 github.com 的 bootstrap.min.css 样式,可能会加载缓慢及样式缺失。
3. 工作流程
1) 拦截入口
Spring Security 底层是通过 Servlet 的 过滤器(Filter) 来拦截请求,并通过 SecurityFilterChain 来组装处理流程:
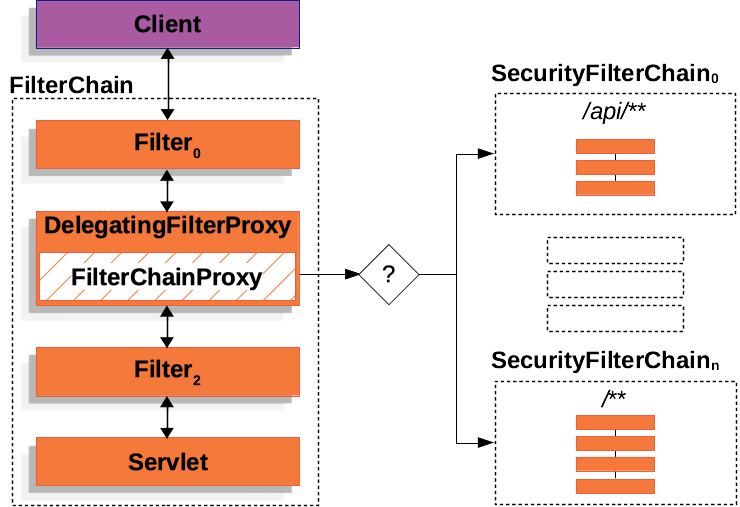
DelegatingFilterProxy:spring-web 包中通用的过滤器代理,实现了 Filter 接口,并且是一个 Spring 组件。
FilterChainProxy:Spring Security 在 spring-security-web 包中自定义的过滤器代理。
SecurityFilterChain:用于实现身份认证和用户授权的核心过滤器链,会被不同的 URL 进行匹配。
2) 凭证比对
在使用用户名和密码进行登录时,默认通过 SecurityFilterChain 中的 UsernamePasswordAuthenticationFilter 进行凭证比对:

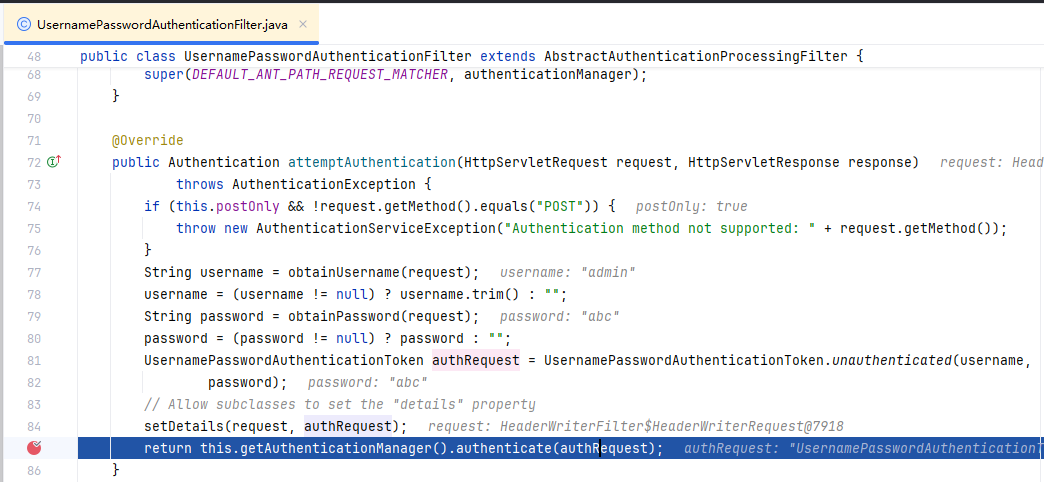
第二节 身份认证
1. 基于内存的身份认证
入门案例就是基于内存的身份认证,我们可以对 SpringSecurity 提供的 InMemoryUserDetailsManager进行自定义配置和注册:
141 // 注意:SpringBoot项目会根据 spring-security 依赖包自动配置该注解3public class WebSecurityConfig {4 5 public UserDetailsService userDetailsService() {6 InMemoryUserDetailsManager manager = new InMemoryUserDetailsManager();7 manager.createUser(8 User.withDefaultPasswordEncoder().username("admin") //自定义用户名9 .password("123") //自定义密码10 .roles("USER") //自定义角色11 .build());12 return manager;13 }14}注意:
自定义 UserDetailsService 后,spring.security相关属性配置需自行应用。
2. 基于数据库的身份认证
1) 数据库脚本
181-- 创建数据库2CREATE DATABASE `security-demo`;3USE `security-demo`;4
5-- 创建用户表6CREATE TABLE `user`(7    `id`       INT          NOT NULL AUTO_INCREMENT PRIMARY KEY,8    `username` VARCHAR(50)  DEFAULT NULL ,9    `password` VARCHAR(500) DEFAULT NULL,10    `enabled`  BOOLEAN      NOT NULL11);12-- 唯一索引13CREATE UNIQUE INDEX `user_username_uindex` ON `user`(`username`); 14
15-- 插入用户数据(密码是 "abc" )16insert into user (id, username, password, enabled) values (1, 'admin', '{bcrypt}$2a$04$atzYEW3OCopaSwZkVE/ZoO6JcSfMIBwkFtpD4Vq9BN3QMgGwYsiw6', 1);17insert into user (id, username, password, enabled) values (2, 'hyx', '{bcrypt}$2a$10$NwvCC8Bi3v4cFgTRizU7PuSqbGvsPnJ8TWROCrYZeQUEk5wuqvRXq', 1);18
2) 数据库相关依赖
371<!-- jdbc -->2<dependency>3    <groupId>mysql</groupId>4    <artifactId>mysql-connector-java</artifactId>5    <version>8.0.30</version>6</dependency>7
8<!-- mybatis-plus -->9<dependency>10    <groupId>com.baomidou</groupId>11    <artifactId>mybatis-plus-boot-starter</artifactId>12    <version>3.5.4.1</version>13    <exclusions>14        <exclusion>15            <groupId>org.mybatis</groupId>16            <artifactId>mybatis-spring</artifactId>17        </exclusion>18    </exclusions>19</dependency>20<dependency>21    <groupId>org.mybatis</groupId>22    <artifactId>mybatis-spring</artifactId>23    <version>3.0.3</version>24</dependency>25
26<!-- lombok -->27<dependency>28    <groupId>org.projectlombok</groupId>29    <artifactId>lombok</artifactId>30</dependency>31
32<!-- json -->33<dependency>34    <groupId>com.alibaba.fastjson2</groupId>35    <artifactId>fastjson2</artifactId>36    <version>2.0.37</version>37</dependency>
3) 数据源配置
91#MySQL数据源2spring.datasource.driver-class-name=com.mysql.cj.jdbc.Driver3spring.datasource.url=jdbc:mysql://119.29.250.81:3306/security-demo4spring.datasource.username=root5spring.datasource.password=1234566
7#SQL日志8mybatis-plus.configuration.log-impl=org.apache.ibatis.logging.stdout.StdOutImpl9
4) DAO代码
211// 实体类2public class User {4 (value = "id", type = IdType.AUTO)5 private Integer id;6 private String username;7 private String password;8 private Boolean enabled;9}10
11// Mapper12public interface UserMapper extends BaseMapper<User> {14}15
16// Mapper XML17// resources/mapper/UserMapper.xml18<?xml version="1.0" encoding="UTF-8"?>19<!DOCTYPE mapper PUBLIC "-//mybatis.org//DTD Mapper 3.0//EN" "http://mybatis.org/dtd/mybatis-3-mapper.dtd">20<mapper namespace="com.atguigu.securitydemo.mapper.UserMapper">21</mapper>
5) DBUserDetailsManager
基于数据库的身份认证,需要自定义一个 UserDetailsManager (继承自UserDetailsService),以支持从数据查询用户名和密码等信息:
701public class DBUserDetailsManager implements UserDetailsManager, UserDetailsPasswordService {3
4 5 private UserMapper userMapper;6
7 // 查询用户名和密码8 9 public UserDetails loadUserByUsername(String username) throws UsernameNotFoundException {10
11 // 查询用户12 User user = userMapper.selectOne(new QueryWrapper<User>().eq("username", username));13 if (user == null) {14 throw new UsernameNotFoundException(username);15 }16
17 // 转换为 SpringSecurity 的 User 对象18 return new org.springframework.security.core.userdetails.User(19 user.getUsername(),20 user.getPassword(),21 user.getEnabled(),22 true, //用户账号是否过期23 true, //用户凭证是否未过期24 true, //用户是否未被锁定25 new ArrayList<>()); //权限列表26 }27
28 // 更新用户密码29 30 public UserDetails updatePassword(UserDetails userdetails, String newPassword) {31 User user = new User();32 user.setUsername(userdetails.getUsername());33 user.setPassword(userdetails.getPassword());34 userMapper.update(user, new QueryWrapper<User>().eq("username", user.getUsername()));35 return loadUserByUsername(userdetails.getUsername());36 }37
38 // 新增用户39 40 public void createUser(UserDetails userDetails) {41 // 转换为业务 User,插入数据库42 User user = new User();43 user.setUsername(userDetails.getUsername());44 user.setPassword(userDetails.getPassword());45 user.setEnabled(true);46 userMapper.insert(user);47 }48
49 // 更新50 51 public void updateUser(UserDetails user) {52
53 }54
55 56 public void deleteUser(String username) {57
58 }59
60 61 public void changePassword(String oldPassword, String newPassword) {62
63 }64
65 // 检查用户是否存在66 67 public boolean userExists(String username) {68 return false;69 }70}注意:
UserDetailsManager中也可以增加和删除用户,以及修改用户密码等。
6) Service代码
231// 接口2public interface UserService extends IService<User> {3 void saveUserDetails(User user);4}5
6// 实现7public class UserServiceImpl extends ServiceImpl<UserMapper, User> implements UserService {9 10 private DBUserDetailsManager dbUserDetailsManager;11
12 13 public void saveUserDetails(User user) {14
15 UserDetails userDetails = org.springframework.security.core.userdetails.User16 .withDefaultPasswordEncoder() // 密码加密器17 .username(user.getUsername()) // 用户名18 .password(user.getPassword()) // 用户密码19 .build();20 dbUserDetailsManager.createUser(userDetails);21
22 }23}注意:
SpringSecurity 默认使用基于自适应单向函数的
BCryptPasswordEncoder进行密码加密。
7) Controller代码
181("/user")3public class UserController {4 5 public UserService userService;6
7 // 查询所有用户8 ("/list")9 public List<User> getList() {10 return userService.list();11 }12
13 // 新增用户14 ("/add")15 public void add( User user) {16 userService.saveUserDetails(user);17 }18}
8) 测试验证
启动 SpringBoot 应用,测试如下:
在浏览器中访问:http://localhost:8080/,使用数据库中的用户和密码进行登录。
访问http://localhost:8080/user/list 查询所有用户,返回 json 数据。
使用 POST 请求 http://localhost:8080/user/add 接口,方法体携带 username 和 password 参数, 进行用户新增操作。
3. 自定义配置
新增配置类 WebSecurityConfig 如下,手动注册一个 SecurityFilterChain 来覆盖默认配置:
271public class WebSecurityConfig {4 5 public SecurityFilterChain filterChain(HttpSecurity http) throws Exception {6 // 开启授权保护7 http.authorizeRequests(8 // 对所有请求开启授权保护9 authorize -> authorize.anyRequest()10 // 已认证请求会自动被授权11 .authenticated());12
13 // 登录配置14 http.formLogin(withDefaults())// 表单登录方式:使用 SpringSecurity 默认登录页15 .httpBasic(withDefaults());// 基础登录方式:使用“浏览器弹窗提示”登录16
17 // 关闭csrf攻击防御18 http.csrf((csrf) -> {19 csrf.disable();20 });21
22 // 支持跨域23 http.cors(withDefaults());24 25 return http.build();26 }27}注意:
SpringBoot 项目会根据 spring-security 依赖包自动配置
@EnableWebSecurity注解。
4. 访问当前登录用户
访问http://localhost:8080/user/info 查询当前登录用户信息,返回 json 数据。
321("/user")3public class UserController {4 5 public UserService userService;6
7 // 获取当前登录用户信息8 ("/info")9 public Map test() {10 // SpringSecurity上下文11 SecurityContext context = SecurityContextHolder.getContext();12
13 // 认证对象14 Authentication authentication = context.getAuthentication();15
16 // 认证信息17 String username = authentication.getName(); // 用户名18 Object credentials = authentication.getCredentials();// 用户凭证(注意脱敏展示)19 Object principal = authentication.getPrincipal(); // 身份信息20 Collection<? extends GrantedAuthority> authorities = authentication.getAuthorities(); // 权限列表21
22 // 返回23 HashMap result = new HashMap();24 result.put("code", 0);25 result.put("username", username);26 result.put("credentials", credentials);27 result.put("principal", principal);28 result.put("authorities", authorities);29
30 return result;31 }32}
5. 自定义登录页(前后端不分离)
1) 登录页
新增登录页面 templates/login.html 如下:
291<html xmlns:th="https://www.thymeleaf.org">3<head>4 <title>自定义登录页面</title>5</head>6<body>7
8<h1>自定义登录页面</h1>9<div th:if="${param.error}">用户名或密码不正确</div>10
11<!-- 登录表单:-->12<!-- 登录页:th:action="@{/login}" -->13<!-- 请求方式:必须为 post -->14<form th:action="@{/login}" method="post">15
16 <!-- 用户名:默认为"username" -->17 <div>18 <input type="text" name="username" placeholder="用户名"/>19 </div>20
21 <!-- 用户密码:默认为"password" -->22 <div>23 <input type="password" name="password" placeholder="用户密码"/>24 </div>25
26 <input type="submit" value="登录"/>27</form>28</body>29</html>
2) 登录接口
81public class LoginController {3
4 ("/login")5 public String login() {6 return "login"; // 返回视图7 }8}
3) 登录配置
修改登录配置信息如下:
141// 登录配置2http3        // 表单登录方式:自定义登录页4        .formLogin(form -> {5            form.loginPage("/login")                // 登录接口6                    .permitAll()                    // 登录页面无需授权即可访问7                    .usernameParameter("username")  // 自定义表单用户名参数,默认是username8                    .passwordParameter("password")  // 自定义表单密码参数,默认是password9                    .failureUrl("/login?error")     // 登录失败的返回地址10            ;11        })12
13        // 基础登录方式:使用“浏览器弹窗提示”登录14        .httpBasic(withDefaults());
6. 自定义登录页面(前后端分离)
1) 请求登录(表单)
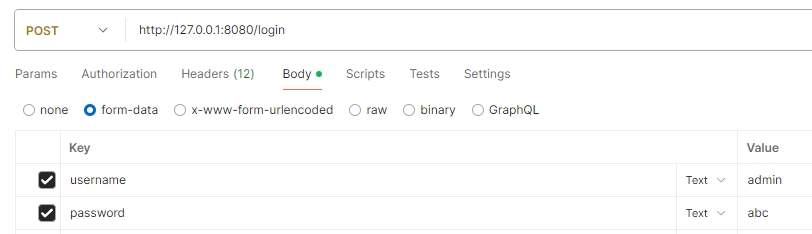
2) 登录/登出处理器
651// 登录成功2public class MyAuthenticationSuccessHandler implements AuthenticationSuccessHandler {3 4 public void onAuthenticationSuccess(HttpServletRequest request, HttpServletResponse response, Authentication authentication) throws IOException, ServletException {5
6 // 获取用户身份信息7 Object principal = authentication.getPrincipal();8
9 // 创建结果对象10 HashMap result = new HashMap();11 result.put("code", 0);12 result.put("message", "登录成功");13 result.put("data", principal);14
15 // 转换成json字符串16 String json = JSON.toJSONString(result);17
18 // 返回响应19 response.setContentType("application/json;charset=UTF-8");20 response.getWriter().println(json);21 }22}23
24// 登录失败25public class MyAuthenticationFailureHandler implements AuthenticationFailureHandler {26
27 28 public void onAuthenticationFailure(HttpServletRequest request, HttpServletResponse response, AuthenticationException exception) throws IOException {29
30 // 获取错误信息31 String localizedMessage = exception.getLocalizedMessage();32
33 // 创建结果对象34 HashMap result = new HashMap();35 result.put("code", -1);36 result.put("message", localizedMessage);37
38 // 转换成json字符串39 String json = JSON.toJSONString(result);40
41 // 返回响应42 response.setContentType("application/json;charset=UTF-8");43 response.getWriter().println(json);44 }45}46
47// 用户登出48public class MyLogoutSuccessHandler implements LogoutSuccessHandler {49
50 51 public void onLogoutSuccess(HttpServletRequest request, HttpServletResponse response, Authentication authentication) throws IOException, ServletException {52
53 // 创建结果对象54 HashMap result = new HashMap();55 result.put("code", 0);56 result.put("message", "登出成功");57
58 // 转换成json字符串59 String json = JSON.toJSONString(result);60
61 // 返回响应62 response.setContentType("application/json;charset=UTF-8");63 response.getWriter().println(json);64 }65}修改登录/登出配置如下:
211// 登录配置2http3        // 表单登录方式:自定义登录页4        .formLogin(form -> {5            form.loginPage("/login")                               // 登录接口6                    .permitAll()                                   // 登录页面无需授权即可访问7                    .usernameParameter("username")                 // 自定义表单用户名参数,默认是username8                    .passwordParameter("password")                 // 自定义表单密码参数,默认是password9                10                    .successHandler(new MyAuthenticationSuccessHandler()) // 认证成功时的处理11                    .failureHandler(new MyAuthenticationFailureHandler()) // 认证失败时的处理12            ;13        })14
15        // 基础登录方式:使用“浏览器弹窗提示”登录16        .httpBasic(withDefaults());17
18// 登出配置19http.logout(logout -> {20    logout.logoutSuccessHandler(new MyLogoutSuccessHandler()); // 登出成功时的处理21});
3) 未认证请求处理
211// 未认证请求处理2public class MyAuthenticationEntryPoint implements AuthenticationEntryPoint {3 4 public void commence(HttpServletRequest request, HttpServletResponse response, AuthenticationException authException) throws IOException, ServletException {5
6 // 获取错误信息7 // String localizedMessage = authException.getLocalizedMessage();8
9 // 创建结果对象10 HashMap result = new HashMap();11 result.put("code", -1);12 result.put("message", "需要登录");13
14 // 转换成json字符串15 String json = JSON.toJSONString(result);16
17 // 返回响应18 response.setContentType("application/json;charset=UTF-8");19 response.getWriter().println(json);20 }21}修改错误处理配置如下:
41// 错误处理2http.exceptionHandling(exception -> {3 exception.authenticationEntryPoint(new MyAuthenticationEntryPoint()); // 请求未认证的接口4});
4) 会话管理
限制用户只能在 1 处登录如下:
181public class MySessionInformationExpiredStrategy implements SessionInformationExpiredStrategy {2 3 public void onExpiredSessionDetected(SessionInformationExpiredEvent event) throws IOException, ServletException {4
5 // 创建结果对象6 HashMap result = new HashMap();7 result.put("code", -1);8 result.put("message", "该账号已从其他设备登录");9
10 // 转换成json字符串11 String json = JSON.toJSONString(result);12
13 HttpServletResponse response = event.getResponse();14 // 返回响应15 response.setContentType("application/json;charset=UTF-8");16 response.getWriter().println(json);17 }18}修改会话管理配置如下:
61// 会话管理2http.sessionManagement(session -> {3 session4 .maximumSessions(1) // 最多在 1 处登录5 .expiredSessionStrategy(new MySessionInformationExpiredStrategy());6});
第三节 用户授权
1. 授权管理
1) 授权管理简介
授权管理一般有如下两种模型:
用户-权限-资源:例如张三的权限是添加用户、查看用户列表,李四的权限是查看用户列表。
用户-角色-权限-资源(RBAC):例如 张三是角色是管理员、李四的角色是普通用户,管理员能做所有操作,普通用户只能查看信息。
2) 未授权请求处理
161public class MyAccessDeniedHandler implements AccessDeniedHandler {2 3 public void handle(HttpServletRequest request, HttpServletResponse response, AccessDeniedException accessDeniedException) throws IOException, ServletException {4 // 创建结果对象5 HashMap result = new HashMap();6 result.put("code", -1);7 result.put("message", "没有权限");8
9 // 转换成json字符串10 String json = JSON.toJSONString(result);11
12 // 返回响应13 response.setContentType("application/json;charset=UTF-8");14 response.getWriter().println(json);15 }16}修改错误处理配置如下:
51// 错误处理2http.exceptionHandling(exception -> {3 exception.authenticationEntryPoint(new MyAuthenticationEntryPoint()); // 请求未认证的接口4 exception.accessDeniedHandler(new MyAccessDeniedHandler()); // 请求未授权的接口5});
2. 基于 URL 的授权
1) 用户-权限-资源模式
在配置中开启授权保护如下:
121// 开启授权保护2http.authorizeRequests(3 authorize -> authorize4 // 具有USER_LIST权限的用户可以访问/user/list5 .requestMatchers("/user/list").hasAuthority("USER_LIST")6 // 具有USER_ADD权限的用户可以访问/user/add7 .requestMatchers("/user/add").hasAuthority("USER_ADD")8 // 对所有请求开启授权保护9 .anyRequest()10 // 已认证的请求会被自动授权11 .authenticated()12);在加载用户时设置用户权限如下:
241public UserDetails loadUserByUsername(String username) throws UsernameNotFoundException {3
4 // 查询用户5 User user = userMapper.selectOne(new QueryWrapper<User>().eq("username", username));6 if (user == null) {7 throw new UsernameNotFoundException(username);8 }9
10 // 用户权限11 Collection<GrantedAuthority> authorities = new ArrayList<>();12 authorities.add(() -> "USER_LIST");13 // authorities.add(() -> "USER_ADD");14
15 // 转换为 SpringSecurity 的 User 对象16 return new org.springframework.security.core.userdetails.User(17 user.getUsername(),18 user.getPassword(),19 user.getEnabled(),20 true, //用户账号是否过期21 true, //用户凭证是否未过期22 true, //用户是否未被锁定23 authorities); //权限列表24}测试结果和结论如下:
491// 1. 有权限的资源能够访问2http://127.0.0.1:8080/user/list3[4 {5 "id": 1,6 "username": "admin",7 "password": "{bcrypt}$2a$04$atzYEW3OCopaSwZkVE/ZoO6JcSfMIBwkFtpD4Vq9BN3QMgGwYsiw6",8 "enabled": true9 },10 {11 "id": 2,12 "username": "hyx",13 "password": "{bcrypt}$2a$10$NwvCC8Bi3v4cFgTRizU7PuSqbGvsPnJ8TWROCrYZeQUEk5wuqvRXq",14 "enabled": true15 }16]17
18// 2. 无权限的资源不能访问19http://127.0.0.1:8080/user/add20{21 "code": -1,22 "message": "没有权限"23}24
25// 3. 未配置权限保护的接口也可以访问26http://127.0.0.1:8080/user/info27{28 "principal": {29 "password": null,30 "username": "admin",31 "authorities": [32 {33 "authority": "USER_LIST"34 }35 ],36 "accountNonExpired": true,37 "accountNonLocked": true,38 "credentialsNonExpired": true,39 "enabled": true40 },41 "code": 0,42 "credentials": null,43 "authorities": [44 {45 "authority": "USER_LIST"46 }47 ],48 "username": "admin"49}注意:
用户的权限以及各权限对应的资源一般在数据库配置并加载。
2) 用户-角色-权限-资源模式
在配置中开启授权保护如下:
101// 开启授权保护2http.authorizeRequests(3 authorize -> authorize4 // 具有管理员角色的用户可以访问/user/**5 .requestMatchers("/user/**").hasRole("ADMIN")6 // 对所有请求开启授权保护7 .anyRequest()8 // 已认证的请求会被自动授权9 .authenticated()10);在加载用户时设置用户权限如下:
161public UserDetails loadUserByUsername(String username) throws UsernameNotFoundException {3
4 // 查询用户5 User user = userMapper.selectOne(new QueryWrapper<User>().eq("username", username));6 if (user == null) {7 throw new UsernameNotFoundException(username);8 }9
10 // 转换为 SpringSecurity 的 User 对象11 return org.springframework.security.core.userdetails.User12 .withUsername(user.getUsername())13 .password(user.getPassword())14 .roles("ADMIN") // 设置ADMIN角色15 .build();16}此时,只有 ADMIN 角色的用户可以访问 /user/** 资源。
3. 基于控制器方法的授权
1) 开启注解配置
在配置类上开启基于控制器方法的授权:
51public class WebSecurityConfig {4 // ...5}
2) 设置控制器方法访问权限
131// 用户必须有 ADMIN 角色 并且 用户名是 admin 才能访问此方法2("/list")3("hasRole('ADMIN') and authentication.name == 'admim'")4public List<User> getList(){5 return userService.list();6}7
8// 用户必须有 USER_ADD 权限 才能访问此方法9("/add")10("hasAuthority('USER_ADD')")11public void add( User user){12 userService.saveUserDetails(user);13}
3) 给用户授予角色和权限
171public UserDetails loadUserByUsername(String username) throws UsernameNotFoundException {3
4 // 查询用户5 User user = userMapper.selectOne(new QueryWrapper<User>().eq("username", username));6 if (user == null) {7 throw new UsernameNotFoundException(username);8 }9
10 // 转换为 SpringSecurity 的 User 对象11 return org.springframework.security.core.userdetails.User12 .withUsername(user.getUsername())13 .password(user.getPassword())14 .roles("ADMIN") // 角色15 .authorities("USER_ADD", "USER_UPDATE") // 权限16 .build();17}
第四节 OAuth2+JWT
1. OAuth2+JWT简介
1) OAuth2简介
OAuth(Open Authorization) 是一个关于授权(authorization)的开放网络协议,允许用户授权第三方应用访问存储在其他服务提供者上的信息,并且不需要将用户名和密码直接提供给第三方应用。
它包括如下四个角色:
资源所有者(Resource Owner):即用户,资源的拥有人,想要通过客户应用访问资源服务器上的资源。
客户应用(Client):通常是一个Web或者无线应用,它需要访问用户的受保护资源。
授权服务器(Authorization Server):负责验证资源所有者的身份并向客户端颁发访问令牌。
资源服务器(Resource Server):存储受保护资源的服务器或定义了可以访问到资源的API,接收并验证客户端的访问令牌,以决定是否授权访问资源。
2) JWT简介
JSON Web Tokens(JWT)是一种基于 JSON 的开放标准(RFC 7519),一般被用来在身份提供者和服务提供者之间传递被认证的用户身份信息,以便于从资源服务器获取资源。每个JWT都是经过数字签名的,因此可以被验证和信任。
JWT通常包含三部分:
Header(头部):通常包含两部分:令牌的类型(即JWT)和所使用的签名算法,如HMAC SHA256或RSA。
Payload(负载):包含所要传递的信息。负载可以包含多个声明(claim)。声明是关于实体(通常是用户)和其他数据的声明。声明有三种类型:注册的声明、公共的声明和私有的声明。
Signature(签名):用于验证消息在传输过程中未被篡改,并且,对于使用私钥签名的令牌,还可以验证发送者的身份。签名是使用头部指定的算法和密钥生成的。
171// JWT2eyJhbGciOiJIUzUxMiIsInR5cCI6IkpXVCJ9 \3.eyJzdWIiOiJzYXRpc2giLCJhdWQiOiJteWFwcCIsIkNVU1QiOiIxIiwiZXhwIjoxNTY2MjE0NTg1LCJpc3MiOiJhdXRoLWFwcCJ9 \4.WknG6jiM_vAaflLnKyjlXh5BrM4MUJR9dFrVx-XE3zRVWiyXeIVzI-OomFh0vVHRwrK3-Tttg0HyKBTnCA3mSg5
6// 解码后7Header: {8 "alg": "HS512",9 "typ": "JWT"10}11Payload: {12 "sub": "satish",13 "aud": "myapp",14 "CUST": "1",15 "exp": 1566214585,16 "iss": "my-auth-app"17}
3) 其他资料
【小家思想】通俗易懂版讲解JWT和OAuth2,以及他俩的区别和联系(Token鉴权解决方案)-腾讯云开发者社区-腾讯云
深入 OAuth2.0 和 JWT_oauth2.0与jwt-CSDN博客
【鉴权】session、token、jwt、oauth2-支付宝开发者社区
第05章_SpringData
第一节 数据源
1. 什么是数据源?
数据源(DataSource)是 JDBC 规范的一部分,是通用的连接工厂,Spring 通过数据源获得与数据库的连接。
注意:
可以从 JNDI 查找数据源,也可以使用第三方提供的连接池实现来配置自己的数据源。
2. 创建数据源
1) DriverManagerDataSource
DriverManagerDataSource是一个 Spring 内置的数据源,每次获取时都返回新连接,不对连接进行缓存,仅用于测试目的。
131public class MyConfig {3 4 public DataSource dataSource() {5 DriverManagerDataSource dataSource = new DriverManagerDataSource();6 dataSource.setDriverClassName("org.hsqldb.jdbcDriver");7 dataSource.setUrl("jdbc:hsqldb:hsql://localhost:");8 dataSource.setUsername("sa");9 dataSource.setPassword("");10
11 return dataSource;12 }13}等效的 XML 配置如下:
101<!-- 加载属性文件 -->2<context:property-placeholder location="jdbc.properties"/>3
4<!-- 配置数据源 -->5<bean id="dataSource" class="org.springframework.jdbc.datasource.DriverManagerDataSource">6 <property name="driverClassName" value="${jdbc.driverClassName}"/>7 <property name="url" value="${jdbc.url}"/>8 <property name="username" value="${jdbc.username}"/>9 <property name="password" value="${jdbc.password}"/>10</bean>注意:
与 DriverManagerDataSource 类似的还有其实现类
SingleConnectionDataSource。更多关于Spring对
javax.sql.DataSource的实现可以查看 SmartDataSource 接口和 AbstractDataSource 抽象类。
2) DBCP DataSource
161<bean id="dataSource3" class="org.apache.commons.dbcp.BasicDataSource"> 2 <!-- 注入连接属性 --> 3 <property name="driverClassName" value="${driverClassName}"></property> 4 <property name="url" value="${url}"></property> 5 <property name="username" value="${username}"></property> 6 <property name="password" value="${password}"></property> 7 8 <!-- 设置初始化连接池大小 --> 9 <property name="initialSize" value="5"></property> 10 <!-- 设置最大连接数 --> 11 <property name="maxIdle" value="50"></property> 12 <!-- 设置最大活动连接数 --> 13 <property name="maxActive" value="10"></property> 14 <!-- 设置等待时间 --> 15 <property name="maxWait" value="5000"></property> 16</bean>
3) C3P0 DataSource
141<bean id="dataSource2" class="com.mchange.v2.c3p0.ComboPooledDataSource" destroy-method="close">2 <!-- 注入连接属性 -->3 <property name="driverClass" value="${driverClassName}"></property>4 <property name="jdbcUrl" value="${url}"></property>5 <property name="user" value="${username}"></property>6 <property name="password" value="${password}"></property>7 8 <!-- 设置初始化连接池大小 -->9 <property name="initialPoolSize" value="5"></property>10 <!-- 设置最大连接数 -->11 <property name="maxPoolSize" value="50"></property>12 <!-- 设置最小的连接数 -->13 <property name="minPoolSize" value="10"></property>14</bean>
4) Druid DataSource
171<bean id="dataSource2" class="com.alibaba.druid.pool.DruidDataSource" init-method="init">2 <!-- 注入连接属性 -->3 <property name="driverClassName" value="${driverClassName}"></property>4 <property name="url" value="${url}"></property>5 <property name="username" value="${username}"></property>6 <property name="password" value="${password}"></property>7 8 <!-- 设置初始化连接池大小 -->9 <property name="initialSize" value="5"></property>10 <!-- 最大连接数 -->11 <property name="maxActive" value="10"></property>12 <!-- 设置等待时间 -->13 <property name="maxWait" value="5000"></property>14 <!-- -->15 <property name="filters" value="stat"></property>16
17</bean>
5) Hikari DataSource
211<bean id="dataSourceHikari" class="com.zaxxer.hikari.HikariDataSource"2 destroy-method="shutdown">3 <property name="driverClassName" value="${jdbc.driver}" />4 <property name="jdbcUrl" value="${jdbc.url}" />5 <property name="username" value="${jdbc.username}" />6 <property name="password" value="${jdbc.password}" />7 8 <!-- 连接只读数据库时配置为true, 保证安全 -->9 <property name="readOnly" value="false" />10 <!-- 等待连接池分配连接的最大时长(毫秒),超过这个时长还没可用的连接则发生SQLException, 缺省:30秒 -->11 <property name="connectionTimeout" value="30000" />12 <!-- 一个连接idle状态的最大时长(毫秒),超时则被释放(retired),缺省:10分钟 -->13 <property name="idleTimeout" value="600000" />14 <!-- 一个连接的生命时长(毫秒),超时而且没被使用则被释放(retired),缺省:30分钟,建议设置比数据库超时时长少30秒,参考MySQL 15 wait_timeout参数(show variables like '%timeout%';) -->16 <property name="maxLifetime" value="1800000" />17 <!-- 连接池中允许的最大连接数。缺省值:10;推荐的公式:((core_count * 2) + effective_spindle_count) -->18 <property name="maximumPoolSize" value="60" />19 <property name="minimumIdle" value="10" />20</bean>21
6) jdbc.properties配置
下面是jdbc.properties文件的常用配置:
411# HSQLDB 2#jdbc.driverClassName=org.hsqldb.jdbcDriver3#jdbc.url=jdbc:hsqldb:hsql://localhost:9001/bookstore4#jdbc.username=sa5#jdbc.password=6 7# MySQL 8jdbc.driverClassName=com.mysql.jdbc.Driver9jdbc.url=jdbc:mysql://localhost:3306/test10jdbc.username=root11jdbc.password=root12 13# PostgreSQL 14#jdbc.driverClassName=org.postgresql.Driver15#jdbc.url=jdbc:postgresql://localhost/bookstore16#jdbc.username=17#jdbc.password=18 19# Oracle 20#jdbc.driverClassName=oracle.jdbc.OracleDriver21#jdbc.url=jdbc:oracle:thin:@localhost:1521:orcl22#jdbc.username=scott23#jdbc.password=scott24 25# MS SQL Server 2000 (JTDS) 26#jdbc.driverClassName=net.sourceforge.jtds.jdbc.Driver27#jdbc.url=jdbc:jtds:sqlserver://localhost:1433/bookstore28#jdbc.username=29#jdbc.password=30 31# MS SQL Server 2000 (Microsoft) 32#jdbc.driverClassName=com.microsoft.sqlserver.jdbc.SQLServerDriver33#jdbc.url=jdbc:sqlserver://192.168.1.130:1433;databaseName=test34#jdbc.username=35#jdbc.password=36 37# ODBC 38#jdbc.driverClassName=sun.jdbc.odbc.JdbcOdbcDriver39#jdbc.url=jdbc:odbc:bookstore40#jdbc.username=41#jdbc.password=
3. 初始化数据源
在容器启动时,如果需要对数据源进行初始化,可以使用 Spring 框架提供的数据源初始化功能。
151<!-- 初始化数据源dataSource2 enabled:根据环境变量来控制是否执行初始化3 separator:初始化脚本默认的语句分隔符。4 ignore-failures:忽略所有DROP语句错误。默认为NONE,可选的还有ALL-忽略所有错误。5-->6<jdbc:initialize-database 7 data-source="dataSource" 8 enabled="#{systemProperties.INITIALIZE_DATABASE}"9 separator="@@" 10 ignore-failures="DROPS">11 <!--初始化脚本1。指定脚本中语句的分隔符为";"-->12 <jdbc:script location="classpath:com/myapp/sql/db-schema.sql" separator=";"/>13 <!--初始化脚本2。以字典顺序执行所有匹配的脚本,使用默认的语句分隔符@@。-->14 <jdbc:script location="classpath:com/myapp/sql/db-test-data-*.sql"/>15</jdbc:initialize-database>注意:
如果您需要更精细的控制,可以直接使用
DataSourceInitializer并将其定义为应用程序中的组件。如果其它 Bean 在 Spring 容器启动过程中依赖数据源的初始化,则必须注意它们的先后顺序。
4. 获取JDBC连接
在 Spring 应用中,一般通过DataSourceUtils工具类的静态方法来获取 JDBC 连接,这样可以参与到 Spring 管理的事务之中。
181// 获取连接。先尝试从事务线程上下文获取连接,如果获取失败,则调用数据源获取新连接。2// 如果事务同步处于活动状态,还会将新获得的连接绑定到线程上下文。3Connection getConnection(DataSource dataSource)4
5// 释放连接。如果事务同步处于活动状态,则归还到线程上下文,否则直接关闭连接。6void releaseConnection( Connection con, DataSource dataSource)7
8// 获得被包装的最原始连接9Connection getTargetConnection(Connection con)10
11// 判断连接是否为事务性连接,即通过 Spring 绑定到当前线程12boolean isConnectionTransactional(Connection con, DataSource dataSource)13
14// 修改JDBC语句的超时时间为指定的超时时间15void applyTimeout(Statement stmt, DataSource dataSource, int timeout)16
17// 修改JDBC语句的超时时间为事务设置的超时时间18void applyTransactionTimeout(Statement stmt, DataSource dataSource)注意:
使用
DataSourceUtils获取的 JDBC 连接会自动参与 Spring 的事务管理,JdbcTemplate也是使用此种方式获取连接的。如果处于事务上下文中,则会在事务结束时,自动归还连接,否则,需要手动调用 releaseConnection 方法手动归还连接。
谨慎使用
jdbcTemplate.getDataSource().getConnection()方式获取连接,它不参与 Spring 管理的事务,需手动关闭。
5. 嵌入式数据库
1) 嵌入式数据库简介
嵌入式数据库由于其轻量级的特性,易于配置并且启动时间短,在开发和测试的过程中非常有用。
注意:
Spring 内置了
HSQL、H2和Derby三种嵌入式数据库,此外,也可以使用扩展 API 来支持新的嵌入式数据库类型。
2) 创建嵌入式数据库
151public class DataSourceConfig {3
4 5 public DataSource dataSource() {6 return new EmbeddedDatabaseBuilder()7 .generateUniqueName(true)8 .setType(H2)9 .setScriptEncoding("UTF-8")10 .ignoreFailedDrops(true)11 .addScript("schema.sql")12 .addScripts("user_data.sql", "country_data.sql")13 .build();14 }15}等效的XML配置如下:
51<!--创建一个嵌入式数据库,名称为dataSource-->2<jdbc:embedded-database id="dataSource" generate-name="true">3 <jdbc:script location="classpath:schema.sql"/>4 <jdbc:script location="classpath:test-data.sql"/>5</jdbc:embedded-database>提示:
默认的数据库类型为
EmbeddedDatabaseType.HSQL,你可以通过type属性修改为H2或DERBY。请将
generate-name属性设置为true,生成唯一名称,否则在创建嵌入式数据库时会被连接到同名的数据库实例上。
2) 使用嵌入式数据库
嵌入式数据库的使用和其它 JDBC 数据源的使用方式类似。
241public class DataAccessIntegrationTest {2 private EmbeddedDatabase db;3
4 5 public void setUp() {6 // 使用默认脚本(classpath:schema.sql and classpath:data.sql)创建一个HSQL数据库7 db = new EmbeddedDatabaseBuilder()8 .generateUniqueName(true)9 .addDefaultScripts()10 .build();11 }12
13 14 public void testDataAccess() {15 JdbcTemplate template = new JdbcTemplate(db);16 template.query( /* ... */ );17 }18
19 20 public void tearDown() {21 // 关闭数据库22 db.shutdown();23 }24}注意:
如果需要在多个测试类中使用,应该将它注册到Spring容器中管理。
3) 扩展嵌入式数据库
您可以通过两种方式扩展 Spring 嵌入式数据库的支持:
实现
EmbeddedDatabaseConfigurer以支持新的嵌入式数据库类型。实施
DataSourceFactory以支持新的 DataSource 实施,例如用于管理嵌入式数据库连接的连接池。
第二节 事务管理
1. 事务管理简介
1) 什么是事务管理?
Spring 为不同类型的事务管理提供了统一的访问接口,使用起来更加简便。
注意:
事务的四大特性:原子性(Atomicity)、一致性(Consistency)、隔离性(Isolation)、持久性(Durability)。
事物的隔离级别:读未提交、读已提交(解决幻读)、可重复读(解决不可重复度)、串行化(解决幻读)。
2) 事务传播行为
事务传播行为指在一个事务中,调用另一个事务方法时,两者事务如何处理的问题。
| 事务传播行为 | 当前处于事务中 | 当前不在事务中 | 备注 |
|---|---|---|---|
PROPAGATION_REQUIRED | 加入当前事务 | 创建新事务 | 需要在事务运行的场景(最常用) |
| PROPAGATION_SUPPORTS | 加入当前事务 | 非事务执行 | 无论是否有事务都可以运行的场景 |
PROPAGATION_REQUIRES_NEW | 挂起当前事务,创建新事务 | 创建新事务 | 需要在独立事务中运行的场景 |
| PROPAGATION_MANDATORY | 加入当前事务 | 直接抛异常 | 需要在外部事务中运行的场景 |
| PROPAGATION_NOT_SUPPORTED | 挂起当前事务,以非事务执行 | 非事务执行 | 需要以非事务运行的场景 |
| PROPAGATION_NEVER | 直接抛异常 | 非事务执行 | 不能存在外部事务的场景 |
| PROPAGATION_NESTED | 创建保存点 | 创建新事务 | 支持嵌套事务的场景 |
2. 相关接口简介
1) PlatformTransactionManager
PlatformTransactionManager是 Spring 事务管理的核心接口,它定义了事务管理的基本方法,包括开始、提交、回滚事务等。
121public interface PlatformTransactionManager {2
3 // 获取事务 4 // 返回当前活动的事务或创建一个新事务,这取决于参数中的事务传播行为5 TransactionStatus getTransaction(TransactionDefinition definition) throws TransactionException;6
7 // 提交事务(注意:如果事务状态被设置为rollbackOnly,则执行回滚)8 void commit(TransactionStatus status) throws TransactionException;9
10 // 回滚事务11 void rollback(TransactionStatus status) throws TransactionException;12}针对 JDBC 数据源的事务管理器实现为DataSourceTransactionManager,它通过连接的autoCommit属性来控制事务的开启和提交。
111public class TxConfig {3 4 public DataSource dataSource() {5 // 配置数据源6 }7 8 public PlatformTransactionManager platformTransactionManager() {9 return new DataSourceTransactionManager(dataSource());10 }11}类似的XML配置如下:
121<!-- 声明一个普通的数据源 -->2<bean id="dataSource" class="org.apache.commons.dbcp.BasicDataSource" destroy-method="close">3 <property name="driverClassName" value="${jdbc.driverClassName}" />4 <property name="url" value="${jdbc.url}" />5 <property name="username" value="${jdbc.username}" />6 <property name="password" value="${jdbc.password}" />7</bean>8
9<!--注册DataSourceTransactionManager-->10<bean id="txManager" class="org.springframework.jdbc.datasource.DataSourceTransactionManager">11 <property name="dataSource" ref="dataSource"/>12</bean>注意:
可以通过
DataSourceUtils访问 DataSourceTransactionManager 管理的 JDBC 连接,详情可参考上一小节。内置的事务管理器实现类还有 HibernateTransactionManager、JtaTransactionManager 等,分别用于不同的场合。
2) TransactionDefinition
TransactionDefinition用于描述事务的属性,如事务的隔离级别、传播行为、超时时间、是否只读等。
671public interface TransactionDefinition {2 // 支持当前活动事务,如果不存在活动事务,则创建一个新事务。默认值。3 int PROPAGATION_REQUIRED = 0; 4 5 // 支持当前活动事务,如果不存在事务,则以非事务执行。请谨慎使用!6 int PROPAGATION_SUPPORTS = 1;7 8 // 支持当前活动事务,如果不存在事务,则抛出异常。9 int PROPAGATION_MANDATORY = 2;10 11 // 创建一个新事务,如果存在活动事务,则暂停。12 int PROPAGATION_REQUIRES_NEW = 3;13 14 // 以非事务方式执行,如果存在活动事务,则暂停。15 int PROPAGATION_NOT_SUPPORTED = 4;16 17 // 以非事务方式执行,如果存在活动事务,则抛异常。18 int PROPAGATION_NEVER = 5;19 20 // 如果存在活动事务,则创建一个嵌套事务,否则创建一个新事务(注意:并非所有的事务管理器都支持嵌套事务)。21 int PROPAGATION_NESTED = 6;22 23 // 使用数据库的默认隔离级别(MySql默认为可重复读,Oracle默认为读可提交)。24 int ISOLATION_DEFAULT = -1;25 26 // 读未提交27 int ISOLATION_READ_UNCOMMITTED = 1;28 29 // 读已提交30 int ISOLATION_READ_COMMITTED = 2;31 32 // 可重复读33 int ISOLATION_REPEATABLE_READ = 4;34 35 // 序列化36 int ISOLATION_SERIALIZABLE = 8; 37 38 // 使用底层事务系统的默认超时时间,如果不支持则不超时。39 int TIMEOUT_DEFAULT = -1;40
41 default int getPropagationBehavior() {42 return PROPAGATION_REQUIRED;43 }44
45 default int getIsolationLevel() {46 return ISOLATION_DEFAULT;47 }48
49 default int getTimeout() {50 return TIMEOUT_DEFAULT;51 }52
53 default boolean isReadOnly() {54 return false;55 }56
57 58 default String getName() {59 return null;60 }61
62 static TransactionDefinition withDefaults() {63 return StaticTransactionDefinition.INSTANCE;64 }65}66
67
常用实现类有DefaultTransactionDefinition和TransactionAttribute,前者方便用户自定义事务的属性,后者一般在下文将会讲到事务拦截器中使用。
注意:
事务的隔离级别和超时时间等参数只有在开启新事务时有效,如果是返回当前活动事务,则不会生效。
如果设置了数据源不支持的事务配置选项,则会事务管理器会抛出异常(read-only标志除外)。
3) TransactionStatus
TransactionStatus提供了事务状态的相关信息,例如事务是否已经完成、是否是新建事务等。
341public interface TransactionStatus extends TransactionExecution, SavepointManager, Flushable {2
3 // 刷新事务(如果事务管理器没有刷新的概念,这个操作可能是无效的)4 void flush();5
6 // 是否存在保存点。可用于实现嵌套事务。7 boolean hasSavepoint();8}9
10public interface TransactionExecution {11 // 判断是否为新事务12 boolean isNewTransaction();13
14 // 设置事务为rollback-only状态,表示事务将会进行回滚15 void setRollbackOnly();16
17 // 判断事务是否为rollback-only状态18 boolean isRollbackOnly();19
20 // 判断事务是否已完成(提交或回滚)21 boolean isCompleted();22}23
24public interface SavepointManager {25 // 创建保存点26 Object createSavepoint() throws TransactionException;27 28 // 回滚到指定保存点29 void rollbackToSavepoint(Object savepoint) throws TransactionException;30 31 // 显式释放保存点(注意:大部分事务管理器会在事务完成时自动释放保存点)32 void releaseSavepoint(Object savepoint) throws TransactionException;33 34}
4) TransactionInterceptor
TransactionInterceptor是 Spring 事务管理的核心组件之一,它通过拦截器的方式,将事务管理逻辑应用到业务方法上。
141public class TransactionInterceptor extends TransactionAspectSupport implements MethodInterceptor, Serializable {2 // 构造拦截器:传入事务管理器和上文提到的 TransactionAttribute 源3 public TransactionInterceptor(TransactionManager ptm, TransactionAttributeSource tas) {4 setTransactionManager(ptm);5 setTransactionAttributeSource(tas);6 }7 8 // 拦截逻辑9 10 11 public Object invoke(MethodInvocation invocation) throws Throwable {12 // 在业务方法前后处理事务...13 }14}
3. 基于XML的声明式事务管理
1) 什么是声明式事务管理?
声明式事务管理是一种通过XML或注解配置来管理事务的方式,将事务管理逻辑与业务逻辑分离,使得代码更加简洁、易于维护。
2) 事务通知配置
如下示例,为x.y.service包下的类创建 AOP 代理,并应用事务通知:
471<!-- from the file 'context.xml' -->2 3<beans xmlns="http://www.springframework.org/schema/beans"4 xmlns:xsi="http://www.w3.org/2001/XMLSchema-instance"5 xmlns:aop="http://www.springframework.org/schema/aop"6 xmlns:tx="http://www.springframework.org/schema/tx"7 xsi:schemaLocation="8 http://www.springframework.org/schema/beans9 http://www.springframework.org/schema/beans/spring-beans.xsd10 http://www.springframework.org/schema/tx11 http://www.springframework.org/schema/tx/spring-tx.xsd12 http://www.springframework.org/schema/aop13 http://www.springframework.org/schema/aop/spring-aop.xsd">14
15 <!-- 业务Bean -->16 <bean id="fooService" class="x.y.service.DefaultFooService"/>17
18 <!-- 数据源 -->19 <bean id="dataSource" class="org.apache.commons.dbcp.BasicDataSource" destroy-method="close">20 <property name="driverClassName" value="oracle.jdbc.driver.OracleDriver"/>21 <property name="url" value="jdbc:oracle:thin:@rj-t42:1521:elvis"/>22 <property name="username" value="scott"/>23 <property name="password" value="tiger"/>24 </bean>25 26 <!-- 事务管理器 -->27 <bean id="txManager" class="org.springframework.jdbc.datasource.DataSourceTransactionManager">28 <property name="dataSource" ref="dataSource"/>29 </bean>30
31 <!-- 事务通知配置。使用txManager事务管理器(如果事务管理器名称包含transactionManager,则transaction-manager属性可省略) -->32 <tx:advice id="txAdvice" transaction-manager="txManager">33 <tx:attributes>34 <!-- get开头的方法以只读事务执行 -->35 <tx:method name="get*" read-only="true"/>36 <!-- 其它方法以默认的事务配置执行 -->37 <tx:method name="*"/>38 </tx:attributes>39 </tx:advice>40
41 <!-- 将事务通知配置为顾问(顾问是只有一个通知的切面) -->42 <aop:config>43 <aop:pointcut id="serviceOperation" expression="execution(* x.y.service.*.*(..))"/>44 <aop:advisor advice-ref="txAdvice" pointcut-ref="serviceOperation"/>45 </aop:config>46
47</beans>简单测试代码如下:
121public final class MyApp {2
3 public static void main(final String[] args) throws Exception {4 ApplicationContext ctx = new ClassPathXmlApplicationContext("context.xml", MyApp.class);5 6 // 从容器获取被代理的服务Bean7 FooService fooService = (FooService) ctx.getBean("fooService");8 9 // 执行业务方法,并进行事务控制10 fooService.insertFoo(new Foo());11 }12}
3) 配置多个事务通知
可以为不同的 Bean 配置不同的事务通知,
421 2<beans xmlns="http://www.springframework.org/schema/beans"3 xmlns:xsi="http://www.w3.org/2001/XMLSchema-instance"4 xmlns:aop="http://www.springframework.org/schema/aop"5 xmlns:tx="http://www.springframework.org/schema/tx"6 xsi:schemaLocation="7 http://www.springframework.org/schema/beans8 http://www.springframework.org/schema/beans/spring-beans.xsd9 http://www.springframework.org/schema/tx10 http://www.springframework.org/schema/tx/spring-tx.xsd11 http://www.springframework.org/schema/aop12 http://www.springframework.org/schema/aop/spring-aop.xsd">13
14 <!-- 事务管理器、数据源和业务Bean相关配置已省略 -->15 16 <!-- 配置事务通知 defaultTxAdvice(由于事务管理器的名称为transactionManager,因此transaction-manager属性被省略) -->17 <tx:advice id="defaultTxAdvice">18 <tx:attributes>19 <tx:method name="get*" read-only="true"/>20 <tx:method name="*"/>21 </tx:attributes>22 </tx:advice>23
24 <!-- 配置事务通知noTxAdvice(由于事务管理器的名称为transactionManager,因此transaction-manager属性被省略) -->25 <tx:advice id="noTxAdvice">26 <tx:attributes>27 <tx:method name="*" propagation="NEVER"/>28 </tx:attributes>29 </tx:advice>30
31 <!-- 将事务通知配置为顾问 -->32 <aop:config>33 <!-- 为service包下以 Service 结尾的类配置默认的事务通知:defaultTxAdvice-->34 <aop:pointcut id="defaultServiceOperation" expression="execution(* x.y.service.*Service.*(..))"/>35 <aop:advisor pointcut-ref="defaultServiceOperation" advice-ref="defaultTxAdvice"/>36
37 <!-- 为service包下以 Manager 结尾的类配置另外的事务通知:noTxAdvice-->38 <aop:pointcut id="noTxServiceOperation" expression="execution(* x.y.service.*Manager.*(..))"/>39 <aop:advisor pointcut-ref="noTxServiceOperation" advice-ref="noTxAdvice"/>40 </aop:config>41 42</beans>
4) 事务通知其它属性
事务通知常用的属性配置如下:
| 属性名 | 描述 | 默认值 |
|---|---|---|
| name | 方法名称(可用*表示任意字符) | |
| propagation | 事务传播行为 | REQUIRED |
| isolation | 事务隔离级别 | DEFAULT |
| timeout | 事务超时时间(秒) | -1 |
| read-only | 事务是否只读 | false |
| rollback-for | 触发回滚的异常列表,以逗号分隔。 | |
| no-rollback-for | 不触发回滚的异常列表,以逗号分隔。 |
注意:
属性
isolation、timeout和read-only只在REQUIRED或REQUIRES_NEW传播行为开启新事务时有效。默认情况下,只有
RuntimeException和Error会回滚事务,可通过rollback-for或no-rollback-for属性修改。
4. 基于注解的声明式事务管理
1) 开启事务注解支持
在配置类上加@EnableTransactionManagement注解,即可开启注解事务支持:
41public class SpringConfig {4}等效的XML配置如下:
61<!--开启注解事务支持-->2<tx:annotation-driven transaction-manager="txManager"/>3
4<bean id="txManager" class="org.springframework.jdbc.datasource.DataSourceTransactionManager">5 <property name="dataSource" ref="dataSource"/>6</bean>@EnableTransactionManagement注解常用属性配置如下:
| 注解属性 | XML属性 | 描述 | 默认值 |
|---|---|---|---|
| 不适用 | transaction-manager | 事务管理器 bean 名称 | transactionManager |
| mode | mode | 代理模式,可选proxy或aspectj | proxy |
| proxyTargetClass | proxy-target-class | 是否使用CGLIB动态代理(仅适用于proxy模式) | false |
| order | order | 事务通知的优先级(优先级越低值越大) | Ordered.LOWEST_PRECEDENCE |
2) 在类或方法上开启事务
在类或方法上加@Transactional注解,Spring 在创建 Bean 实例时,会自动进行 AOP 代理,应用事务通知。
91 // 1. @Transactional注解加在类上,表示该类的所有 public 方法都支持事务2public class DefaultFooService implements FooService {4
5 Foo getFoo(String fooName);6
7 // 2. @Transactional注解也可以加在方法上,进行单独的控制8 void updateFoo(Foo foo);9}@EnableTransactionManagement注解常用的属性配置如下:
| 属性名 | 描述 | 默认值 |
|---|---|---|
| value | 事务管理器bean名称或限定符值 | transactionManager |
| propagation | 事务传播行为 | PROPAGATION_REQUIRED |
| isolation | 事务隔离级别 | ISOLATION_DEFAULT |
| timeout | 事务超时时间。-1表示基础事务系统的默认超时时间或无超时 | -1 |
| readOnly | 事务是否只读 | false |
| rollbackFor/rollbackForClassName | 触发回滚的异常列表(Class/String类型),以逗号分隔。 | |
| noRollbackFor/noRollbackForClassName | 不触发回滚的异常列表(Class/String类型),以逗号分隔。 |
注意:
在多数据源等特殊情况下,可能会配置多个不同的事务管理器,可通过
value属性指定事务管理器名称。如果指定的事务管理器名称不存在,则会选用默认的事务管理器
transactionManager。暂时无法配置事务的名称,但它一般是
全类名.方法名,如:com.example.BusinessService.handlePayment。
3) 制作组合注解
如果需要在多个方法上重复使用@Transactional的相同配置,则可为其自定义一个组合注解:
131// 使用 OrderTx 注解替代 @Transactional(value="order", propagation = Propagation.REQUIRES_NEW) 等一串配置2({ElementType.METHOD, ElementType.TYPE})3(RetentionPolicy.RUNTIME)4(value="order", propagation = Propagation.REQUIRES_NEW)5public @interface OrderTx {6}7
8// 使用 AccountTx 注解替代 @Transactional("account") 等一串配置9({ElementType.METHOD, ElementType.TYPE})10(RetentionPolicy.RUNTIME)11("account")12public @interface AccountTx {13}组合注解定义好后,就可以在代码中使用了:
91public class TransactionalService {2
3 4 public void setSomething(String name) { ... }5
6 7 public void doSomething() { ... }8}9
4) 注意事项
使用@Transactional注解时有几点注意事项:
@Transactional 注解只会对 public 方法生效,protected 和 private 方法上的该注解将会被忽略。
不建议将 @Transactional 注解加在接口上,因为它只适用于基于接口的 AOP 代理,而在创建基于子类的 AOP 代理时无效。
也不建议将 @Transactional 注解加在父类上,因为子类不会继承该注解。
只有通过代理对象调用 public 方法才会进行事务控制,通过 this (实际对象)的自调用无法执行事务通知,不进行事务控制。
不能在未完全初始化时依赖 Spring 提供的事务控制,比如在 @PostConstruct 标注的方法中,这时可能尚未应用事务通知。
默认情况下,事务管理器只会在
RuntimeException和Error时回滚事务,在出现检查型异常时不会回滚事务。
5. 编程式事务管理
编程式事务管理指通过代码来显式控制事务的开启、提交和回滚,可以对事务进行更细粒度的控制,Spring 提供了如下两种使用方式:
1) TransactionTemplate
TransactionTemplate的使用与JdbcTemplate等模板类似,首先配置一个模板实例:
111public class MyConfiguration {3 4 public TransactionTemplate transactionTemplate(PlatformTransactionManager transactionManager) {5 // 创建事务模板6 TransactionTemplate transactionTemplate = new TransactionTemplate(transactionManager);7 transactionTemplate.setIsolationLevel(TransactionDefinition.ISOLATION_READ_UNCOMMITTED);8 transactionTemplate.setTimeout(30);9 return transactionTemplate;10 }11}然后采用回调的方式执行业务代码:
291public class MyService {3 4 private TransactionTemplate transactionTemplate;5
6 public void doBiz() {7 // 执行事务操作(带返回值)8 Object bizResult01 = transactionTemplate.execute(new TransactionCallback() {9 public Object doInTransaction(TransactionStatus status) {10 try {11 // 业务代码...12 return "执行成功";13 } catch (RuntimeException ex) {14 // 设置回滚15 status.setRollbackOnly();16 return "执行失败";17 }18 }19 });20
21 // 执行事务操作(不带返回值)22 transactionTemplate.execute(new TransactionCallbackWithoutResult() {23 protected void doInTransactionWithoutResult(TransactionStatus status) {24 // 业务代码...25 }26 });27
28 }29}注意:
TransactionTemplate 不维护任何对话状态,是线程安全的,但是保存了配置信息,针对不同的事务配置,则需要不同的实例。
2) PlatformTransactionManager
可以直接使用org.springframework.transaction.PlatformTransactionManager接口来进行编程式的事务管理:
251public class MyService {3 4 private PlatformTransactionManager transactionManager;5
6 public void doBiz() {7 // 创建事务配置8 DefaultTransactionDefinition transactionDefinition = new DefaultTransactionDefinition();9 transactionDefinition.setName("SomeTxName"); // 设置事务名称(注:事务名称仅能通过编程式进行设置)10 transactionDefinition.setPropagationBehavior(TransactionDefinition.PROPAGATION_REQUIRED); // 设置事务隔离级别11
12 // 获取事务13 TransactionStatus status = transactionManager.getTransaction(transactionDefinition);14 try {15 // 业务代码...16 } catch (RuntimeException ex) {17 // 回滚事务18 transactionManager.rollback(status);19 throw ex;20 }21
22 // 提交事务23 transactionManager.commit(status);24 }25}
6. 基于事务的事件监听
在事务中发布的事件,可以选择在事务提交后(或其它阶段)进行监听和处理,如:事务提交后发送邮件通知等。
1) 在事务中发布事件
301// 自定义事件类:用户注册2public class UserCreatedEvent extends ApplicationEvent {5 private User user;6
7 public UserCreatedEvent(User user) {8 super(user);9 this.user = user;10 }11}12
13// 在事务中发布事件14public class CustomerService {16 17 private final ApplicationEventPublisher applicationEventPublisher;18
19 20 public Customer createCustomer(User user) {21 // 业务代码...22 User newUser = new User();23 24 // 在事务中发布事件25 applicationEventPublisher.publishEvent(new UserCreatedEvent(newUser));26 27 return newUser;28 }29}30
2) 基于事务的事件监听
151// 在用户注册事务提交后,发送邮件通知2public class UserCreatedEventListener {5 6 private final EmailService emailService;7
8 // 在指定事件的事务提交后监听9 (phase = TransactionPhase.AFTER_COMMIT)10 public void handleUserCreatedEvent(UserCreatedEvent event) {11 emailService.sendEmail(event.getUser().getEmail());12 log.info("Email sent to user: " + event.getUser().getName());13 }14
15}注意:
其它可用的监听时机还有:
BEFORE_COMMIT、AFTER_ROLLBACK、AFTER_COMPLETION。
第三节 数据访问
1. JdbcTemplate
1) 什么是JdbcTemplate?
JdbcTemplate是 Spring 操作数据库的基本方式,内部对资源的创建和释放(如打开和关闭连接)以及 JDBC 工作流程的基本任务(如PS的创建和执行)进行了处理等,用户只需提供SQL语句和对结果集进行处理即可。
2) 配置Jdbctemplate
基于数据源配置 Jdbctemplate 的示例如下:
201public class JdbcTemplateConfig {3
4 // 配置数据源5 6 public HikariDataSource dataSource() {7 HikariConfig config = new HikariConfig();8 config.setJdbcUrl("jdbc:mysql://localhost:3306/your_database");9 config.setUsername("username");10 config.setPassword("password");11 config.setDriverClassName("com.mysql.cj.jdbc.Driver");12 return new HikariDataSource(config);13 }14 15 // 配置Jdbctemplate16 17 public JdbcTemplate jdbcTemplate(DataSource dataSource) {18 return new JdbcTemplate(dataSource);19 }20}然后,就可以在业务类中注入使用了:
81 2public class UserDao{3 4 private JdbcTemplate jdbcTemplate;5 6 // ...7}8
注意:
JdbcTemplate与 Spring 的其它模板相似,其会话数据是线程安全的,但是配置信息(如数据库连接信息)是共享的。数据访问层尽量使用
@Repository注解标识,Spring 后续可能会基于此进行DataAccessException的转换。使 Dao 类继承
JdbcDaoSupport类,也可注入数据源和 JdbcTemplate 实例,然后通过getJdbcTemplate()方法访问。
3) 执行DQL语句
461// 查询单行单列2public String findNameById() {4 return getJdbcTemplate().queryForObject("select username from user where id = ?", String.class, 1);5}6
7// 查询单行多列(封装为对象)8public User findById() {10 return getJdbcTemplate().queryForObject("select * from user where id = ?", new RowMapper<User>() {11 12 public User mapRow(ResultSet rs, int rowNum) throws SQLException {13 User user = new User();14 user.setId(rs.getInt("id"));15 user.setUserName(rs.getString("username"));16 user.setBirthDay(rs.getTimestamp("birthday"));17 user.setSex(rs.getString("sex"));18 user.setAddress(rs.getString("address"));19 return user;20 }21 }, 1);22}23
24// 查询单行多列(封装为MAP)25public Map<String, Object> findById2() {27 return getJdbcTemplate().queryForMap("select * from user where id = ?", 1);28}29
30// 查询多行记录(封装为对象)31public List<User> findAll() {33 return getJdbcTemplate().query("select * from user", new BeanPropertyRowMapper<>(User.class));34}35
36// 查询多行记录(封装为MAP)37public List<Map<String, Object>> findAll2() {39 return getJdbcTemplate().queryForList("select * from user");40}41
42// 直接返回结果集43public SqlRowSet findAll3() {45 return getJdbcTemplate().queryForRowSet("select * from user");46}注意:
如果列名和字段名一致,可以使用
new BeanPropertyRowMapper<>(User.class)简化RowMapper实例。
4) 执行DML语句
281// 单笔更新2public int insert(User user) {4 return getJdbcTemplate().update("insert into user (id, username, birthday, sex, address) values(NULL,?,?,?,?)",5 user.getUserName(), user.getBirthDay(), user.getSex(), user.getAddress());6}7
8// 单笔更新(返回自增列值)9public int insert2(User user) {11 KeyHolder keyHolder = new GeneratedKeyHolder();12 int update = getJdbcTemplate().update(13 new PreparedStatementCreator() {14 15 public PreparedStatement createPreparedStatement(Connection connection) throws SQLException {16 PreparedStatement ps = connection.prepareStatement("insert into user (id, username, birthday, sex, address) values(NULL,?,?,?,?)", new String[]{"id"});17 ps.setString(1, user.getUserName());18 ps.setTimestamp(2, user.getBirthDay());19 ps.setString(3, user.getSex());20 ps.setString(4, user.getAddress());21 return ps;22 }23 },24 keyHolder);25
26 return update > 0 ? keyHolder.getKey().intValue() : update;27}28
注意:
在 JdbcTemplate 中,insert、update和 delete 语句都视为更新语句,处理逻辑一致!
插入时检索自增列值需要 JDBC3.0 驱动支持,并且自定义 PreparedStatement,在第二个字段指定自增列名。
4) 执行DDL语句
91// 执行DDL语句2public int createBackupTable() {4 getJdbcTemplate().execute("drop table if exists user_bak");5
6 getJdbcTemplate().execute("create table user_bak like user");7 8 return 0;9}
5) 批量更新
581// 方式1:一次传入多条无参数的SQL语句2int[] batchUpdate(final String... sql)3
4
5// 方式2:传入 List<Object[]> 类型的批量参数6// 1) 必须保证 Object[] 中对象的顺序和设置参数时的顺序一致7// 2) 支持在第3个参数传递 final int[] argTypes ,显示指明参数类型8public int[] batchUpdate(final List<Actor> actors) {9 List<Object[]> batch = new ArrayList<Object[]>();10 11 for (Actor actor : actors) {12 Object[] values = new Object[]{actor.getFirstName(), actor.getLastName(), actor.getId()};13 batch.add(values);14 }15 16 return this.jdbcTemplate.batchUpdate("update t_actor set first_name = ?, last_name = ? where id = ?", batch);17}18
19
20// 方式3:通过 BatchPreparedStatementSetter 设置参数(在匿名内部类中访问参数列表)21// 1) 如果从流或文件中读取参数,可使用 InterruptibleBatchPreparedStatementSetter 接口,22// 调用其 isBatchExhausted 结束23public int[] batchUpdate(final List<Actor> actors) {24
25 return this.jdbcTemplate.batchUpdate( "update t_actor set first_name = ?, last_name = ? where id = ?",26 new BatchPreparedStatementSetter() {27 // 设置PS(访问外部传入的参数列表:actors)28 public void setValues(PreparedStatement ps, int i) throws SQLException {29 ps.setString(1, actors.get(i).getFirstName());30 ps.setString(2, actors.get(i).getLastName());31 ps.setLong(3, actors.get(i).getId().longValue());32 }33 34 // setValues的执行次数35 public int getBatchSize() {36 return actors.size();37 }38 });39}40
41// 方式4:通过 ParameterizedPreparedStatementSetter 分批次设置参数42// 1) 返回值为一个二维数组,外层数组长度表示已执行的批次数,内层数组的长度表示每批处理的数量,43// 元素的值表示一次更新语句的返回值(如果JDBC程序不支持,则为-2)。44int[][] batchUpdate(String sql, final Collection<T> batchArgs, final int batchSize, final ParameterizedPreparedStatementSetter<T> pss)45public int[][] batchUpdate(final Collection<Actor> actors) {46 int[][] updateCounts = jdbcTemplate.batchUpdate(47 "update t_actor set first_name = ?, last_name = ? where id = ?",48 actors,49 100,50 new ParameterizedPreparedStatementSetter<Actor>() {51 public void setValues(PreparedStatement ps, Actor argument) throws SQLException {52 ps.setString(1, argument.getFirstName());53 ps.setString(2, argument.getLastName());54 ps.setLong(3, argument.getId().longValue());55 }56 });57 return updateCounts;58}
2. NamedParameterJdbcTemplate
1) 什么是NamedParameterJdbcTemplate?
NamedParameterJdbcTemplate 是 Spring 框架中对 JdbcTemplate 的扩展,它通过使用命名参数(而不是传统的问号占位符)来简化 JDBC 操作,使 SQL 语句更易读、更易于维护。
2) 配置NamedParameterJdbcTemplate
301public class MyConfig {3 // 配置数据源4 5 public DataSource dataSource() {6 HikariDataSource dataSource = new HikariDataSource();7 dataSource.setJdbcUrl("jdbc:mysql://localhost:3306/your_database");8 dataSource.setUsername("username");9 dataSource.setPassword("password");10 return dataSource;11 }12
13 // 配置JdbcTemplate14 15 public JdbcTemplate jdbcTemplate() {16 return new JdbcTemplate(dataSource());17 }18
19 // 方式1:基于 JdbcTemplate 配置 NamedParameterJdbcTemplate20 21 public NamedParameterJdbcTemplate namedParameterJdbcTemplate() {22 return new NamedParameterJdbcTemplate(jdbcTemplate());23 }24
25 // 方式2:也可直接基于 DataSource 配置 NamedParameterJdbcTemplate26 27 public NamedParameterJdbcTemplate namedParameterJdbcTemplateByDataSource() {28 return new NamedParameterJdbcTemplate(dataSource());29 }30}
3) 基本使用
321// 方式1:传入 Map<String,Object> 类型参数2public int countOfActorsByFirstName(String firstName) {3 // 名称占位符形式的SQL语句4 String sql = "select count(*) from T_ACTOR where first_name = :first_name";5 6 // 准备参数(Map<String,Object>形式)7 Map<String, String> namedParameters = Collections.singletonMap("first_name", firstName);8 9 // 执行10 return this.namedParameterJdbcTemplate.queryForObject(sql, namedParameters, Integer.class);11}12
13// 方式2:传入 MapSqlParameterSource 类型参数14public int countOfActorsByFirstName(String firstName) {15 String sql = "select count(*) from T_ACTOR where first_name = :first_name";16 17 // 准备参数(MapSqlParameterSource形式)18 SqlParameterSource namedParameters = new MapSqlParameterSource();19 namedParameters.addValue("first_name", firstName);20 21 return this.namedParameterJdbcTemplate.queryForObject(sql, namedParameters, Integer.class);22}23
24// 方式3:传入 BeanPropertySqlParameterSource 类型参数25public int countOfActors(Actor exampleActor) {26 String sql = "select count(*) from T_ACTOR where first_name = :firstName and last_name = :lastName";27 28 // 准备参数(BeanPropertySqlParameterSource),注意属性名和命名参数一致29 SqlParameterSource namedParameters = new BeanPropertySqlParameterSource(exampleActor);30 31 return this.namedParameterJdbcTemplate.queryForObject(sql, namedParameters, Integer.class);32}提示:
除了上述两个实现类,SqlParameterSource还有一个空实现
EmptySqlParameterSource,常用来占位使用。可通过
getJdbcTemplate()和getJdbcOperations()方法访问仅在 JdbcTemplate 类中提供的功能。
4) 支持IN子句
对于in (1,2,3...)形式的 IN 子句,NamedParameterJdbcTemplate 可以自动拼接 IN 子句的参数,只需传入参数列表即可:
121public List<User> findByIds(List<Integer> ids) {3 // 带IN子句的SQL语句4 String sql = "select * from user where id in (:ids)";5 6 // 准备参数7 MapSqlParameterSource mapSqlParameterSource = new MapSqlParameterSource();8 mapSqlParameterSource.addValue("ids", ids);9
10 // 自动拼接IN子句参数11 return namedParameterJdbcTemplate.query(sql, mapSqlParameterSource, new BeanPropertyRowMapper<>(User.class));12}此外,也支持(id, last_name) in ((1, 'Johnson'), (2, 'Harrop'))形式的 IN 子句,在参数传入对象列表即可。
注意:
数据库一般对 IN 中的条目数有限制,列如 Oracle 限制为1000。
5) 批量更新
使用Map数组批量更新
11int[] batchUpdate(String sql, Map<String, ?>[] batchValues)
使用SqlParameterSource数组批量更新
11int[] batchUpdate(String sql, SqlParameterSource[] batchArgs)51public int[] batchUpdate(List<Actor> actors) {2 return this.namedParameterJdbcTemplate.batchUpdate(3 "update t_actor set first_name = :firstName, last_name = :lastName where id = :id",4 SqlParameterSourceUtils.createBatch(actors));5}注意:
SqlParameterSourceUtils.createBatch可你帮助你将List<BizObject>转换为SqlParameterSource[]类型!
3. SQLExceptionTranslator
1) 什么是SQLExceptionTranslator?
SQLExceptionTranslator 用于将数据库异常转换为 Spring 中定义的DataAccessException异常,常用实现类如下:
SQLErrorCodeSQLExceptionTranslator:基于数据库错误代码(通常为数字)的异常转换器,是默认的 SQL 异常转换器。
SQLStateSQLExceptionTranslator:基于 SQL 状态码(通常是五位的字符串)的异常转换器。
SQLExceptionSubclassTranslator:基于
SQLException子类的异常转换器,优点是适用所有数据库。
注意:
可通过 jdbcTemplate.setExceptionTranslator(new SQLStateSQLExceptionTranslator()) 来配置不同的 SQL 异常转换器。
2) 异常转换流程
默认情况下,使用SQLErrorCodeSQLExceptionTranslator进行数据库异常的转换,流程如下:
通过
SQLErrorCodesFactory加载类路径下的名为sql-error-codes.xml的文件。通过数据库元数据中的 DatabaseProductName 查找匹配的
SQLErrorCodes用于异常转换。如果转换失败,则会采用采用后备转换器
SQLExceptionSubclassTranslator和SQLStateSQLExceptionTranslator进行转换。
Spring 在org.springframework.jdbc.support包下提供了 sql-error-codes.xml 文件的默认配置,部分示例如下:
301 2<beans>4 <bean id="MySQL" class="org.springframework.jdbc.support.SQLErrorCodes">5 <property name="databaseProductNames">6 <list>7 <value>MySQL</value>8 <value>MariaDB</value>9 </list>10 </property>11 <property name="badSqlGrammarCodes">12 <value>1054,1064,1146</value>13 </property>14 <property name="duplicateKeyCodes">15 <value>1062</value>16 </property>17 <property name="dataIntegrityViolationCodes">18 <value>630,839,840,893,1169,1215,1216,1217,1364,1451,1452,1557</value>19 </property>20 <property name="dataAccessResourceFailureCodes">21 <value>1</value>22 </property>23 <property name="cannotAcquireLockCodes">24 <value>1205,3572</value>25 </property>26 <property name="deadlockLoserCodes">27 <value>1213</value>28 </property>29 </bean>30</beans>注意:
该文件可以被类路径根目录下的同名文件覆盖!
3) 自定义异常转换器
可以基于SQLErrorCodeSQLExceptionTranslator实现自定义异常转换器:
101// 自定义异常转换器:将特定的错误代码(-12345)转换为DeadlockLoserDataAccessException异常2public class CustomSQLErrorCodesTranslator extends SQLErrorCodeSQLExceptionTranslator {3
4 protected DataAccessException customTranslate(String task, String sql, SQLException sqlex) {5 if (sqlex.getErrorCode() == -12345) {6 return new DeadlockLoserDataAccessException(task, sqlex);7 }8 return null;9 }10}然后通过JdbcTemplate的setExceptionTranslator方法进行设置:
61public JdbcTemplate jdbcTemplate() {3 JdbcTemplate jdbcTemplate = new JdbcTemplate(dataSource());4 jdbcTemplate.setExceptionTranslator(new CustomSQLErrorCodesTranslator());5 return jdbcTemplate;6}
4. 扩展补充
1) SimpleJdbcXxx
SimpleJdbcInsert、SimpleJdbcUpdate、SimpleJdbcCall等通过 JDBC 驱动程序提供数据库元数据来简化用户配置,示例如下:
351// 配置SimpleJdbcInsert、SimpleJdbcCall2public SimpleJdbcInsert simpleJdbcInsert(DataSource dataSource) {4 return new SimpleJdbcInsert(dataSource)5 .withTableName("t_actor") // 指定插入的表名6 .usingGeneratedKeyColumns("id"); // 指定自增列7}8public SimpleJdbcCall simpleJdbcCall(DataSource dataSource) {10 return new SimpleJdbcCall(dataSource)11 // .withProcedureName("proc01") // 指定存储过程名称12 .withFunctionName("func01"); // 指定存储函数名称(指定参数、处理结果集等更多用法请参考官方文档)13}14
15// 注入16private SimpleJdbcInsert simpleJdbcInsert;18private SimpleJdbcCall simpleJdbcCall;20
21// 插入示例22public void add(Actor actor) {23 // 转换参数24 SqlParameterSource parameters = new BeanPropertySqlParameterSource(actor);25
26 // 执行并获取自增列27 Number newId = simpleJdbcInsert.executeAndReturnKey(parameters);28 actor.setId(newId.longValue());29}30
31// 调用存储函数32public String getActorName(Long id) {33 SqlParameterSource in = new MapSqlParameterSource().addValue("in_id", id);34 return funcGetActorName.executeFunction(String.class, in);35}
2) JdbcObject
org.springframework.jdbc.object中包含一些类,可以以更加面向对象的方式访问数据库,示例如下:
491// Student表的“查询对象“2public class StudentSqlQuery extends SqlQuery<Student> {3 public StudentSqlQuery(DataSource dataSource) {4 super(dataSource, "SELECT * FROM Student");5 }6
7 8 protected RowMapper<Student> newRowMapper(Object[] parameters, Map<?, ?> context) {9 return new RowMapper<Student>() {10 11 public Student mapRow(ResultSet rs, int rowNum) throws SQLException {12 Student student = new Student();13 student.setId(rs.getInt("id"));14 student.setName(rs.getString("name"));15 student.setAge(rs.getInt("age"));16 return student;17 }18 };19 }20}21
22// 基本使用23StudentSqlQuery query = new StudentSqlQuery(dataSource);24List<Student> students = query.execute();25for (Student student : students) {26 System.out.println("ID: " + student.getId() + ", Name: " + student.getName() + ", Age: " + student.getAge());27}28
29// 存储过程30public class GetSysDateProcedure extends StoredProcedure {31 private static final String PROCEDURE_NAME = "GET_SYS_DATE";32
33 public GetSysDateProcedure(DataSource dataSource) {34 super(dataSource, PROCEDURE_NAME);35 declareParameter(new SqlOutParameter("currentDate", Types.DATE));36 compile();37 }38
39 public Date execute() {40 Map<String, Object> inputs = new HashMap<>();41 Map<String, Object> results = super.execute(inputs);42 return (Date) results.get("currentDate");43 }44}45
46// 基本使用47GetSysDateProcedure procedure = new GetSysDateProcedure(dataSource);48Date currentDate = procedure.execute();49System.out.println("Current Date: " + currentDate);
3) 关于NULL参数
在设置 PreparedStatement 的参数时,一般通过 Java 类型来推断 JDBC 类型,但如果参数值为 null ,则需要调用驱动的getParameterType来获取 JDBC 类型,这是一个比较耗时的操作,因此,对于可能为空的参数,尽量显式设置 JDBC 类型:
在使用 JdbcTemplate 时,一般都可通过
int[] argTypes类型的附加参数设置类型枚举java.sql.Types。在参数设置时,可通过
SqlParameterValue包装类型信息或通过SqlParameterSource的 registerSqlType 方法注册类型信息。
注意:
可通过
spring.jdbc.getParameterType.ignore=true来禁用从驱动获取 JDBC 类型。
第06章_SpringTest
第一节 SpringTest简介
1. SpringTest是什么?
SpringTest 可以方便的对 Spring 程序进行单元测试和集成测试,一般与Junit或TestNG等测试工具整合使用。
2. SpringTest整合Junit4
1) 引入相关依赖
201<dependencies>2 <dependency>3 <groupId>org.springframework</groupId>4 <artifactId>spring-context</artifactId>5 <version>5.2.9.RELEASE</version>6 </dependency>7 <!-- junit4 -->8 <dependency>9 <groupId>junit</groupId>10 <artifactId>junit</artifactId>11 <version>4.13.2</version>12 <scope>test</scope>13 </dependency>14 <!-- spring-test -->15 <dependency>16 <groupId>org.springframework</groupId>17 <artifactId>spring-test</artifactId>18 <version>5.2.9.RELEASE</version>19 </dependency>20</dependencies>
2) 编写业务类
61public class UserService {3 public void sayHello() {4 System.out.println("hello");;5 }6}
3) 编写测试类
191package org.example.spring.test.service;2
3import org.junit.Test;4import org.junit.runner.RunWith;5import org.springframework.beans.factory.annotation.Autowired;6import org.springframework.test.context.ContextConfiguration;7import org.springframework.test.context.junit4.SpringRunner;8 9(SpringRunner.class) // 整合Junit4,也可以使用 @RunWith(SpringJUnit4ClassRunner.class)10(classes = {UserService.class}) // 上下文配置11public class UserServiceTest {12 13 private UserService userService;14
15 16 public void testHello() {17 userService.sayHello();18 }19}
3. SpringTest整合Junit5
1) 引入相关依赖
201<dependencies>2 <dependency>3 <groupId>org.springframework</groupId>4 <artifactId>spring-context</artifactId>5 <version>5.2.9.RELEASE</version>6 </dependency>7 <!-- junit5 -->8 <dependency>9 <groupId>org.junit.jupiter</groupId>10 <artifactId>junit-jupiter-api</artifactId>11 <version>5.5.2</version>12 <scope>test</scope>13 </dependency>14 <!-- spring-test -->15 <dependency>16 <groupId>org.springframework</groupId>17 <artifactId>spring-test</artifactId>18 <version>5.2.9.RELEASE</version>19 </dependency>20</dependencies>
2) 编写业务类
61public class UserService {3 public void sayHello() {4 System.out.println("hello");;5 }6}
3) 编写测试类
211package org.example.spring.test.service;2
3import org.junit.jupiter.api.Test;4import org.junit.jupiter.api.extension.ExtendWith;5import org.springframework.beans.factory.annotation.Autowired;6import org.springframework.test.context.ContextConfiguration;7import org.springframework.test.context.junit.jupiter.SpringExtension;8import org.springframework.test.context.junit.jupiter.SpringJUnitConfig;9
10(SpringExtension.class) // 整合Junit511(classes = {UserService.class}) // 上下文配置12// @SpringJUnitConfig(classes = {UserService.class}) // 可以使用该注解替换上面两注解13public class UserServiceTest2 {14 15 private UserService userService;16
17 18 public void testHello() {19 userService.sayHello();20 }21}
第二节 相关注解简介
1. 测试环境与属性
1) @ContextConfiguration
@ContextConfiguration用于指定应用上下文的配置信息,可以来自XML、Groovy、@Configuration类或 Spring 的其它组件等。
271// 从默认位置加载XML配置(如com.example.MyTest类加载classpath:com/example/MyTest-context.xml配置)2(SpringRunner.class)3 4public class MyTest {5}6
7//从locations位置加载XML配置8(SpringRunner.class)9(locations={"/app-config.xml", "/test-config.xml"}) 10public class MyTest {11}12
13// 加载@Configuration类或组件类等(默认测试类的静态内部类加载)14(SpringRunner.class)15(classes = {AppConfig.class, TestConfig.class}) 16public class MyTest {17}18
19// 通过自定义上下文初始化器加载配置20(initializers = CustomContextIntializer.class) 21public class ContextInitializerTests {22}23
24// 通过自定义上下文加载器加载配置25(locations = "/test-context.xml", loader = CustomContextLoader.class) 26public class CustomLoaderXmlApplicationContextTests {27}这些配置可以通过类继承的方式来继承和覆盖:
121// 加载基础配置2(SpringRunner.class)3(classes = BaseConfig.class) 4public class BaseTest {5 // class body...6}7
8// 继承基础配置,并使用扩展配置覆盖9(classes = ExtendedConfig.class) 10public class ExtendedTest extends BaseTest {11 // class body...12}
2) @ActiveProfiles
@ActiveProfiles用于指定测试时激活的Profile。
41({"dev", "integration"}) // 激活dev和integration3public class DeveloperIntegrationTests {4}
3) @TestPropertySource
@TestPropertySource用于配置测试属性文件和优先级更高的内联测试属性,并将其添加到 Environment 中的 PropertySources 集合。
71(3 locations = "/test.properties", // 从类路径下加载测试属性文件4 properties = {"timezone = GMT", "port: 4242"} // 配置内联测试属性,优先级比测试属性文件更高5)6public class MyIntegrationTests {7}注意:
该注解配置的属性优先级高于系统环境变量、
@PropertySource或编程方式等添加的属性,并且支持继承和覆盖。
2. 事务相关注解
@Transaction:用于开启测试方法的事务支持,测试方法结束后默认回滚事务。
@Commit/@Rollback:用于标识测试方法进行提交或回滚,可作用于类或方法之上,默认进行回滚操作。
@BeforeTransaction/@AfterTransaction:用于标识方法在事务之前/事务之后执行,做一些准备或善后工作。
341(SpringRunner.class)2(transactionManager = "txMgr")4public class FictitiousTransactionalTest {6
7 8 void verifyInitialDatabaseState() {9 // logic to verify the initial state before a transaction is started10 }11
12 13 public void setUpTestDataWithinTransaction() {14 // set up test data within the transaction15 }16
17 18 // overrides the class-level @Commit setting19 20 public void modifyDatabaseWithinTransaction() {21 // logic which uses the test data and modifies database state22 }23
24 25 public void tearDownWithinTransaction() {26 // execute "tear down" logic within the transaction27 }28
29 30 void verifyFinalDatabaseState() {31 // logic to verify the final state after transaction has rolled back32 }33
34}
3. 数据操作注解
@Sql、@SqlConfig和@SqlGroup用于在测试方法之前或之后执行一些SQL脚本,默认执行的脚本为类目录下的.sql文件,如com.example.MyTest 类的默认脚本为 classpath:com/example/MyTest.sql 。
121// 执行/test-schema.sql脚本,并设置注释前缀和SQL语句分隔符。2({ 4 (scripts = "/test-schema.sql", config = (commentPrefix = "`", separator = "@@")), 5 (6 scripts = "delete-test-data.sql",7 config = (transactionMode = ISOLATED), // 在隔离的事务中运行脚本8 executionPhase = AFTER_TEST_METHOD) // 在测试方法之后执行9 })10public void userTest {11 // execute code that uses the test schema and test data12}
4. 其它常用注解
@Timed:设置超时时间。
@Repeat:重复运行测试N次。
@BootstrapWith:用于指定自定义的TestContextBootstrapper。
@DirtiesContext:用于标识ApplicationContext是否被弄脏,当标记为脏时,会将其从测试框架的缓存中删除并关闭。
@TestExecutionListeners:用于配置TestExecutionListener,并向TestContextManager注册。
@PostConstruct/@PreDestroy:存在一些已知问题,推荐使用来自基础测试框架的测试生命周期回调。
@ContextHierarchy:用于定义ApplicationContext实例的层次结构以进行集成测试。
@WebAppConfiguration:用于声明ApplicationContext为WebApplicationContext类型,适用于测试Web应用程序,并从
file:src/main/webapp加载Web资源,创建MockServletContext。
第三节 扩展补充
1. 常用测试工具
SpringTest包中提供了一些测试可能用到的工具类,如:
ReflectionTestUtils:Spring Test Context框架提供的反射工具类,用于在测试中操作对象的私有字段和方法。
AopTestUtils:Spring提供的 AOP 工具类,用于在测试中获取代理对象的目标对象。
JdbcTestUtils:Spring提供的 JDBC 工具类,用于简化数据库测试操作,如删除表数据、统计表行数等。